Grilling ribs on a gas grill is not only possible, it’s one of the easiest ways to enjoy great barbecue at home. You don’t need a big charcoal smoker or special equipment to get tender, flavorful ribs. With a simple setup and a little patience, your everyday gas grill can turn out racks that are juicy, smoky, and packed with BBQ goodness.
The biggest advantage of a gas grill is control. You can dial in the heat, keep it steady, and avoid the guesswork that often comes with charcoal. That consistent temperature is exactly what you need for ribs, because they love low-and-slow cooking. Instead of blasting them with high heat, you’ll gently cook them over indirect heat until the meat becomes tender and starts to pull back from the bone.
Along the way, you can add layers of flavor with a dry rub, wood chips for smoke, and your favorite BBQ sauce to finish. The goal is simple: ribs that have a nice bark on the outside, stay moist on the inside, and taste like they came from a real smokehouse—even though they were cooked on the gas grill sitting on your patio.
Types of Ribs You Can Grill on a Gas Grill
Before you even turn on your gas grill, it helps to understand the different kinds of ribs you can cook. Not all ribs are the same, and the type you choose will affect flavor, cooking time, and how tender the meat becomes.
The first big difference is between pork ribs and beef ribs. Pork ribs are the most common choice for home grilling. They are lighter in flavor, usually smaller, and cook a bit faster. Beef ribs are larger, richer, and have a bold, deep taste. If you’re craving something hearty and meaty, beef ribs are fantastic, but they can take longer and may be a little less forgiving for beginners.
Within pork ribs, there are three main styles you’ll see at the store:
- Baby Back Ribs
- Baby backs come from high on the pig’s back, near the spine. They are shorter, slightly curved, and usually leaner than other ribs. They cook faster and tend to turn out very tender with the right low-and-slow approach. For new grillers, baby back ribs are often the easiest place to start.
- Spare Ribs
- Spare ribs come from the belly side of the rib cage. They are larger, meatier, and have more fat and connective tissue. This extra fat means more flavor, but it also means they need more time to cook down and become tender. They’re perfect if you don’t mind a longer cook and want that rich, classic BBQ taste.
- St. Louis–Style Ribs
- St. Louis–style ribs are actually spare ribs that have been trimmed into a neat rectangle. The breastbone and cartilage are removed, giving you a more uniform rack that cooks evenly and looks great on the plate. Many BBQ competitors love this cut because of the balance between meat, fat, and appearance.
If you’re a beginner, baby back ribs are usually your best friend. They cook a bit faster and are easier to handle. If you’ve got some experience or you’re willing to be patient, spare or St. Louis–style ribs will reward you with more intense flavor and a satisfying chew.
Rib type also affects cook time and texture. Leaner racks like baby backs will be done earlier and have a slightly lighter bite. Meatier spare ribs take longer but can Guide to Mastering Everyday Cooking become incredibly tender and juicy when cooked low and slow. As a simple rule: the bigger and fattier the ribs, the longer the cook, and the richer the final result.
Essential Tools & Ingredients for Perfect Gas-Grilled Ribs
You don’t need a professional setup to make great ribs. A basic gas grill and a few helpful tools can deliver amazing results.
Tools You’ll Want on Hand
- Gas grill with at least 2–3 burners
- Multiple burners are important because you’ll cook the ribs using indirect heat. One burner will be on, and the ribs will sit over the unlit side.
- Grill tongs
- Long, sturdy tongs let you move and rotate the ribs without burning your hands.
- Basting brush
- Ideal for brushing on barbecue sauce or glazes during the final stage of cooking.
- Meat thermometer
- A key tool for checking doneness. Ribs are best when they reach a higher internal temperature that breaks down connective tissue.
- Aluminum foil or butcher paper
- Used to wrap the ribs during part of the cook if you want extra tenderness and moisture.
- Drip pan
- Placed under the ribs on the cool side of the grill to catch fat and add moisture to the cooking environment.
- Grill brush
- Important for cleaning the grates before and after cooking so your ribs don’t stick.
- Spray bottle (water or apple juice)
- Handy for spritzing the ribs to keep the surface moist and for controlling any flare-ups.
Optional but highly recommended:
- Smoker box or foil packet for wood chips
- Wood chips like hickory, apple, or mesquite add that classic smoky flavor, even on a gas grill. A smoker box or simple foil packet over the hot burner will do the trick.
Key Ingredients
Now let’s talk about what goes on the grill:
- Rack(s) of ribs
- Choose racks that look fresh, pinkish-red, and meaty. Avoid ribs that seem overly trimmed or have a lot of exposed bone.
- Dry rub
- A good basic rub can include:
- Salt
- Black pepper
- Brown sugar
- Paprika
- Garlic powder
- Onion powder
- Cayenne for a little heat
- BBQ sauce
- You can use store-bought or make your own. Thick, sweet sauces are great for glazing at the end of the cook.
- Oil or mustard as a binder
- A light coat of oil or yellow mustard helps the rub stick to the meat.
When you’re at the store, look for fresh, meaty ribs with some marbling. A little fat is good because it melts during cooking and keeps the meat juicy. Avoid ribs that look dried out or have a strong, off smell.
Prepping the Ribs (Before They Hit the Grill)
Proper prep is one of the secrets to great ribs. It doesn’t take long, but it makes a big difference in both flavor and texture.
Removing the Membrane
On the bone side of the ribs, there’s usually a thin, shiny membrane. Leaving it on can make the ribs tougher and block some flavor. To remove it:
- Slide a butter knife or spoon under an edge of the membrane at one corner.
- Lift gently until you can grab it with a paper towel.
- Pull it off in one long strip. If it tears, just start again at another spot.
Taking off the membrane helps seasoning and smoke penetrate better and makes each bite more tender.
Trimming for Even Cooking
Check your rack for loose flaps of meat or large chunks of hard fat. Trim these off with a sharp knife. This helps the ribs cook more evenly and prevents burnt bits.
Patting Dry for Better Bark
Use paper towels to pat the ribs dry on both sides. Dry surfaces allow the rub to stick better and help create a nice “bark,” that flavorful crust on the outside of the meat.
Using a Binder: Mustard vs Oil
Next, lightly coat the ribs:
- Mustard: A thin layer of yellow mustard is a popular choice. It helps the rub cling and adds a touch of tang, but the mustard flavor mostly cooks away.
- Oil: A brush of vegetable or olive oil works well too, and it’s completely neutral.
Both options are good; it’s mostly a matter of preference. The main goal is to help the rub stay in place.
Applying the Dry Rub
Sprinkle your rub generously on both sides and along the edges of the rack. Press it in gently rather than rubbing too hard so you don’t clump or smear it off.
Let the ribs sit with the rub:
- 15–30 minutes at room temperature if you’re in a hurry.
- Several hours or overnight in the fridge if you want deeper flavor.
If you refrigerate them, cover the ribs loosely so they don’t dry out too much.
Marinating vs Dry Brining (Optional)
Some people like to marinate ribs in a liquid mixture before grilling. Others prefer dry brining, which means salting the meat and letting it rest so the salt draws into the fibers. Both can add flavor, but a well-made dry rub on its own is usually enough for great results.
Just before grilling, you can also add a light sprinkle of extra spices or a little brown sugar if you want a sweeter, more caramelized crust.
Setting Up Your Gas Grill for Low-and-Slow Cooking
With your ribs prepped, it’s time to get the grill ready. The way you set up a gas grill is crucial for tender, juicy ribs.
Why Low and Slow Matters
Ribs are full of connective tissue and fat that need time to break down. If you blast them with high heat over a direct flame, the outside will burn while the inside stays tough. Low and slow cooking lets the collagen melt and the fat render, giving you ribs that are tender, moist, and full of flavor.
Ideal Temperature Range
On a gas grill, aim for a cooking temperature between 225°F and 275°F (107°C–135°C). This range is hot enough to cook the ribs safely but gentle enough to keep them tender.
Creating Indirect Heat Zones
You don’t want your ribs sitting over an open flame. Instead, you’ll use indirect heat:
- Turn one burner (or one side of the grill) on to low or medium-low.
- Leave the other burner(s) off.
- Place a drip pan on the unlit side, under where the ribs will sit. You can fill the pan with water, apple juice, or a mix to add moisture and catch drippings.
The ribs will go over the cool side, while the hot side provides the heat that circulates around them.
Adding Smoke Flavor on a Gas Grill
You can still get real BBQ flavor on a gas grill by using wood:
- Smoker box: Fill it with wood chips (hickory for strong flavor, apple or cherry for milder sweetness) and place it over the lit burner.
- Foil packet: If you don’t have a smoker box, wrap a handful of chips in foil, poke a few holes, and put it over the hot burner.
Pre-soaked vs dry chips:
- Soaked chips may smolder a bit longer.
- Dry chips start smoking quicker.
Both approaches work; it’s more about what you prefer.
Monitoring and Stabilizing Temperature
A steady temperature is key:
- Use the grill’s built-in thermometer as a rough guide, but a separate grill thermometer or probe is often more accurate.
- Make small adjustments to the burner knob when needed. Big changes can cause temperature swings.
- Try not to open the lid too often, because you lose heat and smoke every time you lift it.
With the grill set up for indirect heat, a drip pan in place, and wood chips smoking, you’ve built the perfect environment for low-and-slow ribs on a gas grill. All that’s left is patience—and the reward is a rack of ribs that’s tender, juicy, and full of flavor.
Step-by-Step: How to Grill Ribs on a Gas Grill
Let’s walk through the full process of grilling ribs on a gas grill, from the moment you turn the burners on to the moment you slice and serve. Think of this as your simple, friendly roadmap.
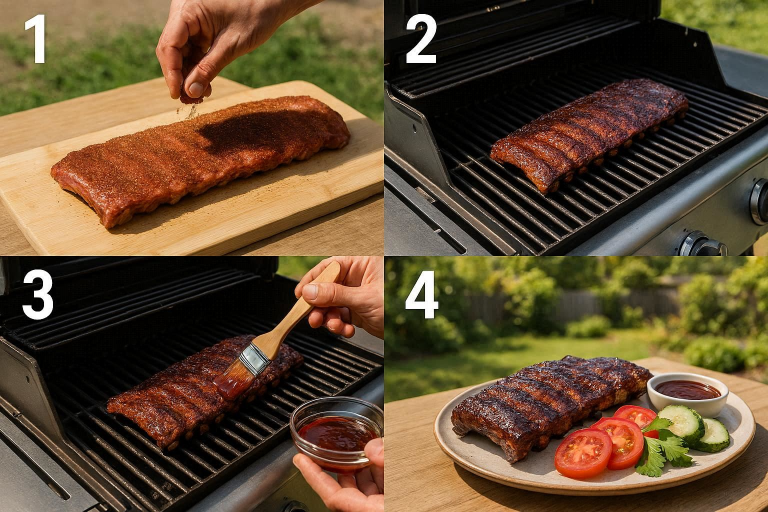
Step 1: Preheat the Grill
Start by setting up your indirect heat zone. Turn one burner on medium-low and leave the other burner(s) off. Close the lid and let the grill preheat until it reaches about 225–275°F (107–135°C).
If you’re using wood chips in a smoker box or foil packet, place that over the lit burner now so it can start smoking as the grill heats up. While the grill is warming, your ribs (already seasoned and prepped) can be sitting at room temperature, ready to go.
Step 2: Place the Ribs Over Indirect Heat
Once the grill is at temperature, place your seasoned ribs bone-side down on the cool side of the grill, over the unlit burner. This protects the meat from direct flames and lets the heat and smoke circulate gently around the ribs.
If you’re using a drip pan, it should sit under the ribs to catch drippings and add moisture. Close the lid as soon as the ribs are in place.
Step 3: Close the Lid and Maintain 225–275°F
From this point on, your main job is to keep the grill steady between 225–275°F. Resist the urge to crank the heat higher to “speed things up.” Low and slow is what makes ribs tender.
Use the grill thermometer or a separate probe to monitor temperature. Make small adjustments to the burner if needed. Think of it like driving on a highway: gentle steering keeps you straight; big swings make you drift all over the road.
Step 4: Periodic Checks and Spritzing
Every 30–45 minutes, it’s okay to take a quick look. When you open the lid:
- Rotate or reposition the ribs if you notice one side of the grill tends to run hotter. This helps them cook evenly.
- If you want, spritz the ribs with a mix of apple juice and water (or just water). This keeps the surface slightly moist and can help develop a nice bark.
Keep the lid open only as long as necessary. The more it’s open, the more heat and smoke you lose, and the longer the cook will take.
Step 5: Estimate Total Cook Time
Plan ahead so you’re not rushing at the end:
- Baby back ribs: usually 4–5 hours.
- Spare or St. Louis–style ribs: usually 5–6 hours.
These are estimates, not strict rules. Every grill is different. Wind, outdoor temperature, and the size of your ribs all play a role. That’s why you’ll also rely on feel and internal temperature later.
Step 6: When to Wrap in Foil
If you’re using a wrapping phase (often called the “Texas crutch”), look at the ribs around the 2–3 hour mark. You want to see:
- Nice color (deep golden or reddish-brown).
- A bark that’s set, meaning the surface is no longer wet and sticky.
At this point, remove the ribs briefly, wrap them tightly in foil (or butcher paper), and add a splash of apple juice, broth, or a bit of sauce inside the wrap. The wrap helps tenderize the ribs by trapping moisture and heat.
Step 7: Unwrap and Finish Over the Grill
After being wrapped for 1.5–2 hours, carefully unwrap the ribs. Watch out for hot steam and juices. Put them back on the grill over indirect heat, still at 225–275°F.
This phase does two things:
- Firms up the bark again after the steaming effect of the foil.
- Lets the surface dry slightly so it’s ready to take on sauce and develop a light, sticky glaze.
Step 8: Saucing the Ribs
During the last 20–30 minutes, you can start brushing on your BBQ sauce. This is the sweet spot:
- Early enough to warm and caramelize the sauce.
- Late enough that the sugars don’t burn.
Brush a thin layer of sauce on both sides, close the lid, and let it cook. You can repeat this once or twice if you like a thicker glaze, but always watch closely. If the sauce starts to blacken, the heat may be a bit too high or they’ve been on too long.
Step 9: Rest Before Slicing
When the ribs are done, take them off the grill and place them on a cutting board. Let them rest for 10–15 minutes. This rest time lets the juices redistribute through the meat instead of running out onto the board.
After resting, flip the rack so the bones are facing up. Use a sharp knife to slice between the bones. Serve with extra sauce on the side and enjoy the reward of your patience.
Using the 3-2-1 or 2-2-1 Method on a Gas Grill
If you like having a clear time structure, the 3-2-1 and 2-2-1 methods are easy systems to follow.
The 3-2-1 Method (Best for Spare Ribs)
For meatier spare ribs, a common approach is:
- 3 hours unwrapped over indirect heat
- 2 hours wrapped in foil with a bit of liquid
- 1 hour unwrapped again, with sauce to finish
During the first 3 hours, you build color and bark. In the next 2 hours, the foil steam-tenderizes the meat. The final hour sets the sauce and firms up the outside.
The 2-2-1 Method (Best for Baby Backs)
For baby back ribs, which are smaller and leaner, the schedule usually looks like:
- 2 hours unwrapped
- 2 hours wrapped
- 1 hour unwrapped
Same idea as 3-2-1, just slightly shorter overall to match the smaller size of the ribs.
Adjusting Time for Your Grill
Not every grill runs the same. If your gas grill tends to hover closer to 275°F, your ribs may be done sooner. If it sits nearer to 225°F, you might need a bit more time.
Also consider rib thickness. Very thick, meaty racks may need extra time in the unwrapped phase. Thin racks may be ready a little earlier.
Avoiding Mushy Ribs
With these methods, the wrapped “2” phase is where you can accidentally overdo it. If ribs spend too long in foil with liquid, they can become overly soft, almost like pulled pork on a bone.
To prevent that:
- Stick close to the recommended times.
- If your ribs feel very soft coming out of the foil, spend more time unwrapped to firm them up.
- Keep your grill in the proper temperature range.
How to Tell When Your Ribs Are Done
Timers and methods are helpful, but ribs are truly done when they’re tender, not just when a certain number of hours pass.
Internal Temperature
Use a meat thermometer to check the thickest part of the meat between bones. For tender, pull-apart ribs, aim for around 190–203°F (88–95°C). This is where collagen and connective tissue have broken down and the meat is soft and juicy.
Bend Test
Pick up the rack with tongs from one end or near the middle. Let the rack dangle. If the ribs bend easily and the surface cracks slightly, that’s a great sign they’re ready or very close.
Toothpick Test
Slide a toothpick or skewer into the meat between the bones. It should slide in and out with little resistance, similar to poking warm butter.
Bone Pullback
Look at the bone ends. When ribs are done, the meat shrinks and bones stick out about ¼–½ inch. This visual cue is easy and reliable.
Always remember: time is a guide, but tenderness is the final judge. Trust what you see and feel.
Common Mistakes to Avoid When Grilling Ribs on a Gas Grill
Even a great rack of ribs can be ruined by a few simple mistakes. Here’s what to watch out for:
- Cooking too hot and fast
- High heat makes ribs tough and dry on the inside before the outside is even cooked properly.
- Putting ribs directly over a high flame
- This leads to burnt, bitter bark and undercooked meat. Indirect heat is your friend.
- Opening the lid too often
- Every time you look, heat and smoke escape. Quick checks are fine, but don’t hover with the lid open.
- Skipping membrane removal
- Leaving the membrane on the bone side keeps ribs chewy and blocks rub and smoke from doing their best work.
- Adding too much sauce too early
- Sugary sauces burn at high heat. Sauce near the end for a shiny glaze instead of a blackened crust.
- Slicing right away without resting
- Skipping the rest lets juices spill out on the board instead of staying in the meat.
- Not cleaning or oiling the grates
- Dirty, dry grates cause sticking and tearing. A quick brush and light oiling before cooking helps a lot.
Flavor Variations & Recipe Ideas for Gas-Grilled Ribs
Once you’ve learned the basics, you can play with flavors and create your own signature ribs.
Rub Styles
- Classic Sweet & Smoky:
- Brown sugar, smoked paprika, garlic, onion, black pepper.
- Spicy Rub:
- Add extra cayenne, chili powder, and crushed red pepper for a kick.
- Herb-Forward or Garlic-Heavy:
- Use garlic, thyme, rosemary, black pepper, and a touch of lemon zest for a different twist.
Sauce Ideas
- Kansas City–Style:
- Thick, sweet, sticky, with molasses or brown sugar and tomato base.
- Carolina–Style:
- Vinegar-based, tangy, and lighter. Great if you prefer less sweetness.
- Dry Rub Only:
- Skip sauce entirely and let the bark and smoke shine as the main flavor.
Wood Flavor Twists
- Hickory: Strong and classic BBQ.
- Apple: Mild and slightly sweet, perfect for pork.
- Cherry: Adds color and gentle fruitiness.
Mix rubs, sauces, and wood types to find what you like. Keep notes on what you used so you can repeat your favorites.
Serving Suggestions & Side Dishes
You’ve put in the work—now make the plate look as good as it tastes.
How to Slice Ribs
Flip the rack bone-side up so you can see the bones clearly. Use a sharp knife to cut between the bones in a smooth motion. You can slice single ribs or cut in pairs if you want bigger pieces.
Ideal Portions
Plan on about 3–4 ribs per person if you’re serving several sides. For very hungry guests or a rib-focused meal, you might go with more.
Classic BBQ Sides
- Coleslaw
- Cornbread
- Baked beans
- Potato salad or roasted potatoes
- Grilled corn on the cob
- Grilled veggies like peppers, onions, or zucchini
Drink Pairings
- Lemonade or iced tea for something refreshing.
- Light beers or lagers to cut through the richness.
- Mocktails with citrus, mint, or berry for non-alcoholic options.
Presentation Tips
Serve the ribs on a big platter, scatter a few herbs or green onions over the top, and offer extra sauce on the side. Add pickles, sliced jalapeños, or a wedge of lime for color and brightness.
How to Store and Reheat Leftover Grilled Ribs
If you’re lucky enough to have leftovers, store them properly so they still taste great the next day.
Cooling and Storing Safely
- Let ribs cool slightly, but don’t leave them out for hours.
- Wrap them tightly in foil or place them in an airtight container.
- Refrigerate within 2 hours of cooking.
- In the fridge, ribs are best within 3–4 days.
- For longer storage, freeze them for up to 2–3 months.
Reheating Without Drying Out
Oven Method:
- Preheat the oven to 250–275°F (120–135°C).
- Place ribs in foil, add a splash of broth, water, or apple juice.
- Seal the foil and heat until warmed through, usually 20–30 minutes.
Grill Method:
- Set up the gas grill again for indirect heat.
- Warm the wrapped ribs gently, then unwrap briefly to re-crisp the bark if you like.
Microwave (Only if You Must):
- Put ribs in a microwave-safe dish with a bit of liquid.
- Cover and heat in short bursts, checking often to avoid drying them out.
Keeping Flavor and Texture
Avoid high, harsh heat when reheating. Gentle warmth with a bit of moisture will keep your ribs juicy and flavorful. If you want, you can brush on a little fresh sauce right before serving to bring back that just-grilled shine.
With these steps, not only will you know exactly how to grill ribs on a gas grill, but you’ll also know how to serve, tweak, and enjoy them to the very last bite.
FAQs
How long does it take to grill ribs on a gas grill?
Most racks of ribs take 4–6 hours on a gas grill using low-and-slow, indirect heat. Baby backs are typically done around 4–5 hours, while spare or St. Louis ribs usually need 5–6 hours depending on thickness and grill temperature.
What temperature should I grill ribs on a gas grill?
Aim to keep your grill between 225°F and 275°F (107°C–135°C). This range lets the ribs slowly tenderize without burning or drying out.
Do I need to boil ribs before grilling them?
No. Boiling ribs can wash away flavor and fat. Proper low-and-slow grilling on a gas grill is enough to make them tender without pre-boiling.
Can I get a smoky flavor on a gas grill without a smoker box?
Yes. You can make a simple foil packet filled with wood chips, poke a few holes, and place it over a lit burner. It will produce smoke similar to a smoker box.
Should I wrap my ribs in foil on a gas grill?
Wrapping is optional but popular. It can help speed up tenderizing and prevent the ribs from drying out. Methods like 3-2-1 and 2-2-1 use a wrapping phase to great effect.
When should I put BBQ sauce on the ribs?
Add sauce during the last 20–30 minutes of cooking. This gives it time to caramelize without burning the sugars in the sauce.
Is it better to use baby back ribs or spare ribs on a gas grill?
Both work well. Baby backs cook faster and are great for beginners. Spare or St. Louis ribs are meatier and richer but take a bit longer.
How do I keep my ribs from drying out on a gas grill?
- Cook over indirect heat at a low temperature.
- Use a drip pan with water or juice.
- Wrap the ribs for part of the cook if needed.
- Avoid constant lid opening and high direct heat.
Can I grill ribs on high heat to save time?
You can, but you probably won’t like the result. High heat tends to give you burnt, tough ribs. For tender, juicy ribs, low and slow is the way to go.
How many racks of ribs can I cook at once on a gas grill?
It depends on your grill size, but the key rule is: all ribs must sit over indirect heat. On a typical 3-burner gas grill, you can often fit 2–3 racks using rib racks or by standing them on edge.