When it comes to updating or remodeling your kitchen, one of the most impactful changes you can make is installing new kitchen cabinets. Cabinets not only enhance the look of your kitchen but also increase functionality and storage space. Whether you’re looking to enhance your kitchen’s style or need additional storage, proper installation is crucial. A well-installed kitchen cabinet set can last for years, giving you peace of mind and a beautiful kitchen.
Now, you might be thinking, “Can I install kitchen cabinets myself?” The answer is yes! In fact, DIY cabinet installation offers numerous benefits, such as significant cost savings compared to hiring professionals. Not to mention, the sense of accomplishment that comes with completing the project yourself is incredibly rewarding. Plus, you have full control over the design, style, and layout of your kitchen.
In this guide, we’ll walk you through everything you need to know to install kitchen cabinets yourself, from the necessary tools to the final touches. So, let’s dive in!
What You’ll Need to Install Kitchen Cabinets
Before starting, it’s essential to gather the right tools and materials. Having everything ready will help make the installation Cleaning Guide for Home & Kitchen process smoother and faster. Here’s a breakdown of what you’ll need:
Tools Required:
- Drill: A must-have for drilling pilot holes, securing screws, and fastening cabinet components.
- Level: To ensure your cabinets are perfectly aligned both horizontally and vertically.
- Tape Measure: To measure spaces, the cabinet dimensions, and distances between your cabinets.
- Screwdriver: For installing screws and cabinet hardware.
- Cabinet Clamps: To hold cabinets in place while securing them to the wall or other cabinets.
Materials Needed:
- Cabinets: You can either purchase pre-assembled cabinets or flat-pack kits that require assembly.
- Screws and Brackets: These are used to attach the cabinets to the wall and secure them to one another.
- Shims: Used for leveling cabinets when the floor or walls aren’t perfectly even.
Safety Gear:
- Protective Glasses: To keep your eyes safe from debris and dust.
- Gloves: Protect your hands when handling materials and tools.
- Knee Pads: Installing cabinets often involves kneeling, so knee pads will help prevent discomfort or injury.
Now that you have everything ready, let’s dive into the installation steps!
Step 1: Measure Your Kitchen Space
Accurate measurements are crucial for ensuring your cabinets fit perfectly in the space. Even a small error can result in misalignment, gaps, or the need for costly adjustments later on.
How to Measure:
- Measure the Width of Your Walls: Start by measuring the length of the walls where the cabinets will go. Be sure to measure in multiple spots—top, middle, and bottom—since walls are rarely perfectly straight.
- Check the Ceiling Height: Measure from the floor to the ceiling to ensure your upper cabinets will fit comfortably without hitting any obstacles like light fixtures or vents.
- Doorways and Windows: Take note of doorways, windows, and any other obstacles that might affect the layout of your cabinets.
Tips for Perfect Fitting:
- Make sure to leave a small gap (about 1/8 inch) between the cabinets and the wall to account for any expansion or contraction over time.
- Double-check all your measurements before ordering or purchasing your cabinets.
Step 2: Prepare the Wall for Installation
Now that you have accurate measurements, it’s time to prepare the wall where your cabinets will be installed. This step involves ensuring that the wall is sturdy, level, and clear of any obstacles.
Assessing Wall Condition:
- Check for Studs: The cabinets need to be secured to the wall studs, so it’s essential to know where they are located. Use a stud finder or tap on the wall to locate them. Mark the spots where the studs are located.
- Plumbing and Electrical: If there are pipes or electrical outlets on the wall, make sure they won’t interfere with your cabinets. You might need to adjust the cabinet layout or plan for custom cuts.
- Level the Wall: If the wall isn’t level, use shims to correct it. This will ensure your cabinets hang straight and don’t end up crooked.
Preparing the Floor:
If the floor isn’t level, it could cause your cabinets to shift or become unsteady over time. If necessary, you may need to use shims at the base of the cabinets to make them level.
Step 3: Assemble Your Cabinets
If you’re working with flat-pack cabinets, the next step is assembly. This process can be relatively straightforward if you follow the instructions carefully.
How to Assemble:
- Lay Out All Parts: Before starting, lay out all cabinet parts on the floor. Check that you have all the necessary pieces and screws.
- Follow the Instructions: Assemble the cabinets according to the instructions provided. Most cabinets have a simple interlocking design, so you can attach the sides, bottom, and top using screws or cam-lock fasteners.
- Check Alignment: Once assembled, ensure that all the cabinet pieces are aligned properly before proceeding. This ensures that the cabinet will be sturdy and functional.
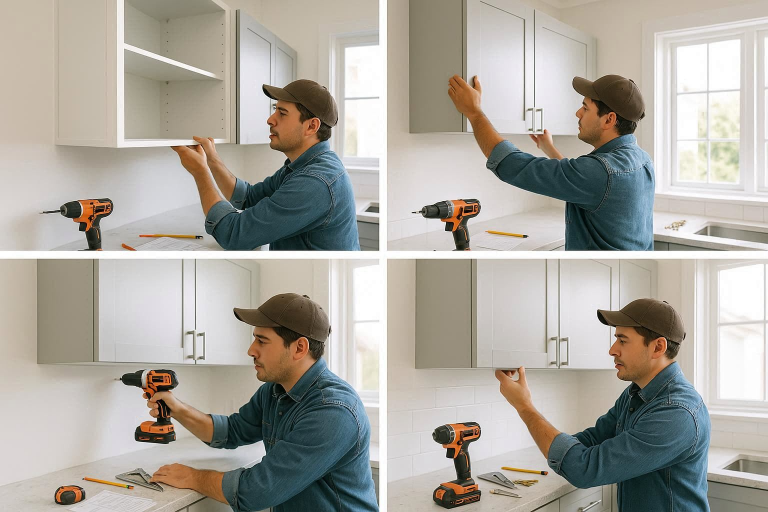
Step 4: Mount the Upper Cabinets
It’s generally recommended to install the upper cabinets first, as this provides a more stable base for the lower cabinets. Plus, it’s easier to reach the higher spaces when there are no lower cabinets in the way.
How to Mount Upper Cabinets:
- Position the Cabinets: Use a cabinet lift or enlist the help of a friend to lift the upper cabinets into place. Be sure they are level and positioned properly along the wall.
- Secure to the Wall: Use screws to attach the cabinets to the wall studs. Drill pilot holes first, and then secure the cabinets tightly. Make sure the cabinets are plumb (vertically level) and adjust as necessary.
- Attach Adjacent Cabinets: If you’re installing multiple cabinets side by side, use cabinet clamps to keep them in place. Secure the cabinets to each other using screws.
Step 5: Install the Lower Cabinets
Once the upper cabinets are securely in place, move on to the lower cabinets. These should be aligned directly below the upper cabinets for a seamless fit.
Installing Lower Cabinets:
- Align the Cabinets: Position the lower cabinets so they align properly with the upper cabinets. Use a level to check that the cabinet bases are level.
- Secure the Cabinets: Just like the upper cabinets, secure the lower cabinets to the wall studs. Ensure the cabinets are flush against each other and the wall.
- Toe Kicks: If your lower cabinets include a toe kick, install it once the cabinets are secure. This piece provides a finished look and helps prevent dirt buildup beneath the cabinets.
Step 6: Attach Cabinet Doors and Hardware
Once the cabinets are in place, it’s time to add the finishing touches—cabinet doors, handles, and other hardware.
How to Install Cabinet Doors:
- Attach Hinges: If your cabinet doors are separate, start by attaching the hinges to both the doors and the cabinet frames. Be sure the doors hang evenly and are aligned properly.
- Install Handles and Knobs: Mark the spot where you want to place handles or knobs on each door and drawer. Drill holes for the hardware and secure them in place.
Step 7: Adjust and Final Touches
With everything in place, it’s time to make any necessary adjustments to ensure your cabinets are perfectly aligned and functional.
Final Adjustments:
- Adjust Door Alignment: If your doors aren’t perfectly aligned, most hinges have adjustment screws that let you shift the door slightly to get it just right.
- Install Shelves: If your cabinets have adjustable shelves, now’s the time to place them inside.
- Seal and Caulk: Fill any gaps between the cabinets and the wall with caulk to create a seamless, professional-looking finish.
- Clean Up: Once the cabinets are installed, take a moment to clean up the area and remove any leftover packaging materials.
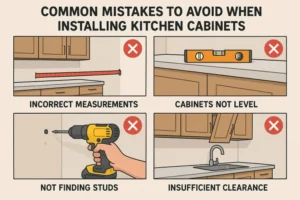
Common Mistakes to Avoid When Installing Kitchen Cabinets
Even experienced DIYers can make mistakes when installing kitchen cabinets. Here are a few common pitfalls to avoid:
- Incorrect Measurements: Failing to measure accurately can lead to cabinets that don’t fit properly. Always double-check your measurements before purchasing or assembling your cabinets.
- Skipping the Leveling Step: Not using a level tool can result in crooked cabinets. This can affect the cabinet doors, drawers, and overall look of the kitchen.
- Not Securing Cabinets to Wall Studs: Cabinets need to be attached to the wall studs for safety and stability. Don’t rely solely on drywall anchors.
Benefits of Installing Kitchen Cabinets Yourself
- Cost Savings: Hiring a professional can be expensive, but installing cabinets yourself can save you hundreds, if not thousands, of dollars.
- Customization: You can choose the exact style, finish, and layout of your cabinets, creating a space that truly reflects your personal style.
- DIY Satisfaction: There’s a unique sense of pride that comes with completing a home improvement project yourself.
FAQ
Q1: Do I need professional help to install kitchen cabinets?
While professional help can be useful in some cases, many homeowners are perfectly capable of installing kitchen cabinets themselves with the right tools and preparation.
Q2: How long does it take to install kitchen cabinets?
Installation can take a few days, depending on your experience and the complexity of the layout.
Q3: How much does it cost to install kitchen cabinets?
DIY installation costs are much lower than hiring a pro, but prices will vary depending on the materials, tools, and hardware you purchase.
Q4: Can I install kitchen cabinets by myself?
Yes! As long as you follow the proper steps and have a helper for the heavier lifting, you can install cabinets yourself.
Q5: How do I make sure my kitchen cabinets are level?
Use a level tool throughout the installation process and adjust the cabinets as necessary. Shims can be used to correct slight unevenness.
Conclusion
Installing kitchen cabinets may seem like a daunting task, but with the right tools, materials, and a little patience, it’s entirely possible to do it yourself. By following the steps outlined in this guide, you can transform your kitchen with beautiful, functional cabinets that suit your style and needs. Take your time, measure twice, and don’t hesitate to ask for help if needed.