Lighting is the jewelry of the kitchen, but unlike a necklace you can take off, recessed lighting is permanent. Get it right, and your kitchen looks expansive, modern, and clean. Get it wrong, and you end up with the dreaded “Swiss cheese effect”—a ceiling riddled with holes that cast shadows exactly where you’re trying to chop vegetables.
If you are wondering where to install recessed lighting in the kitchen, you aren’t just looking for a grid pattern; you need a strategy. This guide breaks down the placement science by “zones” to ensure your workspace is bright, shadow-free, and inviting.
The Golden Rules of Kitchen Lighting Placement
Before drilling a single hole, you must understand the math behind the magic. Randomly placing cans (fixtures) is the fastest way to ruin a renovation.
The Ceiling Height Formula
The most common question is: How far apart should the lights be? The industry-standard formula is simple: Divide your ceiling height by two.
-
8-foot ceiling: Space lights approximately 4 feet apart.
-
10-foot ceiling: Space lights approximately 5 feet apart.
This ensures that the “cones” of light overlap slightly near the floor, creating smooth, even coverage without dark patches.
The “Swiss Cheese” Warning
Avoid “over-lighting.” A common mistake is jamming too many 6-inch cans into a small ceiling. This makes the ceiling look cluttered and lowers the perceived value of the home.
-
Pro Tip: Use 4-inch recessed lights for a more modern, minimal look. They provide just as much light as the old 6-inch versions but take up less visual real estate.
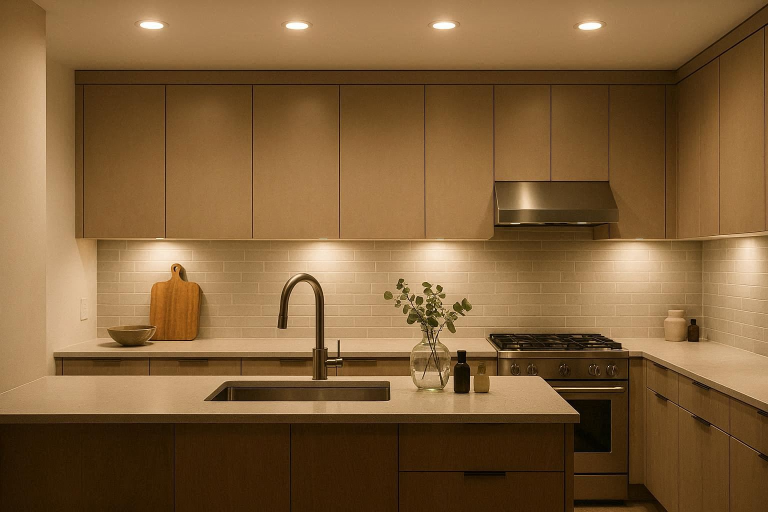
Zone 1: The Critical Work Areas (Task Lighting)
The biggest error homeowners make is prioritizing the middle of the room. In a kitchen, the action happens at the edges—on the counters, stove, and sink. If you only light the center, your body will block the light when you stand at the counter, casting a shadow on your work.
Perimeter Counters & Upper Cabinets (The 18-Inch Rule)
This is the most critical measurement in this entire guide. To light your counters without creating shadows:
-
Measure 18 to 24 inches out from the wall (or roughly 12 inches from the face of your upper cabinets).
-
Why? If the light is too far back (e.g., 36 inches from the wall), it shines on your back, casting a shadow on your knife. If it is too close (e.g., 6 inches), it creates a harsh spotlight on the cabinet doors.
-
Target: You want the beam of light to hit the edge of the countertop.
Over the Kitchen Sink
The sink is a high-traffic zone. You generally need one or two dedicated recessed lights here, depending on the window size.
-
Alignment: Center the lights on the sink, not the room.
-
Switching: Consider putting the sink light on a separate switch for late-night use.
Above the Stove/Range
If you have a microwave or a hood vent with built-in lights, you might not need recessed cans here. However, for high-end hoods without strong lighting:
-
Install two gimbal (adjustable) fixtures about 20 inches away from the hood.
-
Angle them toward the cooking surface to highlight the food without melting the fixture.
Zone 2: The Kitchen Island (The Centerpiece)
The island is often the social hub. Lighting here serves two purposes: task lighting for prep and accent lighting for dining.
Grid vs. Linear Layouts
-
Linear: For narrow islands, a single row of 2–3 lights centered on the island is standard.
-
Grid: For large, deep islands (over 4 feet deep), use a “dice” pattern (4 lights in a square) to ensure light reaches the center.
Mixing Recessed Lights with Pendants
If you plan to install decorative pendant lights:
-
Do NOT place recessed cans directly next to the pendants. It creates visual clutter and “glare bombs.”
-
Instead, position recessed lights around the island perimeter to supplement the pendants, or skip recessed lights over the island entirely if the pendants offer sufficient lumen output.
Zone 3: Ambient & General Walking Areas
Once the “Work Zones” (counters and islands) are lit, you fill in the gaps. This is called ambient lighting.
Lighting the Walkways
Look at the floor space between the island and the main counters.
-
Place a light every 4 to 5 feet down the center of the walkway.
-
Ensure these align with the lights in other rows to maintain a clean grid where possible.
Corner Placement Strategies
Corners are often dark and dead spaces.
-
Install a light roughly 24 inches from the corner walls to “wash” the cabinetry and make the kitchen feel larger.
-
Tip: Dark corners shrink a room; bright corners expand it.
Layouts for Specific Kitchen Shapes
Galley Kitchens
Galley kitchens are narrow. Avoid a single row of lights down the center—this guarantees shadows on your counters.
-
The Fix: Use two rows of lights, pushing them out toward the cabinets (the 18-inch rule). This lights the counters and the floor.
L-Shaped & U-Shaped Layouts
Follow the perimeter of the counters first. Layout the lights in an “L” or “U” shape following the cabinet edge. Then, simply fill in the center of the room with a grid if the space is wide enough (more than 6 feet wide).
Technical Specs You Can’t Ignore
Placement is useless if you buy the wrong lights.
Trim Size and Beam Angle
-
Trim: Go with 4-inch or 3-inch trims for a high-end look. The old 6-inch “saucers” look dated.
-
Beam Angle: Use a narrow flood (25°-40°) for high ceilings or task areas. Use a wide flood (50°-60°) for general ambient lighting.
Ideal Color Temperature (Kelvin)
Kitchens are workspaces, so you need crisp light.
-
Best: 3000K (Soft White) or 3500K (Bright White).
-
Avoid: 2700K (Too yellow/sleepy) or 5000K (Too blue/clinical hospital look).
-
Consistency: Ensure your recessed lights match the Kelvin temperature of your under-cabinet lighting.
Common Mistakes to Avoid
-
The “Runway” Effect: creating perfectly straight lines that don’t align with cabinets or tasks. Function comes first; symmetry comes second.
-
Ignoring Dimmers: Kitchens serve morning coffee (bright) and evening wine (dim). Always install dimmer switches.
-
No LSI Integration: Failing to layer lighting. Recessed lights alone are flat. You need under-cabinet lighting to eliminate the final shadows.
-
Ceiling Joists: Not checking for joists before designing the layout. Always use a stud finder before falling in love with a specific paper layout.
FAQs
Q: How far should recessed lights be from the wall? A: For general lighting, roughly 3 feet. For task lighting over counters, 18–24 inches from the wall is the “sweet spot” to avoid shadows.
Q: Can I put recessed lighting over a stove? A: Yes, but ensure they are heat-rated and placed slightly in front of the stove, not directly inside the heat plume, unless using vapor-proof trims.
Q: How many lumens do I need for a kitchen? A: A general rule is 30–40 foot-candles for ambient light and 70–80 foot-candles for task areas. Practically, this means roughly 700-1000 lumens per fixture.
Q: Should I use baffles or reflector trims? A: Baffles (ridges inside the can) reduce glare and are better for residential kitchens. Reflectors maximize light but can be blinding.
Q: Is it okay to not have pendants over the island? A: Absolutely. Many modern minimalist kitchens use only recessed lighting. Just ensure you use a tighter spacing (like a grid) over the island to define the space.
Conclusion
Knowing where to install recessed lighting in the kitchen is about understanding how you move in the space. By following the Zone Method—lighting the counters first, the island second, and the walkways last—you ensure a kitchen that is not only bright but functional.
Remember the golden rule: Light the surface, not the floor. If you push your lights out to the edges (18 inches from the wall) and use the correct spacing (ceiling height divided by two), you will achieve that professional, high-end look that makes your kitchen the true heart of the home.