Kitchen cabinets are one of the most critical features of any kitchen. They’re not just storage spaces, but they also play a significant role in the overall aesthetic of your home. Over time, cabinets can become worn, outdated, or damaged, but replacing them can be costly. Refinishing your kitchen cabinets can be a great way to breathe new life into your kitchen without breaking the bank.
In this post, we’ll walk you through the entire process of refinishing kitchen cabinets—from why it’s a good idea, to the tools and materials you’ll need, to the step-by-step process of bringing your cabinets back to life. Additionally, we’ll address common mistakes to avoid and offer tips for maintaining your newly refinished cabinets.
Why Refinish Kitchen Cabinets?
Cost-Effective Solution
Refinishing kitchen cabinets is a more affordable alternative to replacing them entirely. While new cabinets can cost thousands of dollars, refinishing them only requires an investment in basic materials, such as paint, stain, primer, and a few essential tools. If you’re handy and ready to get your hands dirty, refinishing can be a Cleaning Guide for Home & Kitchen project that saves you a lot of money. For example, a professional refinishing job could cost between $2,000 and $5,000, depending on the size of your kitchen, but a DIY project might cost you just $200-$500 in materials.
Eco-Friendly Option
When you choose to refinish your cabinets, you’re also being environmentally conscious. Instead of tearing out old cabinets and sending them to a landfill, you’re reusing existing materials. This reduces waste and minimizes the environmental impact of your renovation project.
Enhanced Aesthetic Appeal
One of the best aspects of refinishing kitchen cabinets is the ability to transform the look of your kitchen without the need for a full renovation. Whether you want a modern, sleek look with glossy paint or a more rustic feel with natural wood stain, refinishing gives you the flexibility to completely transform the look and feel of your kitchen. It’s a great way to update your space without committing to a full remodel.
Increased Home Value
Refinishing kitchen cabinets can significantly increase the value of your home. A kitchen with updated cabinets can make your entire space look more modern, appealing, and well-maintained, which is a big selling point if you’re planning to list your home. Even if you’re not selling soon, it’s always a good idea to invest in improvements that add value to your property.
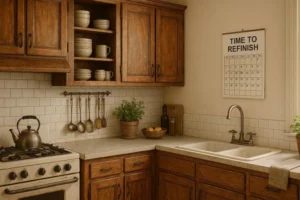
When Is It Time to Refinish Your Kitchen Cabinets?
Visible Damage
If your kitchen cabinets have seen better days, it might be time to give them a refresh. Cracks, chips, faded finishes, or worn-out paint can make your kitchen look outdated and tired. Refinishing allows you to smooth out imperfections and restore your cabinets to their former glory.
Outdated Appearance
Sometimes, cabinets no longer match the vibe of your kitchen. Whether you’ve updated your countertops or changed your decor style, cabinets that no longer fit the aesthetic can detract from the beauty of your kitchen. Refinishing offers a simple solution to update their appearance, giving them a fresh new look that better complements the rest of your space.
Change of Style or Color Preferences
Maybe you’ve always had oak cabinets, but you’ve fallen in love with the modern charm of gray or navy blue. Refinishing your cabinets gives you the opportunity to change their color and style without the hassle or expense of replacing them. This is a great option if you’re craving a change but don’t want the stress of starting from scratch.
Inconsistent Wear
Over time, certain areas of your cabinets may show signs of wear more than others. For instance, the cabinet doors near the stove might have grease stains, while the lower cabinets may be scratched or scuffed. Refinishing your cabinets will give them a more uniform appearance and bring your kitchen back to life.
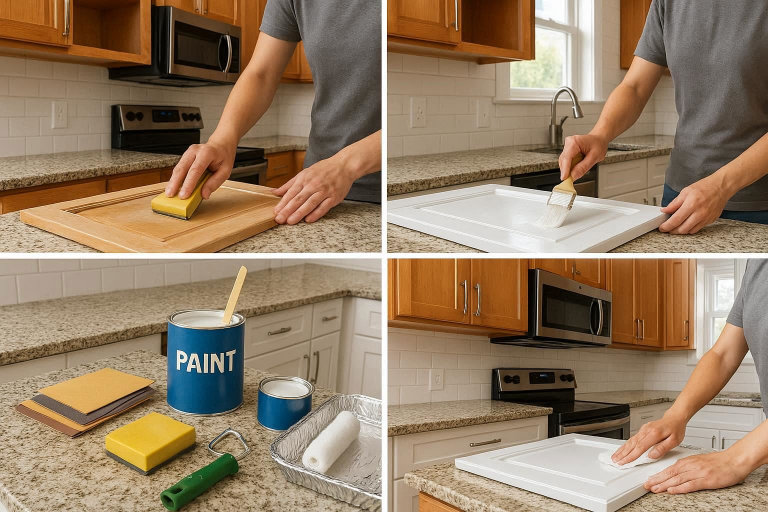
Materials and Tools You Need to Refinish Kitchen Cabinets
Before you begin refinishing, it’s essential to gather all the necessary materials and tools to ensure a smooth process.
Basic Tools
- Screwdrivers (for removing hinges, knobs, and doors)
- Sandpaper (start with coarse grit and finish with fine grit)
- Tack cloth (to remove dust and debris after sanding)
- Paintbrushes (for applying paint or stain)
- Rags (for wiping down surfaces)
Refinishing Materials
- Paint or Stain: Decide if you want a painted finish or a natural wood look. For a smooth, modern look, paint is a great option. If you prefer the natural beauty of wood, go with stain.
- Glaze: A glaze can add an antique or distressed look to your cabinets. It’s applied over a base coat to add depth and dimension.
Protective Gear
- Gloves, Goggles, and Respirators: Refinishing involves working with chemicals and dust, so make sure you protect yourself. Wearing gloves, goggles, and a respirator will help keep you safe during the process.
Wood Fillers & Primers
- Wood Fillers: For repairing cracks, dents, or holes in the wood before you begin refinishing.
- Primer: Priming your cabinets is important, especially if you’re painting them. It helps the paint adhere better and prevents stains or knots in the wood from showing through.
Specialty Finishes (Optional)
- Polyurethane or Lacquer: These finishes are ideal for adding a durable topcoat to protect your cabinets from damage. They provide a shiny, long-lasting finish.
Step-by-Step Guide to Refinishing Kitchen Cabinets
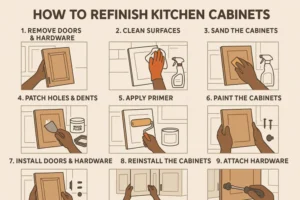
Step 1: Remove Cabinet Doors and Hardware
Start by removing the cabinet doors from their hinges. Use a screwdriver to remove any hardware like knobs and handles. Label each door and its corresponding hardware to make the reassembly process easier later on.
Step 2: Clean the Cabinets Thoroughly
A clean surface is crucial for a successful refinishing job. Use a kitchen degreaser or a mixture of soap and water to scrub away any grease, dirt, and grime. This will ensure that the paint or stain adheres properly to the surface.
Step 3: Sand the Surfaces
Next, you’ll need to sand the cabinets to remove the old finish and smooth out any imperfections. Start with coarse-grit sandpaper (around 120 grit) and finish with fine-grit sandpaper (around 220 grit) for a smooth, even surface. Always sand in the direction of the wood grain to avoid scratches.
Step 4: Repair Damages (if applicable)
If your cabinets have any cracks, holes, or deep scratches, use wood filler to repair them. Once the filler dries, sand it down to ensure it’s smooth and even with the surrounding surface.
Step 5: Apply Primer (if needed)
If you’re painting your cabinets, apply a coat of primer to help the paint adhere more effectively and achieve a smoother finish. Ensure the primer is completely dry before proceeding.
Step 6: Staining or Painting Cabinets
Now comes the fun part—color! If you’re staining, use a brush or rag to apply the stain, following the natural grain of the wood. For painting, apply thin, even coats of paint using a brush or a spray gun. Be sure to let each coat dry completely before applying another.
Step 7: Sealing and Finishing
After the paint or stain has dried, it’s time to protect your work. Apply a layer of polyurethane, lacquer, or another protective finish. This will seal the surface and ensure that your cabinets are durable and resistant to everyday wear and tear.
Step 8: Reassemble the Cabinets
Once the finish is fully dry, reattach the hardware and hang the cabinet doors back in place. Check that everything is aligned correctly and functions smoothly.
Common Mistakes to Avoid When Refinishing Kitchen Cabinets
While refinishing your kitchen cabinets can be a rewarding project, there are some common mistakes to watch out for:
- Skipping Prep Work: Never skip the cleaning and sanding steps. These are essential for achieving a smooth, flawless finish.
- Using Low-Quality Paint or Stain: Using cheap products may save you money initially, but it can lead to poor results that wear out quickly.
- Applying Too Much Finish: Thin, even coats are the key to a smooth finish. Avoid applying thick layers, as they can cause drips or streaks.
- Not Letting Each Coat Dry Completely: Patience is crucial. Rushing the drying process can lead to smudges, streaks, or an uneven finish.
How Long Does it Take to Refinish Kitchen Cabinets?
The timeline for refinishing kitchen cabinets depends on the size of your kitchen, the complexity of the project, and the drying times of the materials you’re using. On average, it could take anywhere from 3 to 5 days to finish the entire project, including drying time.
Factors that can affect the timeline:
- Type of finish: Oil-based finishes take longer to dry than water-based ones.
- Weather conditions: Humidity and temperature can affect drying times, so plan your project for a dry, mild day.
- Skill level: If you’re new to refinishing, expect the process to take longer as you become familiar with the techniques.
How to Maintain Your Refinished Kitchen Cabinets
Once your cabinets are refinished, it’s important to keep them looking great. Here are some tips for maintaining them:
- Regular Cleaning: Clean your cabinets with a soft cloth and a mild cleaner to prevent build-up of grease and dirt.
- Avoid Harsh Chemicals: Stay away from harsh cleaning agents that can strip the finish.
- Periodic Touch-Ups: Over time, the finish may wear down. Keep some leftover paint or stain on hand for touch-ups.
- Polishing and Waxing: Occasionally, polish or wax your cabinets to restore their shine and protect the finish.
Should You Refinish or Replace Your Kitchen Cabinets?
While refinishing is a great option for many people, there are times when replacing your cabinets might be a better choice. If your cabinets are structurally damaged or very outdated, it might be worth the investment to replace them. However, if your cabinets are in good condition and just need a cosmetic update, refinishing is an excellent way to go.
FAQs
- How much does it cost to refinish kitchen cabinets?
- DIY refinishing can cost between $200-$500, while professional services range from $2,000 to $5,000.
- Can you refinish kitchen cabinets without sanding?
- Yes, you can use liquid sandpaper or a deglosser, but sanding provides the best results.
- How long will refinished kitchen cabinets last?
- A well-done refinishing job can last 5-10 years with proper maintenance.
- Is it better to stain or paint kitchen cabinets?
- It depends on your desired look. Stain preserves the natural wood grain, while paint offers more color options.
- Can I change the color of my kitchen cabinets when refinishing?
- Absolutely! Refinishing gives you the opportunity to change the color and style of your cabinets.
- Do I need to remove cabinet doors to refinish them?
- Yes, it’s easier to refinish the doors separately to ensure an even finish.
Conclusion
Refinishing kitchen cabinets is a fantastic way to refresh your kitchen without the expense of a full remodel. With the right materials, tools, and a little patience, you can achieve a professional-looking result that transforms your space. Whether you decide to take on the project yourself or hire a professional, refinishing your cabinets is a worthwhile investment that will enhance the beauty and value of your home for years to come.