
When it comes to home improvement projects, one area where precision and craftsmanship truly shine is kitchen cabinet woodworking. Whether you’re a DIY enthusiast or a professional carpenter, creating high-quality, durable, and aesthetically pleasing kitchen cabinets is a rewarding challenge. In this comprehensive guide, we’ll walk you through everything you need to know about kitchen cabinet woodworking—from choosing the right tools and wood to step-by-step instructions on building your own cabinets.
Kitchen cabinet woodworking is not just about making functional storage spaces; it’s about blending artistry with practicality. Whether you’re remodeling your kitchen or building a new one from scratch, the right cabinet design can significantly enhance the space’s appearance and functionality. Let’s dive into the process!
What is Kitchen Cabinet Woodworking?
Kitchen cabinet woodworking is the craft of designing, constructing, and finishing kitchen cabinets. It involves a series of techniques that require skill, patience, and the right materials. At its core, woodworking for kitchen cabinets is about Cleaning Guide for Home & Kitchen creating durable structures that provide both storage and style.
Various woodworking techniques are used in the process, such as:
- Joinery techniques: These include dovetail joints, butt joints, and mortise-and-tenon joints. Each joint type affects the strength, stability, and overall aesthetic of the cabinet.
- Wood cutting and shaping: This process involves cutting and shaping wood pieces into specific dimensions for the cabinet frames, doors, and shelves.
- Finishing: This step includes sanding, staining, painting, and sealing the wood to enhance its appearance and protect it from moisture and wear.
Common types of wood used for kitchen cabinet construction include:
- Oak: Known for its durability and beautiful grain, oak is a popular choice for cabinets. It’s perfect for rustic or traditional designs.
- Maple: A versatile wood with a fine grain, maple is often used for more modern kitchen designs.
- Plywood: Plywood is often used for cabinet backs and sides because it’s cost-effective and strong.
Essential Tools for Kitchen Cabinet Woodworking
Before you begin, it’s essential to gather the right tools. The quality of the tools you use will directly affect the outcome of your project.
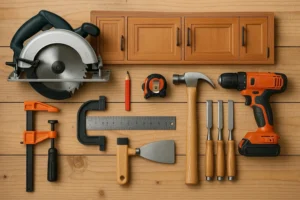
For beginners, here are the basic tools you’ll need:
- Circular saw: For cutting wood panels to the desired size.
- Drill: A drill with various bits is crucial for making holes for screws and hardware.
- Clamps: Used to hold pieces together as you assemble them.
- Measuring tape and square: Accuracy is key when building cabinets, and these tools will help ensure your cuts and joints are precise.
For professionals, the tools become more specialized:
- Table saw: Provides greater accuracy and precision for cutting wood pieces.
- Router: Used to create custom edges and joinery.
- Kreg jig: Ideal for making hidden pocket hole joints for a cleaner look.
Precision tools, such as a laser level or a digital caliper , can be game-changers for both DIYers and professionals. The key to successful cabinet woodworking is accurate measurements and clean cuts, so investing in high-quality tools will pay off in the long run.
Choosing the Right Wood for Kitchen Cabinets
Choosing the right wood is essential for both the aesthetic and durability of your kitchen cabinets. Here’s a breakdown of the most common types of wood used:
- Hardwoods (e.g., oak, maple, cherry, and walnut): These are sturdy, dense, and more resistant to wear and tear. They’re perfect for cabinets that will receive a lot of use.
- Oak: Classic and durable with a bold grain pattern, ideal for traditional or rustic designs.
- Maple: A lighter wood, perfect for modern or contemporary kitchen designs.
- Cherry: Offers a warm, rich tone that darkens over time, perfect for elegant, high-end kitchens.
- Softwoods (e.g., pine and fir): While they are less durable than hardwoods, softwoods are lighter, easier to work with, and more affordable.
- Pine: A popular choice for DIYers due to its affordability and ease of use, but it requires regular maintenance.
- Plywood: Often used for the cabinet sides, backs, and shelves. Plywood is more stable than solid wood and is less prone to warping. It’s also more affordable, making it a great choice for budget-conscious projects.
When selecting wood, keep these factors in mind:
- Durability: How much wear and tear will the cabinets face? Hardwoods are better for high-traffic areas.
- Aesthetic: Consider the overall look you’re aiming for. Light woods like maple are great for modern kitchens, while dark woods like walnut or cherry add richness to traditional designs.
- Cost: Hardwoods tend to be more expensive, so if you’re working with a budget, you might consider using plywood or softwoods for the cabinet frames.
Step-by-Step Process of Building Kitchen Cabinets
Let’s break down the process of building your own kitchen cabinets into manageable steps.
1. Design and Measurement
The first step is designing the layout of your kitchen cabinets. You’ll need to plan the number of cabinets, their size, and their placement in the kitchen. If you’re creating custom cabinets, take accurate measurements of the kitchen space and design your cabinets to fit perfectly.
- Tip: Use graph paper or design software to sketch out your design.
- Accurate measurements are crucial here. Measure your kitchen space several times to ensure precision.
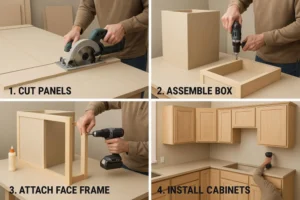
2. Cutting the Wood
Once your design is in place, it’s time to cut the wood pieces for the cabinet frames, doors, shelves, and backs. You’ll need to use a table saw or circular saw to get straight, clean cuts.
- Safety Tip: Always wear protective goggles and ear protection when cutting wood.
3. Assembling the Cabinet Frames
Next, you’ll assemble the cabinet frames. This step involves joining the various pieces together using butt joints, dovetail joints, or mortise and tenon joints. For extra strength, you may also use pocket holes with a Kreg jig.
- Pro Tip: Use clamps to hold the pieces together while the glue dries.
4. Installing Doors and Drawers
Once the frames are assembled, it’s time to attach the cabinet doors and drawers. This part requires careful attention to alignment and functionality.
- Hinges: Choose high-quality European-style hinges for a sleek, hidden look.
- Drawer Slides: Use full-extension slides to ensure smooth operation.
5. Finishing the Cabinets
The final step is finishing the wood. This includes sanding, staining, painting, or sealing. Make sure the surface is smooth before applying any finishes.
- Sanding: Sand the wood with progressively finer grits to ensure a smooth surface.
- Finishing: Apply a clear polyurethane finish or lacquer for a durable, glossy surface.
Tips for Achieving Professional-Level Results
- Precision is Key: Accurate measurements, straight cuts, and well-aligned joints will elevate your cabinets.
- Practice makes perfect: The more you practice, the more refined your skills will become. Start with small projects before tackling an entire kitchen.
- Don’t rush the finishing process: A well-applied finish can make all the difference in the final look of your cabinets.
Common Mistakes in Kitchen Cabinet Woodworking and How to Avoid Them
Even experienced woodworkers can make mistakes. Here are some common errors to watch out for:
- Improper Measurements: Always double-check your measurements. Incorrect cuts will lead to ill-fitting parts.
- Weak Joints: Ensure your joints are solid. Weak joints can cause the cabinet to fall apart over time.
- Uneven Finishes: Always apply your finish in thin, even layers. Avoid thick coats that can result in streaks or drips.
Should You DIY or Hire a Professional for Kitchen Cabinet Woodworking?
The decision to go DIY or hire a professional depends on several factors:
- DIY: Ideal for those with basic woodworking skills and a desire to learn. It can be a cost-effective option, especially for smaller projects.
- Hiring a Professional: If you’re looking for precision, intricate design, or simply don’t have the time, hiring a professional is a great option. Look for an experienced cabinet maker who can offer personalized designs and high-quality craftsmanship.
Maintenance Tips for Wooden Kitchen Cabinets
To keep your wooden kitchen cabinets in great shape:
- Clean regularly: Wipe cabinets down with a damp cloth to remove dust and grime.
- Preserve finishes: Use furniture polish to maintain the natural beauty of the wood.
- Addressing Issues: Fix any scratches or dents promptly to prevent further damage.
FAQs
What type of wood is best for kitchen cabinets?
Hardwoods like oak, maple, and cherry are the most durable and visually appealing choices for kitchen cabinets.
How long does it take to build custom kitchen cabinets?
The time varies, but for a DIY project, expect to spend anywhere from a few days to a couple of weeks, depending on the complexity.
Can I paint my kitchen cabinets after installation?
Yes, you can paint cabinets. Ensure the surface is prepared by sanding and cleaning it thoroughly before applying the paint.
How do I prevent my kitchen cabinets from warping?
Ensure the wood is properly sealed, avoid exposing it to excessive moisture, and maintain a consistent temperature and humidity level in your kitchen.
What are the most common finishes for kitchen cabinets?
Popular finishes include lacquer, polyurethane, and varnish. Each offers different levels of durability and shine.
Conclusion
Kitchen cabinet woodworking is a fantastic way to add a personal touch to your home while enhancing its value. Whether you choose to take on the project yourself or hire a professional, remember that quality craftsmanship, attention to detail, and the right materials will make all the difference. What’s your next step—DIY or professional? Share your thoughts and experiences in the comments below!