If your kitchen cabinets look outdated but the structure is still solid, refacing might be your best option. Kitchen cabinet refacing is a cost-effective and eco-friendly way to give your kitchen a brand-new look without the high price tag of replacing the entire cabinetry.
One key step in refacing — especially for face frame cabinets — is veneer trimming. It’s the process that gives your cabinets that professional, clean edge finish you see in showroom kitchens. In this guide, we’ll walk you through everything you need to know about refacing your kitchen cabinets with veneer and trimming them perfectly for face frame designs.
What is Kitchen Cabinet Refacing?
Definition and Explanation
Cabinet refacing is the process of replacing the visible surfaces of your kitchen cabinets — including doors, drawer fronts, and veneers — while keeping the Cleaning Guide for Home & Kitchen cabinet boxes intact. Instead of tearing out the entire structure, you simply give the exterior a facelift using new materials.
Why Choose Refacing Over Replacement?
There are many reasons homeowners prefer refacing:
- Cost-effective: Refacing costs 40–60% less than a full replacement.
- Eco-friendly: You reuse your existing cabinet boxes, reducing waste.
- Quick upgrade: Most refacing projects can be completed within 3–5 days.
- Less mess: It avoids the major demolition that comes with replacement.
Popular Cabinet Styles for Refacing
Among all cabinet styles, face frame cabinets are particularly well-suited for refacing. Their sturdy frame provides an excellent surface for veneer application, ensuring durability and longevity after the makeover.
Understanding Face Frame Cabinets
What Are Face Frame Cabinets?
Face frame cabinets feature a wooden frame on the front of the cabinet box, creating a strong, traditional structure. The doors and drawers attach directly to this frame.
Common Features
- A 1½-inch frame outlining the cabinet front.
- Hinges that mount to the frame rather than the sides.
- A more classic, detailed appearance than frameless cabinets.
Why Face Frame Cabinets Are Ideal for Refacing
The sturdy face frame provides a reliable base for new veneers. Veneer sheets can easily adhere to the frame and give your cabinets a refreshed, high-end look without compromising stability.
Why Choose Veneer for Cabinet Refacing?
Aesthetic Appeal
Veneer offers a beautiful, real-wood finish that can instantly transform your kitchen. Whether you choose oak, maple, or walnut veneer, it can mimic the appearance of high-end solid wood cabinets.
Durability and Cost-Effectiveness
Veneer is durable yet lightweight. It’s resistant to warping and cracking, and since it uses less material than solid wood, it’s a fraction of the cost.
Variety of Options
You can find:
- Wood Veneer: Real wood slices for a natural look.
- Laminate Veneer: Synthetic material for durability and easy maintenance.
- Peel-and-Stick Veneer: Perfect for DIYers and easy to apply.
Tools and Materials You’ll Need for Veneer Trimming
Before starting, gather the necessary tools and materials to ensure a smooth and efficient workflow.
Essential Tools
- Measuring tape
- Veneer trimmer or edge trimmer
- Utility knife or sharp blade
- Sanding block
- Clamps
- Roller or scraper
- Straight edge or metal ruler
Materials
- Veneer sheets (wood or laminate)
- Adhesive (contact cement or veneer glue)
- Wood filler (for gaps and imperfections)
- Masking tape and cleaning cloths
Safety Gear
Always use:
- Gloves to protect your hands from sharp edges.
- Safety goggles to shield your eyes from wood dust.
- Dust mask for safe breathing during sanding or trimming.
Step-by-Step Guide for Kitchen Cabinet Refacing with Veneer Trimming
Step 1: Preparing the Cabinets
- Remove cabinet doors, drawers, and hardware.
- Clean all surfaces thoroughly using mild detergent to remove grease and dirt.
- Lightly sand the face frames to help the veneer adhesive bond better.
- Wipe off dust with a damp cloth.
Step 2: Measuring and Cutting Veneer
Accurate measurements are key. Measure each section of your face frame separately, noting the width and height.
Pro Tip: Always cut veneer pieces slightly larger than the required size — you’ll trim them later for a perfect fit.
Use a sharp utility knife and a straight edge to make clean cuts. Lay out all pieces before gluing to ensure proper alignment.
Step 3: Applying Veneer to the Face Frame
- Apply adhesive evenly to both the veneer and cabinet surface.
- Wait until the glue becomes tacky (usually 5–10 minutes for contact cement).
- Carefully position the veneer and press it firmly with a roller or scraper, starting from the center and moving outward to remove air bubbles.
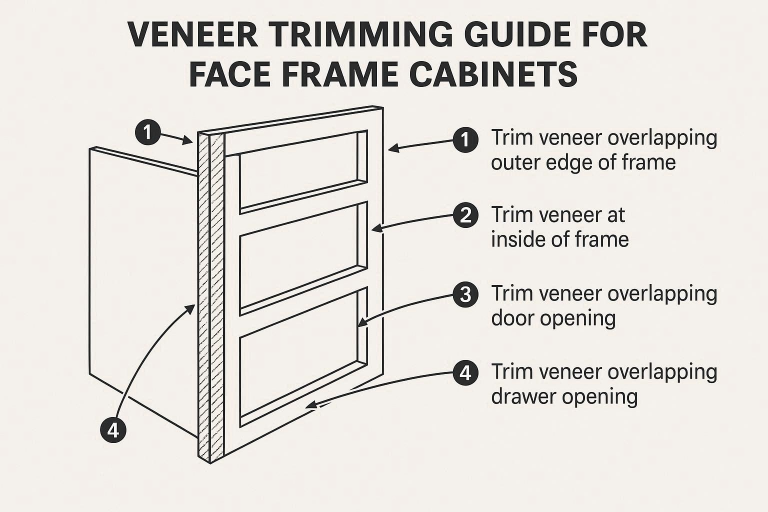
Step 4: Trimming the Veneer
This step defines the final look.
- Use a veneer trimmer or a sharp utility knife to cut off excess veneer.
- Work slowly and steadily to avoid chipping.
- For corners and edges, use light pressure to achieve a smooth, professional edge.
Example: If your face frame edge has intricate corners, a small hobby knife gives more control than large trimmers.
Step 5: Finishing Touches
- Sand down any rough edges with a fine-grit sanding block.
- Apply wood filler to seal small gaps or imperfections.
- Reinstall cabinet doors, drawers, and hardware.
- Finish with a coat of clear sealant or varnish for added protection.
Common Mistakes to Avoid When Refacing with Veneer
1. Not Measuring Properly
Even a small measurement error can cause misalignment. Always double-check dimensions before cutting your veneer.
2. Using the Wrong Adhesive
Choose a high-quality contact cement designed for veneer work. Poor-quality glue can lead to peeling and lifting later.
3. Rushing the Trimming Process
Take your time while trimming. Rushing may result in uneven edges or damaged corners that ruin the overall finish.
4. Ignoring Safety
Wear gloves and goggles at all times. Wood splinters and adhesive fumes can cause injuries if you’re not careful.
How to Maintain Veneered Face Frame Cabinets
Cleaning and Care Tips
- Use a soft, damp cloth to wipe surfaces regularly.
- Avoid abrasive cleaners — they can dull or scratch the veneer.
- For sticky residue, use mild dish soap diluted in warm water.
Preventing Damage
- Avoid excessive moisture exposure.
- Use coasters and mats to prevent spills from seeping into cabinet surfaces.
- Add bumpers to prevent doors from slamming and damaging the veneer edges.
Regular Maintenance
Reapply a thin layer of clear finish every few years to protect your veneer’s shine and color.
Cost of Kitchen Cabinet Refacing with Veneer
Price Range
The cost depends on your kitchen size and the veneer type.
- DIY projects: $1,000–$2,500
- Professional refacing: $5,000–$9,000
- High-end custom veneer: $10,000 and above
DIY vs. Hiring a Professional
If you have basic carpentry skills, DIY refacing is achievable and cost-effective. However, professionals ensure flawless alignment and trimming — especially for detailed face frame cabinets.
Potential Return on Investment
A well-refaced kitchen can increase home value by up to 75–80% of the refacing cost, making it one of the best remodeling investments.
FAQ
What is the difference between veneer and laminate?
Veneer is made from thin slices of real wood, offering a natural look. Laminate is a synthetic material, providing durability and scratch resistance at a lower cost.
Can I reface my cabinets with veneer on my own?
Yes! With the right tools, patience, and attention to detail, it’s a great DIY project.
How long does it take to reface kitchen cabinets with veneer?
Most small to medium kitchens can be completed within 3–5 days, depending on drying and curing times.
What are some alternatives to veneer for cabinet refacing?
You can use solid wood panels, thermofoil, or laminate sheets as alternatives, though veneer offers the most authentic wood look.
How do I avoid peeling or lifting veneer after installation?
Ensure the surface is clean and dry before applying adhesive, and press the veneer firmly with a roller to remove air pockets.
Conclusion
Refacing your kitchen cabinets with veneer and trimming them perfectly can completely transform the heart of your home. It’s affordable, sustainable, and deeply satisfying to see the results of your handiwork.
With the right tools, a bit of patience, and attention to detail, you can achieve a polished, professional look that rivals brand-new cabinetry. Whether you’re upgrading to sell your home or want a refreshed kitchen, veneer trimming for face frame cabinets is the perfect way to give your kitchen a timeless upgrade without breaking the bank.

