The kitchen sink is one of the most used areas in any home. With daily tasks like washing dishes, cleaning vegetables, or even rinsing your hands, it’s no surprise that the drain system takes a lot of wear and tear. Over time, kitchen sink drains can become clogged, leak, or even rust and corrode, all of which can lead to inefficiency and potential water damage. So, how do you go about fixing these problems? The answer is simple: replace the kitchen sink drain.
In this guide, we’ll walk you through the process of replacing a kitchen sink drain, from recognising when it needs to be replaced to step-by-step instructions. Doing this job yourself can save you a lot of money and effort compared to hiring a professional plumber. So, let’s dive in and learn how to replace your kitchen sink drain like a pro!
Why You Might Need to Replace Your Kitchen Sink Drain
You may not think much about the kitchen sink drain unless there’s a problem. However, over time, your drain system can develop issues Organization Ideas for Kitchen and Living Room that might not be so easy to ignore. Here are some common signs that your drain might need replacing:
Signs Your Drain Needs Replacing
1. Constant Clogs Despite Cleaning
If your drain becomes clogged frequently, despite regular cleaning and plunger use, it may be time to replace the drain. Old drains can develop small holes or cracks, making them more susceptible to blockages.
2. Visible Leaks Around the Sink
If you notice water pooling under your sink or around the drain area, it’s a clear sign that there’s a leak. Leaks around the sink could be caused by a loose or damaged drain that needs replacement.
3. Rust, Corrosion, or Damage to the Drain
Drains are regularly exposed to moisture, which can cause rust or corrosion over time. This can weaken the drain system, leading to leaks or poor drainage. If you notice rust or visible damage, replacing the drain will ensure your kitchen sink continues to function properly.
How Ignoring a Faulty Drain Can Affect Your Kitchen Plumbing
While a leaking drain or frequent clogging may seem like a minor inconvenience, ignoring these problems can lead to more significant issues in your kitchen plumbing. A leaking drain can cause water damage to your cabinets, countertops, and even the floor beneath the sink. Additionally, inefficient drainage can lead to stagnant water in the pipes, which may create unpleasant odours and increase the likelihood of mould and bacterial growth.

Tools and Materials Needed for Replacing a Kitchen Sink Drain
Before you begin replacing your kitchen sink drain, you’ll need to gather a few essential tools and materials. Here’s a list to make sure you have everything ready:
Tools Required:
- Pipe Wrench: This will help you loosen and remove the drain nut and other components of the drain system.
- Plumber’s Tape: Essential for sealing joints and creating a leak-proof connection.
- Adjustable Pliers: These will come in handy for loosening tight fittings and pipes.
- Bucket or Container for Water: You’ll need this to catch any remaining water when you remove the old drain.
- Silicone Sealant or Plumber’s Putty: Used to create a waterproof seal when installing the new drain.
Materials:
- New Kitchen Sink Drain Kit: Make sure the kit is the correct size for your sink and includes all necessary components (flange, drain nut, gasket, etc.).
- Gaskets and Washers: These are used to ensure tight, leak-proof seals between drain parts.
Step-by-Step Guide on How to Replace a Kitchen Sink Drain
Step 1 – Prepare the Area
Before starting the replacement process, make sure to prepare your workspace:
- Turn Off the Water Supply: While you’re replacing the drain, there will still be some water in the pipes. Shut off the water supply to avoid any spills or flooding.
- Place a Bucket or Towel Under the Drain: This will catch any remaining water from the pipes and prevent it from spilling onto the floor.
Step 2 – Remove the Old Drain
Once you’ve prepared the area, it’s time to remove the old drain:
- Loosen and Remove the Drain Nut: Using your pipe wrench, loosen the drain nut that connects the drain to the sink. Be sure to do this carefully to avoid damaging the sink.
- Disconnect the Drain Pipes: Once the drain nut is loose, disconnect the pipes connected to the drain.
- Remove Any Remaining Parts: If there are any other components, such as the drain flange or gasket, remove them as well.
Step 3 – Clean the Sink Area
Now that the old drain is out, it’s important to clean the sink area:
- Remove Debris and Residue: Check the area around the sink and remove any old plumber’s putty, grime, or other debris.
- Clean the Sink: Make sure the sink surface is smooth and clean to ensure a proper seal when installing the new drain.
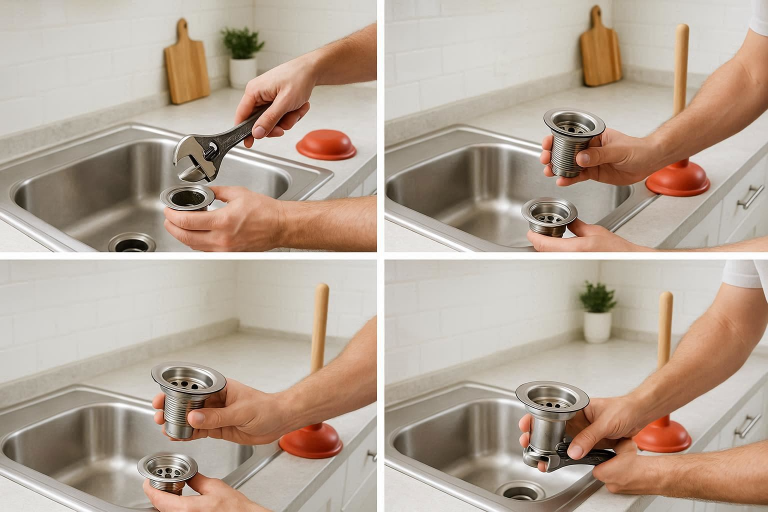
Step 4 – Install the New Drain
Once the sink area is cleaned, you can begin installing the new drain:
- Apply Plumber’s Putty or Silicone Sealant: Apply a small amount of plumber’s putty or silicone sealant to the underside of the drain flange. This will help create a water-tight seal when the drain is installed.
- Insert the New Drain: Place the new drain into the sink hole. Push it down firmly to ensure it sits properly.
- Secure the Drain with a Drain Nut: Attach the drain nut and tighten it carefully with your adjustable pliers. Be cautious not to overtighten, as this could cause the sink to crack or become damaged.
Step 5 – Reconnect the Drain Pipes
After the new drain is securely in place, reconnect the drain pipes:
- Reattach the Drain Pipe: Connect the drain pipe to the new drain and secure it in place to prevent leaks.
- Use Plumber’s Tape if Necessary: If you find any loose connections, apply plumber’s tape to the threads to create a leak-proof seal.
Step 6 – Test the New Drain
Finally, you’ll want to test the new drain to make sure everything is functioning properly:
- Turn On the Water: Slowly turn on the water supply and check for leaks.
- Run Water Through the Drain: Let the water run for a few minutes to ensure proper drainage and to make sure there are no leaks.
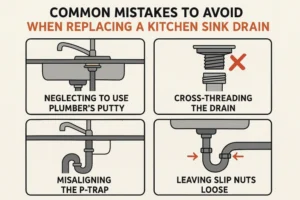
Common Mistakes to Avoid When Replacing a Kitchen Sink Drain
While replacing a kitchen sink drain is a relatively simple task, it’s easy to make a few mistakes. Here are some common ones to avoid:
- Over-tightening the Drain Nut: It’s tempting to tighten the drain nut as much as possible, but over-tightening can cause the sink to crack or damage the drain components.
- Forgetting to Apply Plumber’s Putty or Silicone Sealant: Not using enough putty or sealant can lead to leaks. Always ensure there’s a proper seal when installing the drain.
- Not Checking for Leaks: After completing the installation, always check for leaks. It’s better to catch a small issue early than deal with water damage later.
How to Maintain Your New Kitchen Sink Drain
Now that you’ve installed your new kitchen sink drain, it’s important to maintain it to ensure it lasts for years to come. Here are a few maintenance tips:
- Regular Cleaning: Clean your drain regularly to avoid buildup of food, grease, and other debris. Use a gentle cleaning solution to avoid damaging the drain.
- Avoid Harsh Chemicals: Avoid using harsh chemicals like drain cleaners, as they can corrode the drain and pipes over time.
- Prevent Clogs: Make sure to use a drain strainer to catch food scraps and other debris before they enter the drain. This will help prevent clogs and reduce the risk of blockages.
FAQ
How often should I replace my kitchen sink drain?
A kitchen sink drain typically lasts between 5 to 10 years. However, if you notice signs of damage, frequent clogs, or leaks, it may be time to replace it sooner. Regular inspection will help you determine when replacement is necessary.
Can I replace the kitchen sink drain myself, or should I hire a plumber?
Replacing the kitchen sink drain is a manageable DIY project, especially if you’re comfortable with basic plumbing tasks. However, if you’re not confident or if you encounter any issues during the process, hiring a plumber is a good idea.
What are the signs that my kitchen sink drain is leaking?
If you see water stains around the base of the sink, notice dampness under the sink, or spot puddles of water forming around the drain, these are signs that your kitchen sink drain may be leaking.
What kind of drain should I buy for my kitchen sink?
Most kitchen sinks use a standard 3.5-inch drain, but it’s always a good idea to double-check your sink’s size before purchasing a new drain. Make sure the drain you choose matches the size and style of your sink.
Conclusion
Replacing your kitchen sink drain doesn’t have to be a daunting task. With the right tools, materials, and a little know-how, you can easily replace the drain yourself and save money in the process. By following this guide, you can enjoy a fully functioning kitchen sink without the hassle of frequent clogs or leaks. If you encounter any problems, remember that hiring a professional plumber is always an option.