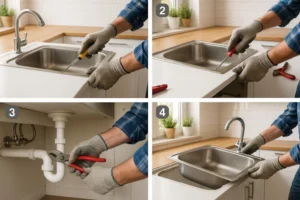
Replacing or installing a kitchen sink might seem like a daunting task, but with the right tools and a little patience, it can be a straightforward DIY project. Whether you’re upgrading to a more modern design, replacing a sink that’s developed leaks, or simply remodeling your kitchen, knowing how to replace and install a kitchen sink is a valuable skill for any homeowner.
In this guide, we’ll walk you through the entire process of replacing or installing a kitchen sink, from gathering materials to testing your new installation. Whether you’re a seasoned DIYer or a first-time installer, this clear, step-by-step guide will make the job easier.
So, let’s get started and transform your kitchen sink!
What You’ll Need to Replace and Install a Kitchen Sink
Before you begin the process, it’s essential to have the necessary tools and materials on hand. Having everything ready will make the job go Cleaning Guide for Home & Kitchen smoothly and save you from having to pause midway through.
Essential Tools and Materials:
- Adjustable Wrench: Useful for tightening or loosening nuts on the plumbing.
- Pipe Wrench: This helps in dealing with larger, more stubborn pipes.
- Plumber’s Tape: Used to seal threaded connections to prevent leaks.
- Silicone Sealant: Provides a waterproof seal around your sink.
- P-Trap: The U-shaped pipe that ensures no foul smells come up through the drain.
- New Kitchen Sink: The star of the show! Make sure your new sink fits the existing hole in your countertop.
- New Faucet (Optional): If you’re replacing the faucet as well, now is the time to install it.
- Bucket or Towels: For catching any water that might spill while disconnecting pipes.
Safety Precautions:
- Turn off the Water Supply: It’s crucial to cut off the water supply to avoid a mess and potential flooding.
- Protect Your Hands: Wear gloves to avoid sharp edges or tools that could cause injury.
How to Remove the Old Kitchen Sink
Removing your old kitchen sink is the first step before installing the new one. Let’s walk through how to remove it safely.
Turn off the Water Supply
- The very first thing you need to do is turn off the water supply. You can usually find the shut-off valves under your kitchen sink. These valves control the water flow to the sink, so closing them will prevent any leaks when you disconnect the pipes.
Disconnect the Plumbing
- Detach the Water Lines: Use an adjustable wrench to disconnect the water supply lines from the faucet. You might need a bucket or towels to catch any remaining water in the lines.
- Remove the Drain Pipe: Next, use the pipe wrench to loosen and remove the drain pipe that’s connected to the sink’s drain. Again, be ready for some water to spill out.
Remove the Sink Mounting
- Loosen Clips or Brackets: Most kitchen sinks are held in place by clips or brackets underneath the countertop. Use your adjustable wrench to loosen these attachments.
- Remove Caulk: If the sink is sealed with caulk, use a utility knife to carefully cut through it and free the sink from the countertop.
- Detaching a Stubborn Sink: If your sink is being stubborn and won’t come off easily, try gently tapping it with a rubber mallet to loosen it without damaging the sink or countertop.
Clean the Area
- After removing the old sink, take the time to clean the countertop area. Wipe away any old caulk, debris, or grime to create a clean surface for your new sink installation.
How to Prepare for Installing the New Sink
Now that the old sink is gone, it’s time to prepare for the installation of your new sink.
Measure the New Sink and Cut the Countertop (If Necessary)
- Check the Fit: Before you begin, ensure the new sink fits the existing hole in your countertop. If you’re upgrading to a larger sink, you may need to enlarge the opening. Use a jigsaw to carefully cut the countertop, ensuring it’s even on all sides.
Install the Faucet and Drain Assembly
- Install the Faucet First: Before you drop the sink into place, it’s easier to install the faucet while the sink is out of position. Follow the manufacturer’s instructions to secure the faucet in place.
- Install the Drain Assembly: Next, install the drain, starting with the strainer and drain tailpiece. Use plumber’s tape around the threads to ensure a watertight seal.
Installing the New Kitchen Sink
Now comes the exciting part: installing the new kitchen sink!
Place the Sink in Position
- Align the Sink: Carefully place the sink in the hole you’ve prepared in the countertop. Make sure it’s aligned properly and sits flush with the countertop.
- Seal with Silicone or Putty: Use plumber’s putty or silicone sealant around the edges of the sink to prevent water from seeping underneath. Apply a generous bead, but don’t overdo it—too much sealant can create a mess when you press the sink into place.
Secure the Sink
- Attach Clips or Brackets: Most sinks come with clips or brackets that help hold it securely. Attach them to the underside of the countertop and tighten them carefully. Make sure the sink is firmly held in place but avoid overtightening, as this could crack the sink or damage the countertop.
Reconnect the Plumbing
- Reattach the Water Supply Lines: Use your adjustable wrench to reconnect the water supply lines to the faucet. Be sure to tighten them, but not too much, as this can cause damage.
- Reconnect the Drain Pipe: Reattach the drain pipe to the tailpiece and ensure everything fits snugly. Tighten the connections as necessary, but remember, over-tightening can lead to cracks.
Testing the Installation
Once everything is in place, it’s time to test your work!
Turn on the Water Supply
- Slowly turn on the water supply and check for any leaks. Pay special attention to the faucet and drain connections. If you see any leaks, don’t panic! Simply tighten the connections where necessary.
Test Drainage and Water Flow
- Turn on the faucet and test the water flow. Ensure that the water drains properly and there are no blockages. Check for leaks around the drain as well.
Troubleshooting Common Issues
Even with the best of intentions, things don’t always go perfectly. Let’s go over a few common issues you might encounter.
Dealing with Leaky Faucets or Drains
- If you notice any leaks, check the connections. Tighten the nuts and ensure that all washers are in place. It’s often a matter of a loose connection.
Uneven Sink Placement
- If your sink isn’t sitting evenly, you may need to adjust the clips or brackets. Loosen them slightly, realign the sink, and tighten again.
Water Pressure Issues
- Weak water pressure can be caused by a clogged aerator or issues with the water supply line. Try cleaning the aerator first, and if that doesn’t help, check the supply lines for blockages.
Tips for a Successful Kitchen Sink Installation
- Take Your Time: Rushing through the process can lead to mistakes and leaks. Take your time to ensure everything is correctly installed.
- Consider Professional Help if Necessary: If you’re not comfortable with plumbing or encounter any complex issues, it’s okay to call in a professional plumber.
- Maintain Your Sink Regularly: Keep your sink clean and check for leaks periodically. A well-maintained sink will last for many years.
FAQ
How long does it take to replace a kitchen sink?
Typically, replacing a kitchen sink takes between 2 to 4 hours, depending on your experience and the complexity of the installation.
Can I replace my kitchen sink without a plumber?
Yes! With the right tools and a little patience, many homeowners can replace a kitchen sink themselves. If you’re unsure, however, don’t hesitate to call a professional.
What type of sink is best for my kitchen?
Common options include stainless steel, composite, and cast iron. Stainless steel is durable and easy to clean, while composite sinks are scratch-resistant and stylish. Cast iron is heavy and durable but may require more maintenance.
How do I fix a leaking kitchen sink after installation?
Check the connections for tightness. Ensure the washers are properly placed, and if needed, apply plumber’s tape to the threads.
Do I need to replace the faucet when installing a new sink?
Not necessarily. If your faucet is still in good condition and you like it, you can keep it. However, if you’re updating your sink, it’s a great opportunity to upgrade the faucet as well.
Conclusion
Replacing and installing a kitchen sink may seem like a challenging project, but with the right tools, preparation, and patience, it’s entirely doable on your own. By following the steps outlined in this guide, you can replace your sink confidently, save money, and enjoy a fresh, functional kitchen.
Take your time, ensure everything is tightly connected, and don’t be afraid to ask for professional help if needed. Feel free to share your experiences, ask questions, or leave a comment below—we’d love to hear how your installation went!


