When it comes to kitchen upgrades, replacing an old faucet with a sleek single-handle faucet is one of the easiest ways to improve both functionality and style. Whether your current faucet is leaking, outdated, or simply not working as efficiently as it should, replacing it is a rewarding DIY project that can be done in just a few hours. In this guide, we’ll walk you through how to replace your kitchen faucet with a single handle—emphasizing simplicity, effectiveness, and the satisfaction of doing it yourself.
What You Need to Know Before Replacing Your
Start with size. Measure the existing cutout, cabinet width, and depth to the back wall. Most base cabinets fit 25–33 in. sinks; larger units need a 36 in. cabinet. Check bowl depth (8–10 in.) so drawers and disposal still clear.
Choose a type. Drop-in is forgiving. Undermount needs a solid countertop and careful support. Stainless (16–18 gauge) resists chips; fireclay and cast iron are heavier and need bracing. Match faucet holes, accessories, and dispenser locations.
Plan the plumbing. Shut off valves should work and be accessible. Confirm the drain center and height; P-trap, disposal, and dishwasher tailpiece must align. Replace old supplies, basket strainers (3½-in.), and gaskets. Use 100% silicone for rims; plumber’s putty only where the manufacturer allows.
Mind structure and finish. Heavy sinks may exceed countertop span without rails. Seal bare stone. For wood counters, add a waterproof sleeve and maintain caulk.
Budget time and parts. Have a new strainer, putty or silicone, tape, supply lines, and a quality adhesive. Expect two people to lift safely. Photograph each step.
Know when to call a pro. If the wall is out of plumb, valves leak, or you need to move drains or cut stone, hire a licensed plumber today.
Single-Handle Kitchen Faucet
Before diving into the project, it’s essential to understand the Choosing Cookware Sets advantages and key reasons to replace your kitchen faucet.
Benefits of Replacing a Kitchen Faucet with a Single Handle
A single-handle faucet is a popular choice for many kitchens due to its efficiency and modern design. Here are a few reasons why you should consider upgrading to one:
- Space-Saving Design: A single handle takes up less space on the countertop and provides a cleaner, more streamlined look compared to dual-handle faucets.
- Easy Water Temperature and Flow Control: With a single handle, controlling both the water temperature and flow becomes effortless. Turn it one way for hot, the other for cold, and adjust the flow with ease.
- Modern, Sleek Appearance: Single-handle faucets have a contemporary design that enhances the look of your kitchen. They are available in a variety of finishes to match any decor.
When to Replace Your Faucet
Knowing when it’s time to replace your faucet can save you from unnecessary frustration and repair costs. Here are some signs to look out for:
- Leaking Faucet: If your faucet drips even when turned off, it’s time for a replacement.
- Rust and Corrosion: Over time, mineral deposits and exposure to water can cause rust and corrosion, making the faucet unsightly and inefficient.
- Inefficient Water Flow: If your faucet isn’t delivering enough water pressure or has an inconsistent flow, replacing it could solve this issue.
- Outdated Look: If your faucet looks old or doesn’t match the modern style of your kitchen, it’s an easy fix to upgrade to something new.
Tools and Materials You’ll Need
Before you start replacing your faucet, you’ll need to gather the right tools and materials. Here’s what you’ll need for a successful installation:
Basic Tools Required
- Adjustable Wrench: Ideal for loosening and tightening nuts and bolts.
- Basin Wrench: This tool is essential for tight spaces, particularly when removing the nuts that hold your faucet in place.
- Screwdriver: For loosening screws on the faucet.
- Plumber’s Tape: Helps prevent leaks by sealing threaded connections.
- Pipe Wrench (Optional): In case you need to remove stubborn water lines.
Additional Materials
- New Single-Handle Faucet: Choose a faucet that suits your style and fits your sink configuration.
- Faucet Supply Lines (If Needed): New supply lines are often necessary when installing a new faucet.
- Silicone Caulk or Plumber’s Putty: Helps create a watertight seal around the base of the faucet.
- Towel or Sponge: To wipe down and clean the area.
Step-by-Step Instructions to Replace Your Kitchen Faucet
Now that you’ve got your tools ready, it’s time to replace your old faucet with a shiny new single-handle one. Follow these steps carefully for a smooth installation:
Step 1 – Turn Off the Water Supply
Before you begin, you need to turn off the water supply to avoid flooding your kitchen:
- Locate and turn off the water valves under the sink. Usually, there are two valves—one for hot water and one for cold water.
- Open the faucet to relieve any remaining pressure in the pipes.
Step 2 – Remove the Old Faucet
Now that the water supply is off, it’s time to remove the old faucet:
- Disconnect the water supply lines from the faucet using your adjustable wrench.
- Loosen the mounting nuts that secure the faucet to the sink. These are usually located underneath the sink.
- Once the nuts are loosened, remove the faucet. You may need to wiggle it a bit if it’s stuck.
- Clean the area around the sink to remove any mineral buildup or debris.
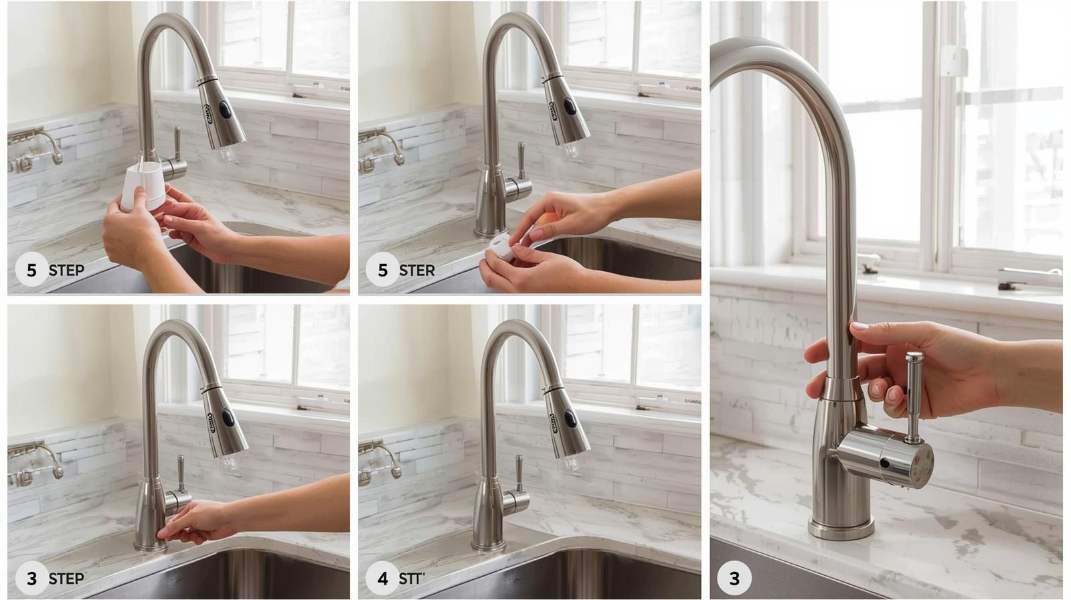
Step 3 – Prepare the New Faucet
Before installing the new faucet, make sure it’s ready for installation:
- Apply plumber’s putty or silicone caulk around the base of the new faucet. This will create a watertight seal and prevent leaks.
- Attach the mounting hardware to the new faucet as instructed by the manufacturer. Make sure everything is secure but not too tight, as this could damage the faucet.
Step 4 – Install the New Faucet
Now that the faucet is prepped, you can install it into place:
- Position the new faucet over the hole in the sink.
- Secure the faucet with the mounting nuts. If space is tight, you may need to use a basin wrench to reach the nuts.
- Tighten the nuts until the faucet is firmly in place, but be careful not to over-tighten.
Step 5 – Connect the Water Supply Lines
Once the faucet is installed, it’s time to reconnect the water supply lines:
- Attach the hot and cold water supply lines to the new faucet. Tighten the connections with an adjustable wrench.
- If needed, use plumber’s tape on the threads to ensure a tight, leak-free connection.
Step 6 – Turn On the Water and Test
Finally, it’s time to test your new faucet:
- Slowly open the water supply valves to restore water flow.
- Test the faucet to ensure the water flow is smooth and the temperature adjusts properly. Check for any leaks around the base and supply lines.
Common Mistakes to Avoid During Faucet Replacement
When replacing a faucet, it’s easy to make mistakes that could lead to leaks or inefficient operation. Here are some common pitfalls to avoid:
Over-tightening Connections
While it might seem like a good idea to tighten everything as much as possible, over-tightening can damage components and lead to leaks. Tighten the connections just enough to secure them without applying excessive force.
Not Using Plumber’s Tape on Threads
Plumber’s tape is crucial for ensuring a leak-free connection. If you skip this step, you risk water seeping through the threads, leading to leaks.
Forgetting to Clean the Area Before Installation
A clean, dry surface is essential for a secure fit. Always wipe down the area around the faucet base before installation to ensure a tight seal and avoid water damage.
Tips for Maintaining Your New Single Handle Kitchen Faucet
Once your faucet is installed, regular maintenance is key to keeping it in good working condition:
Regular Cleaning and Maintenance
- Clean mineral buildup: Over time, mineral deposits can accumulate on the faucet. Use vinegar or a mild cleaner to keep the faucet clean and free of buildup.
- Smooth handle operation: Regularly clean the handle to ensure smooth movement and avoid it becoming stiff or difficult to operate.
How to Prevent Leaks
- Ensure tight, secure connections: Check the water supply lines and faucet connections regularly to prevent leaks.
- Inspect for signs of wear: Periodically check the faucet and surrounding areas for signs of damage or wear.
How to Choose the Best Single Handle Kitchen Faucet for Your Home
Selecting the right faucet for your kitchen is important, both for functionality and style. Here are a few things to consider when choosing a new faucet:
Factors to Consider
- Material and Finish Options: Choose a faucet that complements your kitchen’s design. Popular finishes include brushed nickel, chrome, and matte black.
- Spout Height and Reach: Make sure the faucet spout is tall enough to accommodate your sink size and make washing large pots easier.
- Water Flow Rate and Efficiency: Look for faucets with a good water flow rate while maintaining efficiency to save on water bills.
Popular Brands and Models
Some top-rated brands for single-handle faucets include:
- Delta Faucet
- Moen
- Kohler
- American Standard
These brands offer a variety of high-quality faucets with different styles, features, and price points.
FAQ:
How long does it take to replace a kitchen faucet?
Typically, the process takes about 1-2 hours, depending on your experience and the condition of the old faucet.
Do I need professional help to replace my faucet?
No, replacing a faucet is a DIY-friendly task if you have the right tools and follow the instructions.
Can I replace a kitchen faucet without turning off the water supply?
No, it’s essential to turn off the water supply before starting to avoid leaks and potential flooding.
Why is my new faucet leaking after installation?
Leaking can occur due to loose connections, damaged seals, or improper installation. Double-check all connections and seals for tightness.
How do I know if my new faucet will fit?
Make sure to measure the faucet dimensions and compare them with the hole configuration and space available in your sink.
Conclusion
Replacing your kitchen faucet with a single-handle model is an easy and rewarding task that can significantly improve your kitchen’s functionality and style. By following the simple steps outlined in this guide, you can complete the job in just a few hours, saving money and gaining satisfaction from a job well done.
Ready to replace your faucet? Follow this guide for a simple installation, and enjoy a brand-new look and functionality in your kitchen!