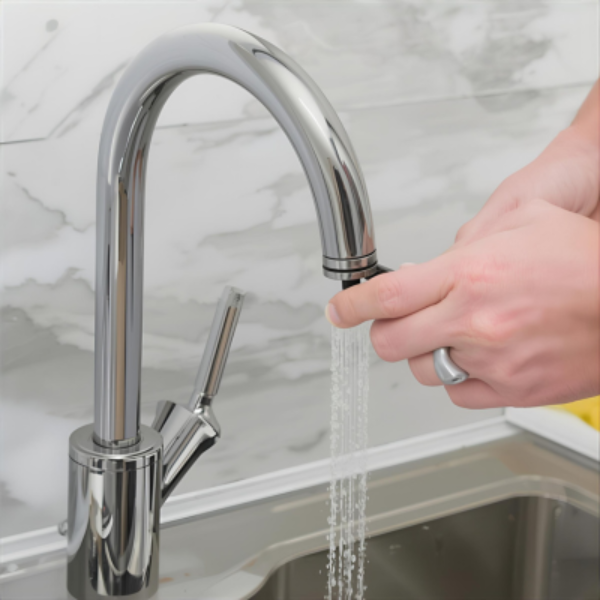
If you’ve ever had your kitchen side sprayer thumb control come loose or break, you know how frustrating it can be. A malfunctioning thumb control can disrupt the water flow, making it difficult to control the sprayer, whether you’re cleaning dishes, rinsing produce, or washing the sink. Not only is it inconvenient, but it can also make you feel like your kitchen is out of order.
But don’t worry! Fixing a loose or broken thumb control is a manageable task. In this step-by-step guide, I’ll walk you through how to reattach the thumb control, restore your sprayer to full working order, and keep everything functioning smoothly.
Understanding the Kitchen Side Sprayer Thumb Control
What is a Kitchen Side Sprayer Thumb Control?
A kitchen side sprayer is an essential tool in many homes, used for tasks like rinsing dishes, cleaning vegetables, and even washing out the sink. The thumb control is the small lever that allows you to control the water flow—press it to activate the water, and Kitchen Appliances for Small Homes release to stop it.
This design is meant to be convenient, allowing you to operate the sprayer with just one hand, making it easier for multitasking in the kitchen. Over time, however, the thumb control can become loose or break, especially with frequent use or prolonged exposure to water and detergents.
Why Do Thumb Controls Come Loose or Break?
There are several common causes for a malfunctioning thumb control. Most often, wear and tear is to blame, as frequent use can loosen or break the components over time. Other causes may include:
- Accidental impacts: Dropping the sprayer or bumping it can loosen the control mechanism.
- Improper installation: Sometimes, the thumb control wasn’t installed properly, leading to looseness.
- Prolonged exposure: The combination of water, detergent, and constant use can weaken seals or connections inside the sprayer.
These factors can cause the thumb control to malfunction, leaving you with a non-functional sprayer.

Tools and Materials You’ll Need to Reattach the Thumb Control
Before you get started, make sure you have the necessary tools to do the job right. While this is a relatively simple repair, having the right materials will make the process smoother.
Basic Tools Required
- Screwdriver: You’ll need either a flathead or Phillips screwdriver, depending on your sprayer model.
- Pliers or adjustable wrench: These are useful for tightening or loosening connections.
- Replacement parts: If necessary, have screws, washers, or other small parts on hand to replace damaged components.
- Teflon tape: If re-sealing the connection, Teflon tape will help create a tight seal.
Optional Tools for Complex Repairs
- Socket set or wrench: This is used to tighten hard-to-reach connections or if multiple parts are involved.
- Rubber gasket or silicone: If re-sealing is necessary, these materials can help prevent leaks after reattaching the thumb control.
Step-by-Step Guide to Reattaching the Kitchen Side Sprayer Thumb Control
Now that you have your tools ready, let’s dive into the actual process of reattaching the thumb control. With a little patience, you’ll have your sprayer working like new in no time!
Step 1: Turn Off the Water Supply
Before starting any repairs, always turn off the water supply to avoid any accidents or leaks while working on the sprayer. Here’s how to do it:
- Locate the water shutoff valves under your kitchen sink (usually, they are beneath the cabinet).
- Turn the valves clockwise to stop the water flow. Once the valves are closed, you can safely work on your sprayer.
- You might also want to press the sprayer’s thumb control a few times to relieve any remaining water pressure in the system.
Step 2: Disconnect the Side Sprayer Hose
With the water supply off, the next step is to disconnect the side sprayer hose from the unit. This will give you access to the thumb control mechanism.
- Unscrew the hose from the sprayer unit carefully using a wrench or pliers.
- Be gentle when handling the hose to avoid damaging it or the connections. Inspect the hose for any wear or damage while it’s detached.
Step 3: Inspect the Thumb Control and the Mechanism
Once you’ve disconnected the hose, take a moment to inspect the thumb control and the internal mechanism.
- Check the thumb control to see if it is completely detached or if it’s just loose.
- Inspect the internal components, looking for any broken parts, worn-out seals, or damaged screws. If any of these parts appear damaged or worn out, you may need to replace them.
- If the thumb control mechanism is intact, ensure everything is in the correct position before reattaching.
Step 4: Reattach the Thumb Control to the Sprayer
Once everything looks good, it’s time to reattach the thumb control. Depending on your sprayer model, you’ll either snap the control back into place or secure it with screws.
- Align the thumb control properly with the mechanism and make sure it clicks or screws in tightly.
- If you’re using screws, tighten them carefully but not too tightly to avoid over-tightening or stripping the threads.
Ensure the thumb control is securely in place, and check that it operates smoothly without any wobbles or loose parts.
Step 5: Reconnect the Side Sprayer Hose
Next, reconnect the sprayer hose to the unit. Here’s how:
- Position the hose’s connection at the sprayer unit and screw it back in securely.
- Use pliers or a wrench to tighten the connection, but be careful not to overtighten it. Tighten just enough to create a secure seal.
- If needed, use Teflon tape around the threads of the connection to prevent leaks.
Step 6: Turn the Water Supply Back On
Once the thumb control is reattached and the hose is secured, you can turn the water supply back on.
- Slowly turn the water valves counterclockwise to allow the water to flow.
- Test the sprayer by pressing the thumb control to ensure it’s functioning properly. Check for any leaks around the connection or thumb control.
- If the sprayer works fine and there are no leaks, you’ve successfully completed the repair!
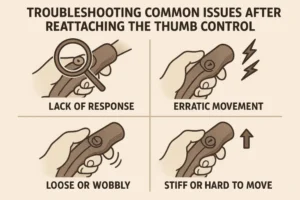
Troubleshooting Common Issues After Reattaching the Thumb Control
While the repair should be straightforward, issues may persist sometimes. Here’s how to troubleshoot common problems after reattaching the thumb control.
Sprayer Still Leaking
If you notice water leaking around the thumb control or connection:
- Check the seals: Worn or damaged seals are a common cause of leaks. Replacing the seals often solves this problem.
- Tighten the connections: Sometimes, leaks happen if the hose isn’t tightened enough. Try tightening the connection slightly using pliers or a wrench.
Thumb Control Not Responding Properly
If the thumb control isn’t working as expected:
- Check for blockages: Sometimes, debris or mineral build-up inside the sprayer can block the flow of water.
- Inspect the internal mechanism: If the internal mechanism is damaged, you may need to replace the thumb control or the entire sprayer unit.
Difficulty Tightening Connections
If you find it difficult to tighten the connections:
- Use Teflon tape: Wrap a small amount of Teflon tape around the threads of the connection before reattaching the hose. This helps create a tighter seal.
- Rubber gaskets: If you’re still having issues, consider adding a rubber gasket or silicone to improve the seal.
How to Prevent Future Issues with the Kitchen Side Sprayer Thumb Control
Once you’ve successfully reattached the thumb control, here are some tips for preventing future issues:
Regular Cleaning and Maintenance
- Clean the sprayer and thumb control regularly to prevent build-up of dirt, minerals, and debris.
- Use mild soap and warm water to wipe down the sprayer and thumb control, keeping the mechanism free from blockages.
Periodic Inspections
- Check the sprayer for any loose parts, damage, or leaks every few months to catch issues before they become bigger problems.
Tightening Connections Over Time
- Periodically check the connections to ensure they remain tight and leak-free. Over time, some connections may loosen due to wear, so keeping an eye on them can prevent future malfunctions.
When to Call a Professional
While most repairs are easy to handle yourself, some situations may require professional assistance.
Persistent Leaks or Malfunctions
If the sprayer continues to leak or malfunctions despite your efforts, it’s time to call a plumber. They can help diagnose and fix internal issues that you may not be able to address yourself.
Unsuccessful DIY Repairs
If your DIY attempts have made the situation worse, or if you can’t identify the source of the issue, a professional will be able to fix the problem quickly and efficiently.
FAQ
Q1: Can I use any type of sprayer thumb control for my kitchen side sprayer?
No, thumb controls are usually designed for specific sprayer models. It’s important to get the correct replacement part based on your sprayer’s brand and model.
Q2: What if the thumb control is broken and can’t be reattached?
If the thumb control is damaged beyond repair, you will need to replace it with a new one. Check your sprayer’s manual or consult with the manufacturer for compatible parts.
Q3: How do I know if my sprayer’s internal mechanism is broken?
If the sprayer continues to leak or the thumb control does not operate smoothly even after reattachment, there may be an internal issue. In this case, it’s best to replace the mechanism or call a professional.
Q4: Should I replace the hose when reattaching the thumb control?
If the hose is in good condition and not cracked or leaking, there’s no need to replace it. However, if you notice any wear or damage, it’s advisable to replace the hose as well.
Q5: Can I use plumbing tape to seal leaks around the sprayer connection?
Yes, Teflon or plumbing tape can help seal leaks around the connection, providing a tighter fit. Ensure you wrap it around the threads carefully before reconnecting.
Q6: How often should I check the kitchen sprayer for issues?
It’s a good idea to inspect your kitchen sprayer every 6 months to ensure it’s working properly. Regular cleaning and checking for wear and tear can extend its lifespan.
Conclusion
Reattaching a kitchen side sprayer thumb control is a straightforward process with the right tools and a little patience. By following the steps outlined in this guide, you can easily restore your sprayer to full functionality. Regular maintenance and careful handling can help prevent future issues and ensure that your kitchen sprayer continues to serve you well.
So, grab your tools, follow the guide, and enjoy a fully functional kitchen sprayer!