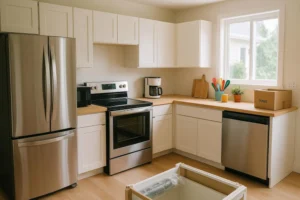
If you’ve ever looked at your kitchen and thought it could use an upgrade, you’re not alone. Kitchen units play a crucial role in the functionality and aesthetics of the space. The good news? Installing kitchen units yourself can save you a significant amount of money and give you a sense of accomplishment.
Why do people choose to install kitchen units themselves? Simple: it’s cost-effective, and there’s a certain satisfaction in doing things yourself. With the right tools, a little patience, and the right guidance, you can have your kitchen looking brand new without hiring an expensive professional.
This guide will walk you through the entire process—from the tools you’ll need to the final touches. Whether you’re a complete beginner or just looking for some pointers, we’ve got you covered. Let’s dive into the basics of installing kitchen units.
Tools and Materials You’ll Need to Install Kitchen Units
Before you begin the installation process, it’s essential to gather all the necessary tools and materials. Trust me, there’s nothing more frustrating Cleaning Guide for Home & Kitchen than halfway through a project, only to realize you’re missing a key tool.
Essential Tools:
- Tape Measure – Accurate measurements are key to a successful installation. A tape measure ensures that everything fits perfectly.
- Spirit Level – This tool helps ensure your cabinets are aligned properly. A slight tilt can make everything look uneven and sloppy.
- Drill – Used for creating pilot holes and driving screws into the wall and cabinets. Make sure it has adjustable speed settings.
- Screwdrivers – A set of both flathead and Phillips screwdrivers will come in handy for various tasks.
- Screws and Brackets – These are used to secure your cabinets to the wall and connect units together. Make sure you choose screws of the correct size and type.
Materials You’ll Need:
- Kitchen Unit Frames – These are the skeletons of your cabinets. Make sure they’re sturdy and match the style you want.
- Panels – These are used for the front of your units, often referred to as the doors or drawer fronts.
- Hinges – Essential for attaching cabinet doors.
- Handles – For opening and closing doors/drawers.
Optional Tools for Advanced Installation:
- Circular Saw or Jigsaw – If you need to cut panels or units to fit your space, these tools will come in handy.
- Stud Finder – Used to locate studs behind the wall for secure anchoring.
Now that we’ve covered the basics, let’s move on to preparing your kitchen for installation.
Preparing Your Kitchen Space for Installation
The preparation phase is just as important as the installation itself. Taking the time to measure accurately and clear your work area will make the installation process much smoother.
1. Measuring the Space
Accurate measurements are crucial. Here’s how to do it:
- Measure the walls – Start by measuring the height, width, and depth of the wall area where you’ll be installing the cabinets. Double-check for any irregularities in the wall shape.
- Measure the floor area – Ensure your base units sit perfectly level, so measure the distance from the floor to the ceiling at various points to ensure the floor is even.
- Check for uneven surfaces – If your floors or walls are slightly uneven, consider using a shim to balance the units during installation.
2. Clearing the Area
Before installing your kitchen units, it’s essential to clear the area of any old cabinets, appliances, or fixtures. Remove any clutter, and ensure the area is safe to work in. You don’t want anything in the way while you’re handling heavy units.
3. Check for Plumbing and Electrical Obstacles
If you’re installing units that require plumbing or electrical work, check for any existing plumbing pipes, electrical outlets, or wires. It’s critical to make sure you don’t accidentally drill into something you shouldn’t. If you’re unsure about the location of pipes or wires, consult a professional to avoid potential damage or hazards.
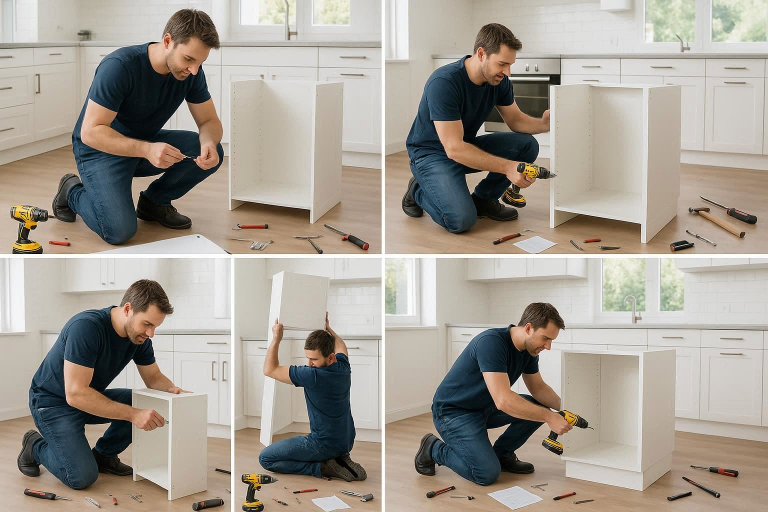
Step-by-Step Guide on How to Install Kitchen Units
Now, let’s get to the good stuff: the installation! Here’s a breakdown of each step you’ll need to follow to install kitchen units like a pro.
Step 1: Start with the Base Cabinets
Your base cabinets are the foundation for the rest of the units, so start by positioning them properly.
- Position and Align the First Unit – Use your tape measure and spirit level to ensure the first cabinet is correctly placed. It’s essential to leave a small gap between the units and the wall for easy adjustment later.
- Fixing the Base Unit to the Wall and Floor – Drill pilot holes into the wall, making sure to hit the studs for secure attachment. Use the appropriate screws to secure the cabinet. If the base unit is adjustable, make sure it’s perfectly level before tightening.
Step 2: Install the Wall Cabinets
Next, you’ll want to tackle the wall cabinets, which are usually installed above the base units.
- Secure Wall Units – Using the same method as with the base units, use a drill and screws to secure the cabinets to the wall studs.
- Level and Align – Double-check the alignment of the wall cabinets. You don’t want them crooked or uneven, so take your time and adjust as necessary.
Step 3: Join the Units Together
Once the base and wall cabinets are installed, it’s time to connect the units.
- Secure the Units Together – Use screws or brackets to attach the base and wall units. This ensures that the entire setup is sturdy and doesn’t shift over time.
- Adjust Gaps for a Seamless Fit – Sometimes the units might not fit perfectly. Take a moment to adjust any gaps between the units, ensuring they are as seamless as possible.
Step 4: Installing Doors and Drawers
Once the frames are up, it’s time to install the doors and drawers.
- Attach Hinges to Doors – Install the hinges on the doors first. Ensure that they open and close smoothly.
- Install Drawer Systems – If your units include drawers, follow the manufacturer’s instructions to install the drawer slides and align the drawers with the cabinet.
- Adjust Hinges – After attaching the doors, use a screwdriver to make adjustments for perfect alignment.
Step 5: Final Adjustments and Finishing Touches
Before calling it a day, make a few final adjustments.
- Check the Alignment and Stability – Ensure all cabinets are level and securely attached to both the wall and floor.
- Install Handles, Knobs, and Final Hardware – Attach the handles or knobs to the doors and drawers for easy use.
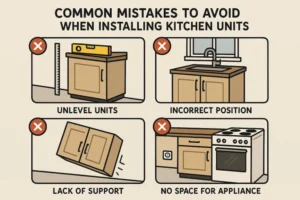
Common Mistakes to Avoid When Installing Kitchen Units
Even though it seems like a straightforward process, it’s easy to make mistakes. Here are some common pitfalls to watch out for:
1. Rushing the Measurement Process
Taking your time with measurements is crucial. A small error can throw off the entire installation, making your cabinets look out of place or even unusable.
2. Not Checking for Level During Installation
A small misalignment can make your cabinets look crooked. Use your spirit level at every stage to make sure everything is perfectly aligned.
3. Skipping Anchor Points and Reinforcements
Ensure each unit is securely anchored to the wall, especially for heavier cabinets. If you skip this step, your units might not be stable and could even fall.
How Long Does It Take to Install Kitchen Units?
The time it takes to install kitchen units depends on several factors, including the size of your kitchen, your experience level, and the complexity of the installation.
- Small Kitchen (1-2 days): If you’re installing just a few units in a small kitchen, you can typically complete the job in 1-2 days.
- Medium Kitchen (2-4 days): Installing a full set of kitchen units with a few additional cabinets might take about 2-4 days.
- Large Kitchen (4-6 days): A larger kitchen with many units and intricate details could take anywhere from 4-6 days.
Do You Need Professional Help to Install Kitchen Units?
You might be wondering if you should hire a professional or go the DIY route. Here’s a breakdown:
- DIY Pros: You’ll save money and have complete control over the design and installation.
- DIY Cons: It takes time, and mistakes can happen. However, with the right guidance, it’s entirely possible to install the units yourself.
- Professional Help: If you’re unsure about your abilities, or if the installation involves complex plumbing or electrical work, hiring a professional might be the best route.
Maintenance Tips After Installation
Once your kitchen units are installed, you’ll want to maintain them to ensure they last for years.
- Regular Cleaning – Wipe down surfaces regularly to prevent the buildup of dirt, grease, and grime.
- Avoid Water Damage – Never leave standing water on the kitchen units, as it can cause the wood to warp or discolor.
- Check for Loose Fixtures – Over time, screws and brackets can loosen. Make sure everything is tight and secure every few months.
FAQs
Q1: How much does it cost to install kitchen units?
The cost depends on whether you’re doing it yourself or hiring a professional. DIY costs mainly include tools and materials, which could range from $500 to $2,000. Professional installation can cost anywhere from $2,000 to $5,000, depending on the complexity.
Q2: Can I install kitchen units by myself if I’ve never done it before?
Yes, but be prepared for a learning curve. With patience, the right tools, and a clear guide, anyone can install kitchen units, even with no prior experience.
Q3: How do I align my kitchen units perfectly?
Use a spirit level at every stage to ensure your units are aligned correctly. Also, double-check measurements and make small adjustments as needed.
Q4: How do I fix kitchen units to the wall securely?
Use a drill to screw your units into wall studs. Use heavy-duty screws and wall anchors to ensure stability.
Q5: Can I install kitchen units over existing cabinets?
It’s possible, but not recommended. Installing over old cabinets might cause uneven surfaces and could result in poor structural integrity.
Q6: How do I adjust the doors on kitchen units?
You can adjust the hinges by loosening the screws and moving the door to the desired position.
Conclusion
Installing kitchen units yourself may seem daunting at first, but with the right preparation and patience, it’s completely doable. Take your time, measure carefully, and follow the steps in this guide to ensure your kitchen turns out beautifully.
Remember, the satisfaction of completing a DIY project is unmatched. By sticking to a well-organised plan, you can have a kitchen that not only functions perfectly but looks fantastic as well.