Installing a kitchen sink drain may seem like a complicated task, but with the right tools and a little know-how, it’s a manageable DIY project for most homeowners. A well-installed kitchen sink drain not only ensures water flows smoothly away from your sink but also helps avoid costly plumbing problems in the future. In this guide, we’ll walk you through the steps to install your kitchen sink drain, saving you time and money while giving you full control over the process.
Benefits of Installing the Drain Yourself
Installing the drain yourself can save you a significant amount on labor costs, and it gives you the satisfaction of knowing the job is done right. It’s also a great way to understand how your kitchen plumbing works. Additionally, you’ll have control over the installation process and can ensure everything is properly aligned to avoid leaks or future problems.
Now, you may wonder if you can handle this on your own. Don’t worry – we’ll break it down for you. You’ll need a few tools, and although the difficulty level is moderate, anyone with basic DIY skills should be able to handle it. Let’s dive in!
Tools and Materials You’ll Need
Before you get started, gather these essential tools and materials:
Wrenches and Pipe Cutters
Wrenches are crucial for tightening your pipes and ensuring a secure fit. A pipe cutter is used for cutting PVC pipes to the correct length.
Plumber’s Tape
Plumber’s tape (also known as Teflon tape) is essential Cleaning Guide for Home & Kitchen for sealing connections and preventing leaks. It’s particularly useful for threaded connections, where water might otherwise leak.
Adjustable Pliers
These pliers will come in handy for securing the drain assembly and tightening connections that require extra grip.
PVC Pipes and Fittings
PVC pipes are a popular choice for kitchen sink drain systems. They’re affordable, durable, and easy to work with. You’ll need several pieces, including the main drain pipe and any necessary fittings.
Bucket and Towels
You may encounter a small amount of leftover water when disconnecting the old drain, so it’s a good idea to have a bucket handy to catch any spills and towels for cleanup.
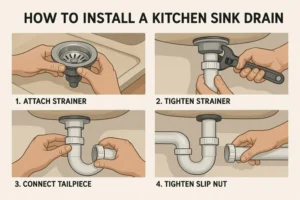
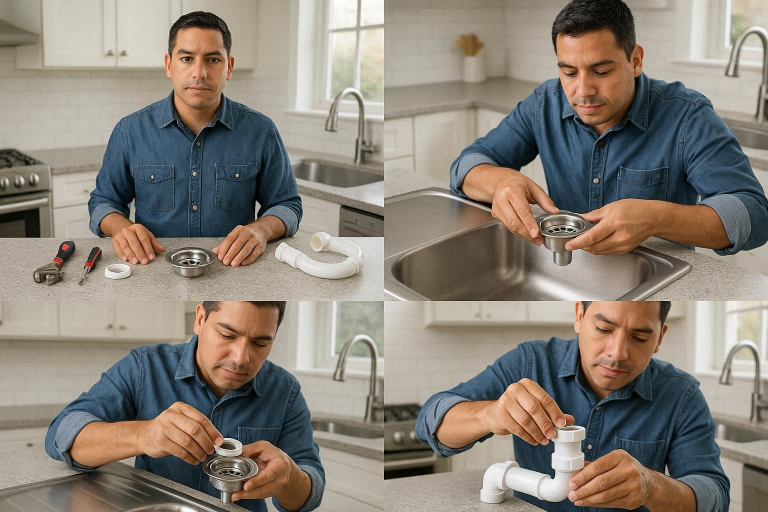
Step-by-Step Guide to Installing a Kitchen Sink Drain
1. Turn Off the Water Supply
Before you start, always turn off the water supply to your sink. This is the first and most important step to avoid accidental flooding or leaks while you’re working. Locate the shut-off valve under the sink and turn it clockwise until it’s fully closed. Ensure that both hot and cold water lines are turned off.
2. Remove the Old Drain (If Replacing)
If you’re replacing an old drain, the first step is to disconnect the existing drain. Use a wrench to loosen the nut that connects the drain to the sink. You may also need to disconnect the drainpipe and the P-trap, if they are part of the system. Once the parts are loose, remove them carefully, and clean the sink area to prepare for the new installation.
Pro Tip: Place a towel or bucket under the sink to catch any remaining water.
3. Install the Drain Flange
Now, it’s time to install the drain flange, which is the part that sits in the sink and connects to the drain pipe. First, apply a small amount of plumber’s putty around the rim of the flange to create a seal. Press the flange firmly into place, making sure it sits snugly. The putty will help prevent any water from leaking around the flange. Once it’s in position, secure it with the retaining nut under the sink.
Tip: Be sure to wipe off any excess plumber’s putty that squeezes out during installation.
4. Attach the Drain Pipe
Next, connect the drain pipe to the flange. The drain pipe is typically a PVC pipe, which you can easily cut to the correct length if needed. Attach one end of the pipe to the flange and the other to the P-trap or waste pipe, depending on your setup.
Use the adjustable pliers to tighten the connections, ensuring they are snug but not over-tightened, which can damage the pipes. Don’t forget to wrap plumber’s tape around the threaded connections to prevent leaks.
5. Install the P-Trap
The P-trap is a U-shaped pipe that prevents odors from coming up through the drain. It’s a crucial part of the kitchen sink drain system. Install the P-trap by connecting one side to the drain pipe and the other side to the waste line or drain pipe that leads to the home’s plumbing system.
Ensure that the P-trap is properly aligned and that all the fittings are tightened securely. The trap should have a slight downward slope to allow water to flow freely.
6. Connect the Drain to the Waste Line
Now that the P-trap is installed, connect the other end to the waste line. This is the part of the drain that leads to the home’s main sewer system. Ensure that all connections are aligned properly, and tighten the fittings as needed. Again, plumber’s tape will help ensure a tight, leak-proof seal.
7. Check for Leaks
With everything connected, it’s time to test the installation. Turn the water supply back on, and run water through the drain. Check the entire system for leaks, starting from the drain flange to the connections under the sink. If you spot any leaks, tighten the connections and double-check the plumber’s tape.
Tip: It’s better to be thorough with leak checks before you finish the job to avoid water damage later.
Common Mistakes to Avoid When Installing a Kitchen Sink Drain
While installing a kitchen sink drain is a manageable task, there are some common mistakes you’ll want to avoid:
Improperly Tightening Connections
Over-tightening or under-tightening connections can cause leaks or damage the pipes. Be firm but careful when tightening fittings to avoid damaging the threads.
Not Using Plumber’s Tape
Failing to use plumber’s tape on threaded connections can lead to slow leaks over time. Make sure you wrap the tape tightly around the threads before securing the fittings.
Installing the Drain Without Ensuring Proper Alignment
Alignment is critical. Make sure that the drain pipes are straight and the connections are flush. If your drain pipes are crooked, it can lead to poor water flow and leaks.
Using the Wrong Type of Drain Pipe Material
Different plumbing systems require different materials. Be sure to use PVC pipes, as they are commonly used in kitchen sink drains. Using incompatible materials can lead to issues with durability and sealing.
Tips for Maintaining Your Kitchen Sink Drain
Once your drain is installed, regular maintenance is key to ensuring it functions properly:
- Clean Regularly: Avoid clogs by cleaning your drain regularly. Pouring a mixture of baking soda and vinegar down the drain is a natural way to keep it clear.
- Avoid Grease and Food Scraps: Never pour grease or large food scraps down the drain. These can build up and create clogs.
- Check Connections Periodically: Every few months, inspect the drain connections for leaks. Tighten them if necessary to prevent water damage.
When to Call a Professional
While installing a kitchen sink drain is a task many DIYers can handle, there are times when it’s best to call a professional plumber. Some situations where you might need expert help include:
- Misalignment of Pipes: If the pipes aren’t aligning properly or the drain won’t fit as it should, a professional can fix the issue.
- Persistent Leaks: If you’ve checked all the connections and still have leaks, it may be time to consult a plumber to prevent damage to your cabinets or floors.
- Old Plumbing: If your home has old plumbing or complex piping, it might be safer and more efficient to have a professional handle the installation.
FAQ
How long does it take to install a kitchen sink drain?
Typically, the installation takes 1-2 hours, depending on your experience and the complexity of your kitchen setup.
Do I need special tools to install a kitchen sink drain?
You’ll need basic plumbing tools such as adjustable wrenches, pipe cutters, and plumber’s tape.
Can I install a kitchen sink drain myself?
Yes, with the right tools and instructions, you can certainly install a kitchen sink drain as a DIY project.
What if my drain keeps leaking after installation?
Check all connections for tightness, and ensure you’ve used plumber’s tape. Re-tighten any loose fittings and re-test the system.
Can I install a new drain if my sink is already in place?
Yes, you can install the drain without removing the sink, but it may be more challenging to access the plumbing connections under the sink.
What materials should I use for a kitchen sink drain?
PVC pipes and fittings are the best choice for kitchen sink drains due to their affordability and ease of installation.
Conclusion
A well-installed kitchen sink drain is crucial for the smooth functioning of your kitchen. With the right tools, some patience, and a little know-how, you can save money and take pride in completing the installation yourself. If you encounter any challenges, don’t hesitate to call a professional plumber for help.
Ready to tackle more plumbing projects? Explore our other DIY guides on home plumbing or contact an expert if you need assistance. Happy plumbing!