Kitchen cabinets are the backbone of a well-organized kitchen, providing essential storage and enhancing the overall aesthetic of the space. Whether you’re remodeling or just looking to update your kitchen, installing new cabinets can make a huge difference. The idea of DIY cabinet installation might seem daunting, but with the right tools, preparation, and technique, it can be a rewarding experience that saves you money.
In this guide, we’ll take you through everything you need to know about installing kitchen cabinets like a pro. From gathering the right tools to the finishing touches, you’ll learn the entire Ideas for Kitchen and Living Room process in detail. Ready to transform your kitchen? Let’s dive in!
Preparing for Kitchen Cabinet Installation
Understanding the Tools You’ll Need
Before you begin, it’s important to gather the right tools to ensure a smooth installation process. Here’s a list of the essential tools you’ll need:
- Measuring tape: Accurate measurements are crucial for fitting cabinets properly.
- Level: A level ensures your cabinets are installed straight, avoiding any crooked cabinets.
- Drill: A cordless drill is essential for drilling holes for screws and other fasteners.
- Screws: Use long screws to anchor your cabinets to the wall securely.
- Cabinet brackets: These help support the cabinets as you secure them to the wall.
- Shims: Shims help you level the cabinets if the floor or wall isn’t perfectly even.
Measuring Your Kitchen Space for Cabinets
Accurate measurements are critical to ensuring that your cabinets fit perfectly in the designated space. Here’s a step-by-step guide on how to measure:
- Measure the wall space: Start by measuring the width, height, and depth of the wall where the cabinets will be placed. Don’t forget to measure across the entire wall from corner to corner.
- Ceiling height: Measure the distance from the floor to the ceiling to ensure that your upper cabinets will fit.
- Cabinet dimensions: Compare the measurements with your cabinet’s dimensions to ensure they match.
- Account for obstacles: Pay attention to plumbing, electrical outlets, and vents. Ensure your cabinets will not obstruct these.
Choosing the Right Cabinets for Your Space
Selecting the right cabinets is crucial. There are three main types to choose from:
- Stock cabinets: These are pre-manufactured and ready to install. They are the most affordable but offer less customization.
- Semi-custom cabinets: These cabinets allow for some personalization, such as different finishes or sizes, but are still somewhat limited.
- Custom cabinets: Perfect for a completely tailored look, these cabinets are built specifically for your kitchen and design preferences.
When selecting cabinets, consider your kitchen style, available space, and budget. If you’re on a tight budget, ready-to-install or flat-pack cabinets might be the best option, as they offer a balance of affordability and customization.
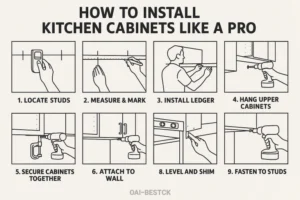
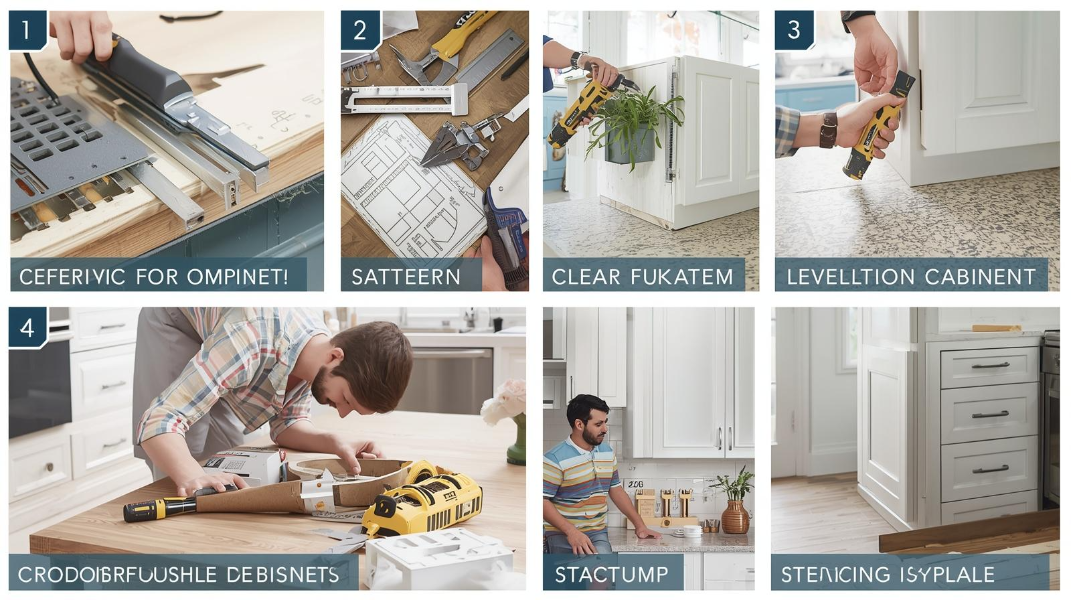
Step-by-Step Guide to Installing Kitchen Cabinets Like a Pro
Marking the Cabinet Layout
The first step in installation is marking the placement of your cabinets on the wall. This will guide where the screws and brackets go. Here’s how to do it:
- Use a pencil to mark a reference line on the wall at the desired height of the cabinets.
- Level the line: Use a level to ensure the line is perfectly straight. This step is crucial, as any tilt will result in crooked cabinets.
- Mark stud locations: Locate the wall studs using a stud finder and mark them on the wall. This is where you’ll secure the cabinets for added stability.
Installing the Upper Cabinets First
It’s always best to start with the upper cabinets before installing the base ones. Here’s how to install them properly:
- Lift the cabinets: With the help of a friend, lift the upper cabinets into position.
- Use a support bracket: Secure the cabinets using a support bracket, which will hold them in place while you work.
- Check the level: Ensure the cabinets are level before fastening them to the wall. This step is essential for a professional finish.
Installing the Base Cabinets
Once the upper cabinets are secure, move on to the base cabinets. Here’s the process:
- Position the base cabinets: Slide the base cabinets into place, making sure they are aligned with the upper cabinets.
- Level the base: Use shims to level the base cabinets. A level tool will help ensure they are perfectly aligned with the upper cabinets.
- Secure the cabinets: Screw the base cabinets into place using the wall studs.
Securing Cabinets Together and to the Wall
To create a seamless and sturdy installation, it’s important to connect the cabinets and fasten them securely to the wall:
- Align the cabinets: Once the base cabinets are in place, align them with the adjacent units.
- Use screws: Screw the cabinets together using cabinet brackets or screws to form a solid unit.
- Anchor to the wall: Ensure each cabinet is fastened securely to the wall studs to prevent movement.
Installing Cabinet Doors and Hardware
The final step is installing the doors and hardware:
- Attach cabinet doors: Use the provided hinges to attach the cabinet doors to the cabinet frames.
- Install handles and knobs: Mark the placement for the handles and knobs, then drill pilot holes for screws.
- Tighten the hardware: Securely attach the handles, knobs, and pulls to complete the look.
Finishing Touches
Installing Cabinet Shelves
Now that your cabinets are installed, it’s time to add shelves. Here’s how:
- Determine shelf height: Adjust the shelves based on your needs, whether you want more space for larger items or a more compact arrangement.
- Secure shelves: Place the shelves into the brackets or secure them with screws to prevent sagging.
Adding Molding and Trim
Molding and trim add a polished, professional look to your cabinets:
- Install crown molding: Crown molding adds a stylish finish at the top of your cabinets. Measure and cut the molding to fit.
- Add baseboard trim: This trim along the bottom of the cabinets helps to hide any gaps between the cabinets and the floor.
Adjusting Cabinet Doors for a Perfect Fit
Even after installation, your cabinet doors may need fine-tuning to align perfectly:
- Adjust hinges: Cabinet doors often require adjustment to achieve a flush, uniform look. Use the hinge adjustments to shift the doors into place.
- Align doors and drawers: Ensure there is even spacing between the cabinet doors and drawers.
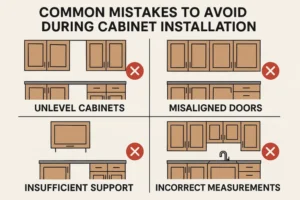
Common Mistakes to Avoid During Cabinet Installation
Overlooking Measurements
Accurate measurements are the foundation of any successful cabinet installation. Always double-check your measurements to avoid costly mistakes. If you’re unsure, it’s better to measure twice and cut once.
Skipping Leveling Steps
Don’t skip the leveling process! Cabinets that aren’t properly leveled will look unprofessional and may cause doors to hang unevenly. Use a level to ensure both the base and upper cabinets are straight.
Neglecting Wall Studs and Secure Fastening
Wall studs are critical for securing your cabinets. Failing to anchor the cabinets properly can lead to dangerous accidents and may cause the cabinets to fall. Always use screws that anchor into wall studs for maximum stability.
FAQ
How Long Does It Take to Install Kitchen Cabinets?
The time it takes to install kitchen cabinets depends on your experience and the complexity of the project. On average, a DIYer can expect to spend 1-3 days installing cabinets. The more help you have, the faster the process will go.
Can I Install Kitchen Cabinets Myself, or Should I Hire a Pro?
If you’re comfortable with basic carpentry and have the right tools, installing cabinets yourself can be a great DIY project. However, if you’re unsure about your skills or the complexity of the cabinets, hiring a professional might be a better option.
What Should I Do if My Cabinets Don’t Fit?
If your cabinets don’t fit, don’t panic. There are a few solutions:
- Modify the cabinets: If your cabinets are too large, you can cut them down to size.
- Use spacers: If the cabinets are too small, add spacers to fill the gap.
How Much Does It Cost to Install Kitchen Cabinets?
The cost of installing kitchen cabinets varies depending on whether you do it yourself or hire a professional. Materials can range from $100 to $500 per cabinet, and professional installation costs between $200 and $500 per cabinet.
Do I Need to Remove My Old Cabinets Before Installing New Ones?
Yes, you’ll need to remove your old cabinets before installing new ones. The removal process is simple and involves disconnecting the cabinets from the wall, unscrewing them, and carefully removing them.
What’s the Best Way to Maintain My Newly Installed Cabinets?
To maintain your cabinets:
- Clean regularly with a mild detergent.
- Avoid harsh chemicals that could damage the finish.
- Protect them from excessive heat and moisture.
Conclusion
Installing kitchen cabinets like a pro isn’t as difficult as it may seem. With the right tools, patience, and attention to detail, you can achieve a flawless cabinet installation that will elevate your kitchen’s look and functionality.
So, grab your tools, follow the steps, and get ready to transform your kitchen with beautiful new cabinets!
Call to Action (CTA)
Have you installed kitchen cabinets before? Share your experiences in the comments below, or ask any questions you might have! If you’re looking for more kitchen design inspiration, check out our other blogs like “How to Choose the Best Kitchen Cabinet Design” or “Top 10 Kitchen Renovation Tips”.
Also, don’t forget to download our free Kitchen Cabinet Installation Checklist to ensure your project runs smoothly!