If you’re looking to upgrade your kitchen, installing a new faucet with a sprayer is an excellent choice. Whether you’re washing dishes, rinsing vegetables, or cleaning up after a meal, a faucet with a sprayer makes the job easier. Not only does it offer more flexibility and convenience, but it also adds a modern touch to your sink area. If you’re considering this upgrade, you’re in the right place! In this guide, we’ll walk you through the process of installing a kitchen sink faucet with a sprayer, so you can complete the job on your own.
By the end of this post, you’ll feel confident tackling the installation yourself, and we’ll cover everything from the tools you’ll need to troubleshooting any issues that may arise. Let’s dive in!
Tools and Materials Needed for Installation
Before diving into the installation, it’s important to gather the necessary tools and materials. Having everything ready ensures a smooth and efficient Healthy Cooking Gadgets process. Here’s what you’ll need:
Basic Tools for Faucet Installation
- Adjustable Wrench: This tool is essential for tightening and loosening the nuts on the faucet base and water lines.
- Basin Wrench: A basin wrench is designed specifically for working in tight spaces under the sink, making it easier to loosen and tighten nuts that secure the faucet.
- Screwdriver (Flathead and Phillips): These will be required to remove any screws, such as those holding the faucet in place or securing the sprayer bracket.
- Plumber’s Tape: Plumber’s tape is used to wrap around threaded connections to prevent leaks. It’s a must-have for ensuring tight, leak-proof connections.
Faucet and Sprayer Components
When you buy a kitchen sink faucet with a sprayer, the kit typically includes:
- The Faucet: The central component of the system.
- The Sprayer: This part provides extra reach for cleaning and rinsing.
- The Hose: A flexible hose that connects the sprayer to the faucet.
- Mounting Hardware: Nuts, bolts, washers, and any other necessary components to secure the faucet to the sink.
It’s also important to check the manufacturer’s instructions to ensure you’re using all the correct components and following the proper procedure for your specific faucet model.
Preparing Your Kitchen Sink Area
Before you get started, it’s crucial to prepare your sink area. The following steps will make the installation process easier and more efficient.
Turn Off the Water Supply
First, locate your water supply valves under the sink. Typically, there are two valves—one for hot water and one for cold water. Turn both valves clockwise to shut off the water supply. This step is crucial to prevent any leaks or water flow during the installation.
Clear the Area Around the Sink
Ensure the area around your sink is clean and free of any obstructions. This not only provides more space to work but also prevents any debris from interfering with the installation. If you’re replacing an old faucet, you’ll need to remove it before installing the new one. To do this, unscrew the nuts and bolts holding the old faucet in place. Be prepared for any leftover water in the pipes to spill out, so have a towel or bucket on hand to catch any drips.
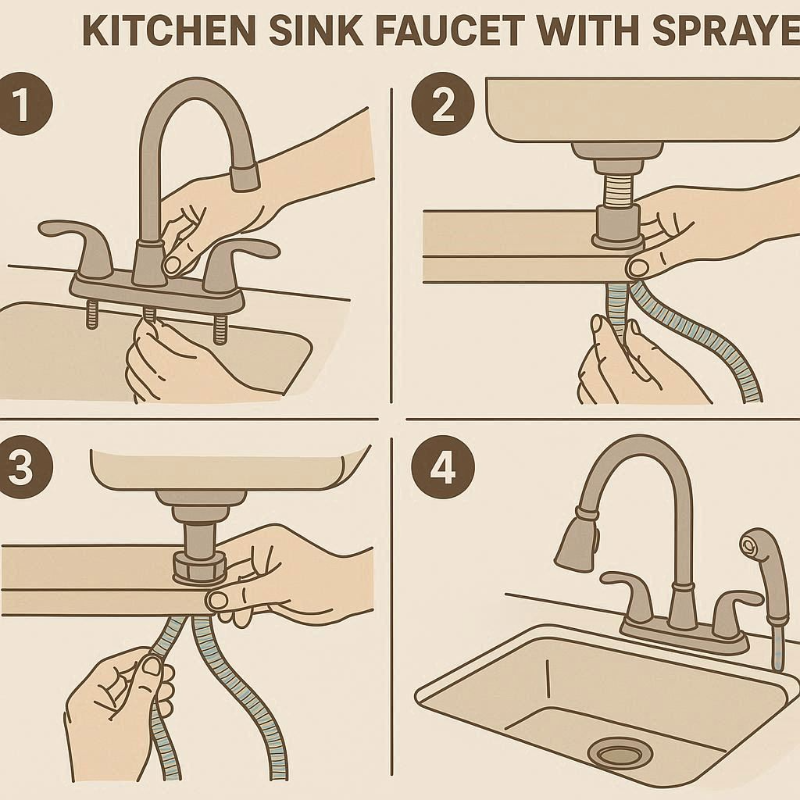
Step-by-Step Guide to Installing the Faucet
Now that you’ve prepared the area, it’s time to start installing your kitchen sink faucet with sprayer. Let’s go through the process step by step.
Step 1: Install the Faucet Base
Start by aligning the faucet base with the mounting holes on your sink. Most sinks have pre-drilled holes where the faucet will sit. Place the faucet base over the hole, ensuring it’s centered and stable. Once in place, secure the faucet using the provided mounting hardware. You may need a basin wrench to tighten the nuts underneath the sink. Make sure the faucet is firmly attached to avoid any movement once it’s fully installed.
Step 2: Connect the Water Supply Lines
Next, you’ll need to connect the water supply lines to the faucet. There will be two lines: one for hot water and one for cold water. Attach the appropriate supply line to each faucet inlet. Use an adjustable wrench to tighten the connections securely. Be sure to wrap plumber’s tape around the threads to prevent leaks. Tightening the nuts too much can cause damage, so make sure they are snug but not overly tight.
Step 3: Install the Sprayer Hose
Now, it’s time to install the sprayer hose. Take the flexible hose and attach one end to the sprayer nozzle and the other end to the faucet. Make sure the connection is secure but not overtightened. Position the hose so that it’s easy to pull out when you need it, but avoid any sharp bends or kinks in the hose, as these can impede water flow.
Step 4: Install the Sprayer
The sprayer itself needs to be mounted near the faucet. Most kitchen sink faucets with sprayers have a small holder that attaches to the side of the sink deck. Secure the holder in place using the provided screws or adhesive strip. Once the sprayer is in place, connect the sprayer’s water supply line to the faucet. Make sure the hose is securely attached to the faucet and the sprayer is in its proper holder.
Testing Your Installation
It’s time to test your work. Follow these steps to ensure everything is functioning correctly:
Turn on the Water Supply
Slowly turn on the water supply by rotating the valves counterclockwise. Be gentle at first to avoid sudden pressure changes. Once the water is running, check for any leaks around the faucet or water supply lines. If you notice any leaks, tighten the connections with your adjustable wrench, but make sure you don’t overtighten them, as this can cause damage.
Test the Sprayer
Next, test the sprayer. Pull the sprayer out of its holder and press the button or lever to release the water. Make sure the flow is strong and consistent. If the water flow is weak or the sprayer doesn’t function at all, check for kinks or blockages in the hose. You may also want to check the sprayer’s connection to ensure it’s tight.
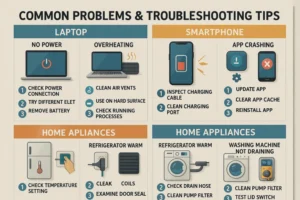
Common Problems and Troubleshooting Tips
Even with careful installation, you might run into a few issues. Here are some common problems and how to solve them:
Leaks Around the Faucet
Leaks are one of the most common issues when installing a kitchen faucet. If you notice water leaking from around the faucet base, it could be due to loose mounting hardware or a worn-out washer. Tighten the nuts beneath the sink with a basin wrench and replace any worn washers. You can also reapply plumber’s tape to the water supply connections.
Low Water Pressure
Low water pressure can occur if the aerator or sprayer nozzle is clogged with debris. Remove the aerator from the faucet and clean it thoroughly. If you notice any sediment buildup inside the sprayer hose, clear it out using water or compressed air. Low pressure can also be caused by blocked water supply lines, so ensure they are fully open.
The Sprayer Not Functioning Properly
If the sprayer isn’t dispensing water, first check for any kinks or blockages in the hose. If the hose is clear, check the water connection at both ends and ensure everything is securely attached. If the issue persists, try disassembling the sprayer and cleaning the nozzle.
Conclusion
Installing a kitchen sink faucet with a sprayer is a simple yet effective upgrade that can enhance the functionality of your kitchen. By following the step-by-step guide in this post, you can install the faucet yourself and enjoy the benefits of a more convenient, flexible sink setup. Remember to take your time, use the right tools, and test your work to ensure everything is working correctly. If you encounter any issues, don’t hesitate to troubleshoot using the tips provided.
FAQ
How long does it take to install a kitchen sink faucet with sprayer?
The installation typically takes around 1 to 2 hours, depending on your experience. If it’s your first time installing a faucet, it might take a bit longer, but with the right tools and guidance, you’ll be done in no time.
Do I need a professional to install a faucet with sprayer?
While this is a DIY-friendly project, a professional may be necessary if your plumbing system is outdated or the installation is more complicated. If you’re comfortable with basic plumbing tasks, this is a great project to tackle yourself.
Can I install a sprayer with any kitchen faucet?
Not all faucets are designed to support a sprayer. You’ll need to choose a faucet that either includes a sprayer or is sprayer-ready. Some faucets come with a sprayer attachment, while others may require an additional kit.
Q4: What should I do if my faucet keeps leaking after installation?
If your faucet leaks, check the water supply connections, tighten the mounting hardware, and replace any worn washers. You can also reapply plumber’s tape to ensure a secure, leak-proof connection.
Can I install the faucet without removing the old one?
If you’re upgrading an existing faucet, it’s typically best to remove the old one first to ensure a proper fit for the new faucet. However, if the old faucet is already removed, you can proceed with the installation without any issues.
Call to Action
Now that you know how to install a kitchen sink faucet with sprayer, why not give it a try yourself? If you prefer professional help or have a complex plumbing setup, don’t hesitate to call in an expert. For more DIY tips and home improvement ideas, check out our other guides and tutorials. Happy installing!