A sudden, unexpected leak under the kitchen sink is every homeowner’s nightmare. The frantic search for the way to stop the cascading water can feel like a scene from a disaster movie.
In those crucial moments, you don’t have time to search the internet. You need to know exactly where is the water shut off valve under kitchen sink and how to operate it immediately.
Fortunately, modern plumbing design makes isolating a leak at your sink a simple, two-minute job—if you know where to look.
This comprehensive guide will walk you through finding, identifying, and correctly using the specific shut-off valves for your kitchen faucet and connected appliances. Read this before you need it, and you’ll be ready for any plumbing emergency.
Why Locating Your Kitchen Sink Shut-Off Valve is Critical (Before Disaster Strikes)
The shut-off valve, also known as a stop valve or fixture shut-off, is your first and best defense against water damage.
Think of it as a localized emergency brake for your sink.
-
Minimizes Damage: In the event of a burst supply line or a major leak, quickly closing this valve prevents hundreds of gallons of water from flooding your kitchen floor.
-
Allows Localized Repairs: If you need to replace your kitchen faucet, fix a leak in a supply line, or replace a disposal, the individual shut-off valves allow you to work on the sink without cutting off the water supply to the rest of your house.
-
Prevents Stress: Knowing where these valves are located and how to use them offers invaluable peace of mind.
The Anatomy of Your Under-Sink Plumbing
Before diving into the exact location, it helps to Cleaning Guide for Home & Kitchen understand what you’re looking at inside your base cabinet.
You will typically see:
-
The Drain Pipe: A large, often white or black PVC pipe, usually coming down from the sink basket and connecting to a U-shaped pipe (the P-trap). This carries wastewater.
-
The Supply Lines: Two smaller, flexible metal or braided lines, one for hot water and one for cold water, running up to the underside of your faucet.
-
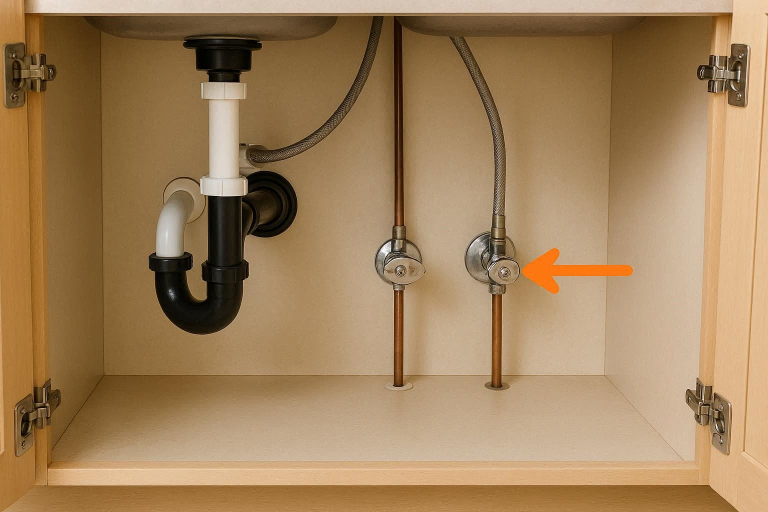
The Shut-Off Valves: These are the small, usually metal, control points located where the supply lines meet the main plumbing pipes coming out of the wall or floor. This is your target.
Where to Find the Water Shut Off Valve Under Kitchen Sink: A Step-by-Step Search
For most homeowners, the search for the kitchen sink shut-off valve will be quick and easy. Plumbing codes usually mandate these valves be installed in an easily accessible location.
The Most Common Location
In over 95% of homes, you will find the shut-off valves in the following spot:
The valves are located inside the cabinet directly beneath the kitchen sink, right where the flexible hot and cold water supply lines connect to the rigid water pipes extending from the wall or the floor.
There should be two separate valves—one for the hot water line and one for the cold water line.
What to Look for: Identifying the Hot and Cold Valves
Identifying which valve is which is crucial, especially if you only need to work on one side (e.g., repairing a dripping hot water handle).
-
Placement Rule: By standard plumbing convention, the hot water shut-off valve should be on the left side when you are facing the cabinet, and the cold water shut-off valve should be on the right side.
-
Color Coding: Many supply lines or the valves themselves are color-coded: Red for hot, and Blue for cold.
-
Trace the Pipe: If the placement or color is unclear, simply trace the flexible supply tube up to the faucet. The line on the left is hot, and the line on the right is cold.
Alternative Locations If No Valve is Present
What if you open the cabinet door and find only blank pipes? This is common in some older homes or properties where the valves were improperly installed or removed.
If the valves are not under the sink:
-
Check the Basement/Crawlspace: The individual sink lines might run directly down through the floor to the nearest main pipe in the basement or crawlspace. Look directly beneath the sink area.
-
Utility Closet/Laundry Room: In apartments or condos, the unit’s main shut-off valves might be located in a dedicated utility closet.
-
Turn Off the Main Valve: If you cannot locate individual fixture shut-offs, you will have to use the main water shut-off valve for the entire house. This is typically located near the water meter, where the main water line enters the home (basement, garage, or outside curb).
Anatomy of the Kitchen Sink Shut-Off Valve: Types and Operation
Not all valves are created equal. Knowing the type you have will tell you how to correctly turn it off. The two most common types are the multi-turn and the quarter-turn.
The Multi-Turn (Compression/Gate) Valve
-
Appearance: This valve typically has a round, multi-sided handle that looks like a small wheel or football-shaped knob.
-
Operation: To shut off the water, you must turn the handle clockwise multiple times (3 to 6 full rotations) until it feels snug.
-
Note: These older valves are more prone to seizing or leaking around the stem packing if they haven’t been used in a long time. They can also fail to shut off the water completely.
The Quarter-Turn (Ball) Valve
-
Appearance: This is the newer, preferred style. It has a lever or rectangular handle that is parallel to the pipe when open.
-
Operation: To shut off the water, simply move the lever or handle 90 degrees (a quarter turn) so that it is perpendicular to the pipe.
-
Advantage: They offer a quicker, more definitive shut-off and are far less likely to get stuck or leak. Most plumbers recommend upgrading to these if you have older multi-turn valves.
Understanding Angle Stop vs. Straight Stop Valves
The shape of the pipe connection determines the technical name of the valve:
| Valve Type | When You See It | Configuration |
| Angle Stop | Water pipes come out of the wall. | The inlet and outlet are at a 90-degree angle. |
| Straight Stop | Water pipes come up from the floor. | The inlet and outlet are in a straight line. |
How to Turn Off the Water Supply: The Hot and Cold Method
Once you have located the valves, the process of isolating the sink is simple.
Step 1: Clearing the Cabinet Space
Remove everything from under the sink. This is crucial for two reasons:
-
It gives you clear access to the valves.
-
It removes items that could be damaged if a leak occurs while you’re manipulating the pipes.
Tip: Use a flashlight or your phone’s light to clearly illuminate the valves.
Step 2: Turning the Valve (Knob vs. Lever)
-
For Multi-Turn Knobs: Turn the knob clockwise (righty-tighty) until it is tight. Do not use excessive force, as this can damage the valve’s internal washers.
-
For Quarter-Turn Levers: Move the lever 90 degrees so it points away from the pipe. If the handle starts parallel, it should end perpendicular to the pipe.
Mandatory: Repeat this process for both the hot and cold water supply lines.
Step 3: Verifying the Water Shut-Off
After turning both valves, go to the kitchen faucet and turn on both the hot and cold water.
-
Run the Water: Let the water run for a few moments to drain any water left in the supply lines.
-
Check the Flow: The flow should reduce to a slow drip or stop completely. If the water still runs freely, the valve has either failed (see troubleshooting below) or you have turned the wrong valve.
-
Proceed with Work: Once the water stops, you can safely disconnect the supply lines to perform your repair or replacement.
Bonus Valves: Shut-Offs for Dishwashers and Other Appliances
The kitchen sink area is a busy hub for your home’s water. In addition to the hot and cold faucet lines, you may find one or two more valves.
The Dishwasher Supply Valve
Many dishwashers are connected to the hot water line under the sink. This connection will often have its own dedicated shut-off valve.
-
Location: Look for a third valve, typically connected to the hot water side, running a smaller copper or PEX line to the dishwasher area.
-
Function: This valve is essential for safely disconnecting and replacing a dishwasher without interrupting water to the sink faucet.
The Water Filter/Dispenser Connection
If you have a reverse osmosis system, an instant hot water dispenser, or a refrigerator icemaker line running under the sink, it will also have its own water supply and shut-off point.
-
Appearance: This is often a very small, thin plastic or copper line with a tiny shut-off knob, sometimes a simple saddle valve (though saddle valves are often discouraged and banned by modern codes).
-
Actionable Step: If your icemaker or water filter leaks, trace the line back to this shut-off valve to isolate the problem.
Troubleshooting Common Shut-Off Valve Issues
Even the best-maintained valves can present problems, especially if they haven’t been touched in years.
The Valve is Stuck or Difficult to Turn
Old multi-turn valves can seize up from mineral buildup or lack of use.
-
Lubrication: Spray a small amount of penetrating oil (like WD-40) onto the valve stem (just behind the handle). Let it sit for 15-30 minutes.
-
Gentle Force: Use an adjustable wrench to gently nudge the valve body while turning the handle. Hold the pipe leading into the valve with a second wrench to prevent twisting the pipe.
-
Do NOT Overdo It: Applying too much force can cause the old valve or pipe to snap, turning a small leak into a catastrophic flood. If it won’t budge, it’s safer to shut off the main house water supply and call a plumber.
The Valve Doesn’t Completely Stop the Water Flow
A slow drip after turning the valve means the internal rubber washer or packing gland has worn out or deteriorated.
-
Tighten the Packing Nut: On multi-turn valves, there is a small nut just beneath the handle (the packing nut). Tightening this nut slightly can sometimes compress the packing material enough to stop the leak.
-
Call a Pro: If the drip persists, the valve is failing and needs to be replaced. You must shut off the main house water supply to perform this replacement.
My Sink Has No Individual Shut-Off Valves!
If your sink lacks dedicated fixture shut-offs, you have two options for repairs:
-
Use the Main House Shut-Off: The only way to stop the water is to turn off the water to your entire home. This is the least convenient but most necessary immediate solution.
-
Install New Valves: When you perform the repair, take the opportunity to install new, high-quality quarter-turn angle stop valves. This is a mandatory upgrade that will save you stress (and money) in the future.
Essential Maintenance and Tips for Your Shut-Off Valves
A shut-off valve is only useful if it works when you need it. A simple maintenance plan can ensure your valves are always ready for action.
The “Exercise” Routine: Preventing Seizing
The primary reason valves fail is lack of use. Mineral deposits and corrosion build up and fuse the internal parts together.
-
Quarterly Check: Every three to four months, perform a quick “exercise” routine on your valves.
-
The Turn-Off/Turn-On: Slowly turn the valve fully closed (clockwise) and then fully open (counter-clockwise). This movement scrapes away minor corrosion and keeps the internal mechanisms lubricated and mobile.
When is it Time to Replace the Shut-Off Valve?
While the entire lifespan of your plumbing system is decades, the smaller fixture shut-off valves have a shorter reliable service life.
-
Age: If your valves are more than 15-20 years old and are the original multi-turn style, they are prime candidates for replacement.
-
Signs of Failure:
-
The valve leaks from the handle stem when you turn it.
-
It does not stop the water flow completely.
-
It is seized and cannot be turned without extreme force.
-
LSI & NLP Terms to Incorporate: Fixture shutoff, stop valve, multi-turn, quarter-turn, angle stop, straight stop, compression fitting, P-trap, supply lines, water main, pipe wrench, water damage, flexible supply tube, packing nut.
FAQs
How can I tell the difference between the hot and cold water shut-off valves?
The hot water valve is almost always on the left side when you face the sink cabinet, and the cold water valve is on the right side. Look for color coding (Red/Hot, Blue/Cold) or trace the supply line up to the faucet handle.
What tool do I need to turn off a stubborn water valve?
You usually only need your hand. If the valve is stuck, you may need an adjustable wrench or pliers to apply gentle, steady pressure. A basin wrench can also be helpful for reaching hard-to-access fittings. Remember to hold the pipe to prevent twisting.
Is it okay to use the main house shut-off valve instead?
Yes, absolutely. In an emergency where you can’t find or operate the sink valves, immediately go to the main water shut-off valve for your house. This is a life-saver for preventing major flooding, even though it will temporarily cut off water to the entire home.
What does a dual-port or 3-way stop valve do?
A dual-port or 3-way stop valve is a single valve that has one inlet and two separate outlets. These are commonly used under the kitchen sink to provide water to both the faucet supply line and a connected appliance (like a dishwasher, refrigerator icemaker, or water filter system).
How often should I test my shut-off valves?
You should “exercise” or test your shut-off valves at least once or twice a year. By turning them fully off and then fully on, you prevent mineral buildup and corrosion from seizing the valves, ensuring they work when a plumbing emergency occurs.
Conclusion:
Knowing where the water shut off valve under your kitchen sink is located is one of the most critical pieces of home maintenance knowledge.
Whether you’re dealing with a leak, replacing a faucet, or installing a new dishwasher, these valves give you localized control over your water supply.
Take five minutes today to open your under-sink cabinet, locate both the hot and cold valves, and give them a quick, gentle turn to ensure they aren’t seized. This small act of prevention will save you stress, time, and potentially thousands of dollars in water damage down the line.