If you’ve ever needed to remove a kitchen drawer, whether for cleaning, repair, or simply reorganizing, you know it can feel like a daunting task. But it doesn’t have to be! Whether you’re cleaning out hard-to-reach spots, replacing broken drawer slides, or giving your kitchen a much-needed makeover, knowing how to remove your kitchen drawers safely and efficiently can make all the difference. Plus, doing it correctly will help you avoid any damage to the drawer or the cabinet.
In this article, we’ll walk you through a step-by-step guide on how to remove kitchen drawers quickly and stress-free, highlighting essential tips, common problems, and solutions along the way.
Why You Might Need to Remove Kitchen Drawers
There are several reasons you may need to remove a kitchen drawer. Whether you’re aiming to tidy up, repair a broken component, or update the design of your kitchen, Ideas for Kitchen and Living Room understanding why and when to remove the drawer is essential.
Cleaning and Maintenance
A primary reason for removing kitchen drawers is cleaning. Over time, dust, crumbs, and other debris can build up behind or underneath the drawer, making it difficult to reach and clean thoroughly. By removing the drawer, you gain access to these often-forgotten areas, ensuring a deep clean.
For example, if you’re renovating your kitchen and want to give everything a fresh start, it’s a good idea to remove and clean your drawers and cabinet spaces.
Repairing or Replacing Drawer Components
If the drawer slides or glides are damaged or malfunctioning, removing the drawer is the first step in fixing or replacing these components. Drawer slides can wear out, and glides may need replacing after years of use.
Consider a situation where you have a kitchen drawer that sticks, and no matter how hard you pull, it won’t open smoothly. By removing the drawer, you can inspect and repair the slides or install new ones.
Organizing or Rearranging Your Kitchen
Perhaps your kitchen has undergone a few organization changes, and you need to reconfigure the drawer setup. You should install dividers, add organizers, or completely reconfigure the contents of the drawer to optimize space.
For instance, removing drawers to install a new drawer divider for utensils or adding an organizer for spices makes your kitchen more functional and organized.
Updating or Refinishing
Another reason to remove kitchen drawers is to update or refinish them. Whether you’re replacing an old drawer that no longer matches your kitchen’s new design or giving it a fresh coat of paint, this step can transform the look of your kitchen.
For example, if you’re renovating your kitchen with a modern or farmhouse style, you could update the drawer hardware or even refinish the drawers entirely to match the new aesthetic.
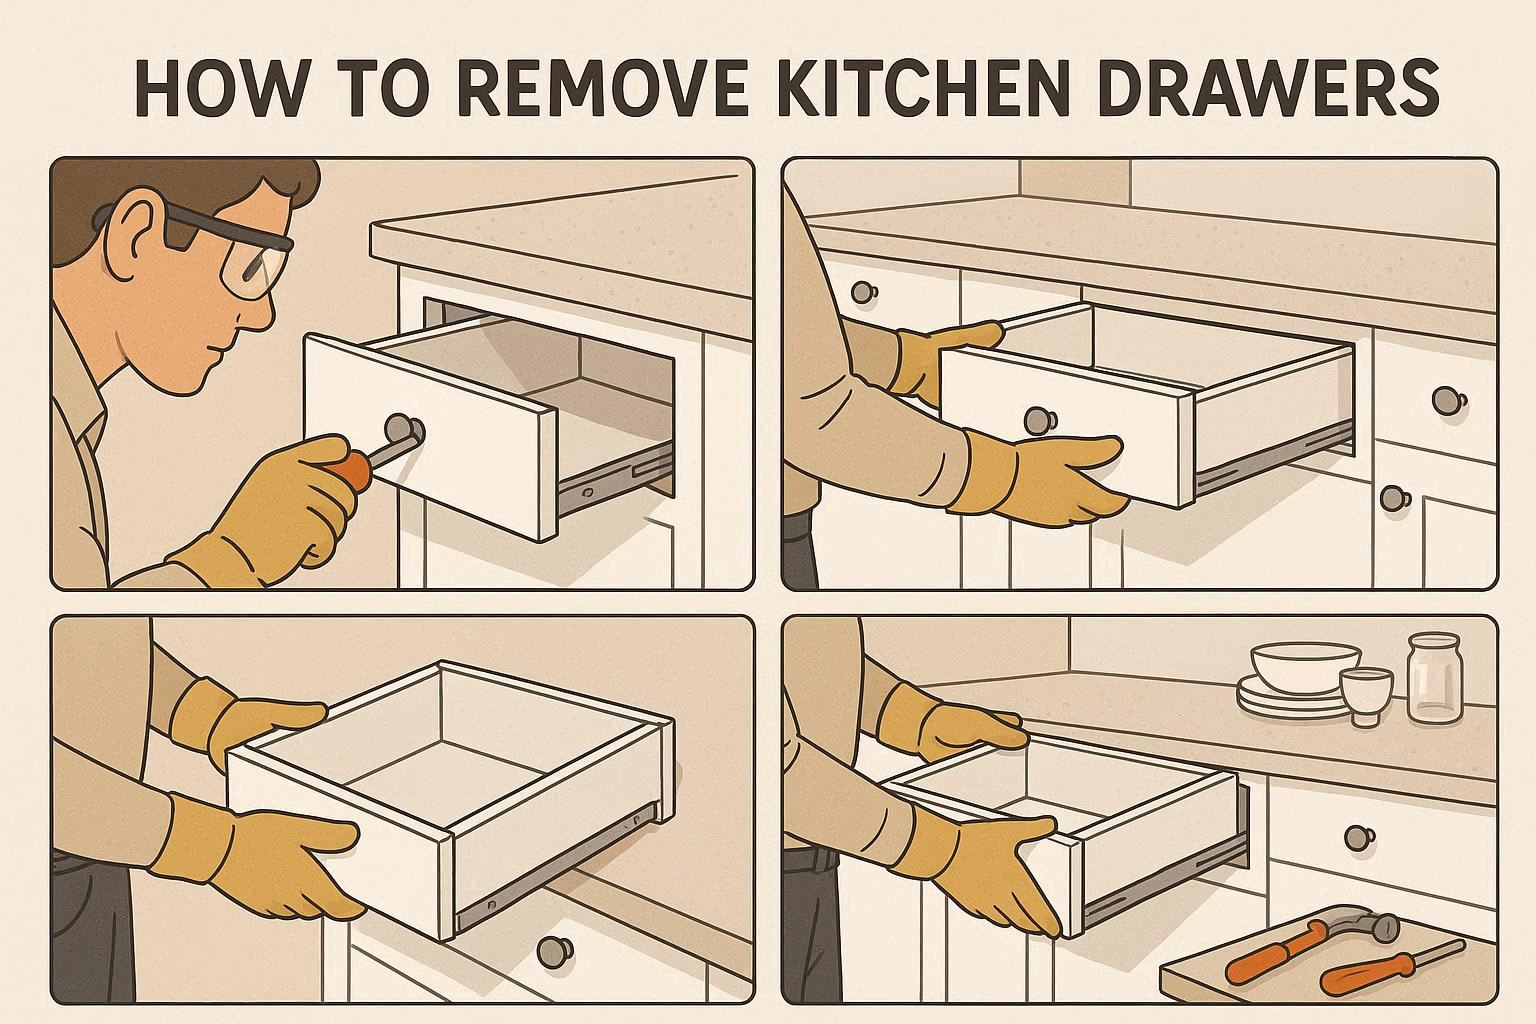
Step-by-Step Guide to Removing Kitchen Drawers
Removing kitchen drawers doesn’t have to be difficult. Let’s break it down step by step:
Step 1: Gather the Necessary Tools
Before you get started, it’s important to have all the necessary tools on hand. This will help you avoid unnecessary interruptions while you’re in the process.
Tools you’ll need:
- Screwdriver: Used to unscrew the drawer’s screws or fasteners.
- Pliers: For loosening or removing parts that are stuck or tightly fastened.
- Flashlight: Helps you see hard-to-reach areas inside the cabinet.
- Tape Measure: To measure the new drawer or replacement components (if necessary).
- Lubricant: To loosen stuck drawers or rails (such as WD-40).
Step 2: Empty the Drawer
Before attempting to remove the drawer, it’s crucial to empty it. This ensures that you don’t accidentally drop or damage any of the contents.
Emptying the drawer also gives you the opportunity to inspect its contents and determine if any items need to be discarded or reorganized. For example, if you’re removing a drawer to add dividers or an organizer, you’ll need to remove everything first.
Step 3: Inspect the Drawer Slides or Glides
Drawer slides or glides are what allow the drawer to slide in and out smoothly. There are several types of drawer slides, including side rails, center rails, and bottom tracks. You should carefully inspect these before you begin.
- Side Rails: These are mounted on the sides of the drawer and the cabinet.
- Center Rails: A single rail that runs along the middle of the drawer.
- Bottom Tracks: Rails that run along the bottom of the drawer.
Once you’ve identified the type of slides, check for visible screws or clips that are holding the drawer in place. This will help you know where to focus your attention when attempting to remove the drawer.
Step 4: Unlock or Loosen the Drawer from the Tracks
Some drawers have locking mechanisms that prevent them from being pulled out easily. For example, some drawers with soft-close mechanisms might require you to release the lock before they can be removed.
- For drawers with locks: Use a screwdriver or pliers to release the locking mechanism.
- For drawers without locks: Pull the drawer out while ensuring it stays aligned with the rails.
If the drawer resists sliding out, don’t force it. Use a lubricant on the rails and gently wiggle the drawer to release it from its tracks.
Step 5: Remove the Drawer from the Cabinet
After unlocking the drawer, it’s time to gently remove it. Once it’s free from the tracks, carefully pull the drawer out of the cabinet.
Be mindful of the weight of the drawer, especially if it contains heavy items. Lift it out slowly, ensuring you don’t damage the tracks or the drawer itself.
What to do if the drawer is stuck?
If the drawer doesn’t slide easily, try gently wiggling it from side to side while pulling. If that doesn’t work, apply lubricant to the tracks and give it another try. In some cases, a stuck drawer might need additional tools or help from another person.
Step 6: Reinstalling the Drawer (Optional)
Once the drawer is removed, you may want to reinstall it after completing the necessary repairs or updates.
- Reinstalling: Slide the drawer back onto its tracks carefully. Ensure that it’s aligned with the rails, so it slides smoothly.
- Final checks: Once installed, check if the drawer opens and closes smoothly. Tighten any screws or clips as necessary.
Common Problems You Might Encounter While Removing Kitchen Drawers
While removing kitchen drawers is typically straightforward, sometimes you may run into a few problems. Here’s how to handle some of the most common issues:
Drawer Not Sliding Out Smoothly
- Causes: Dirt or debris on tracks, misaligned rails, or damaged slides.
- Solution: Clean the tracks with a damp cloth to remove any dust or debris. Apply lubricant to ensure smooth movement.
Stuck or Jammed Drawers
- Causes: Broken slides, malfunctioning locking mechanisms.
- Solution: If a drawer is stuck, check for broken slides or obstructions. Apply lubricant or use pliers to release the locking mechanism. If this doesn’t work, a new set of slides may be necessary.
Broken or Damaged Drawer Components
- Causes: Old or worn-out slides, glides, or rails.
- Solution: Inspect the drawer components. If parts are damaged, purchase replacements from a local hardware store or online. Replacing the parts is relatively easy and will restore functionality.
Tips for Making the Process Stress-Free
Removing kitchen drawers can be a smooth process if you keep a few things in mind. Here are some tips to make the job easier:
Take Your Time and Stay Organized
Removing kitchen drawers may seem simple, but rushing the process can lead to mistakes or damage. Always take your time and keep track of screws, clips, or other small parts as you remove them.
Use a Helper if Needed
If the drawer is heavy or awkward to handle, consider asking a friend or family member to help. Having a second pair of hands can make the removal process much easier and faster.
Avoid Rushing and Prevent Damage
Rushing the removal can result in damage to both the drawer and the cabinet. Patience is key. Take your time, use the right tools, and ensure the drawer is properly detached before trying to remove it.
Frequently Asked Questions (FAQ)
How do I remove a drawer with a soft-close mechanism?
Soft-close drawers often have additional locking mechanisms. Gently pull the drawer out until you hear a slight click, indicating the lock has disengaged. Some soft-close drawers also have a button or tab that needs pressing to release the lock.
My drawer is stuck! How can I get it out?
If your drawer is stuck, first check for obstructions or debris. If nothing is blocking it, try lubricating the tracks and gently wiggling the drawer. In some cases, the slides may need to be replaced.
Can I remove kitchen drawers without damaging them?
Yes! By taking the time to inspect the drawer slides and loosening any fasteners carefully, you can remove the drawer without damaging it. Just be sure to lift the drawer gently and avoid forcing it out.
What if my drawer slides are broken?
If the slides are broken, you’ll need to replace them. Drawer slides are readily available at most hardware stores and come in various sizes and styles.
How often should I clean and maintain my kitchen drawers?
It’s a good idea to clean and maintain your kitchen drawers every 6 to 12 months. Regular cleaning helps keep the tracks and components in good working condition, preventing common issues like sticking drawers.
Conclusion
Removing kitchen drawers is a manageable DIY task when approached step-by-step. With the right tools, a little patience, and some attention to detail, you can easily tackle this task and enjoy a cleaner, more organized kitchen. Whether you’re cleaning, repairing, reorganizing, or updating your kitchen drawers, following the steps outlined in this guide will help ensure the process is quick, easy, and stress-free.
So, get ready to roll up your sleeves and try this process yourself—your kitchen will thank you! Don’t forget to check out other kitchen organization tips for a more functional and beautiful space.