A properly sealed kitchen sink is essential for maintaining the functionality and aesthetics of your kitchen. Sealing your kitchen sink to the countertop ensures water doesn’t seep beneath, causing potential damage to your cabinetry and countertop. Without a proper seal, you risk the growth of mold and mildew, as well as costly repairs in the future.
In this article, we will guide you through quick and easy ways to seal your kitchen sink to the countertop. From the tools you’ll need to step-by-step instructions, we’ll make this process stress-free and efficient, helping you protect your kitchen for years to come.
Why Sealing the Kitchen Sink to Countertop is Essential
Prevent Water Leaks
One of the primary reasons for sealing the kitchen sink is to prevent water from seeping beneath the sink. Water leakage can occur around the edges of the sink, especially when there’s heavy use or if the seal is worn out. Over time, this can cause serious damage to the cabinetry, as water can warp or even rot the wood.
A waterproof seal around the sink will protect the integrity of your kitchen, preventing water from damaging the countertop and surrounding cabinetry. Think of it as a shield that keeps the water where it belongs—within the sink.
Protect the Countertop from Moisture
Moisture can be a kitchen’s worst enemy. Over time, the constant exposure to water can cause countertops to swell, discolor, or even develop mold and mildew. This is Cleaning Guide for Home & Kitchen particularly true with porous countertop materials like wood, laminate, or granite.
Sealing the sink to the countertop creates a moisture-resistant barrier that helps protect your kitchen from unsightly and costly damage. By applying a proper seal, you safeguard both the aesthetic appeal and structural integrity of your countertop.
Improve Sink Stability
Beyond preventing leaks and protecting the countertop, sealing the sink to the countertop also helps improve sink stability. Without a secure seal, your sink may shift or become unstable, especially under heavy use. A solid, even seal provides additional support, keeping the sink firmly in place and preventing any wobbling or shifting that could damage your kitchen’s structure.
Materials You’ll Need to Seal Your Kitchen Sink
Before you begin, it’s important to gather the necessary materials. Using the right products ensures a smooth and effective sealing process.
Silicone Sealant
Silicone sealant is the go-to material for sealing kitchen sinks. Its flexibility, water resistance, and durability make it ideal for this job. Silicone creates a watertight seal that holds up well over time, preventing water from leaking beneath the sink.
When choosing a silicone sealant, consider the type that best matches your countertop material. For example, if you have a granite or marble countertop, look for a high-quality, non-staining silicone that is safe for natural stone surfaces.
Caulk Gun
A caulk gun is essential for applying silicone sealant precisely and evenly. It allows you to control the amount of sealant being dispensed, ensuring you don’t overapply or create a messy finish. Choose a caulk gun with an ergonomic design for ease of use and better precision.
Cleaning Supplies
Proper cleaning is key to a strong seal. To clean the sink and countertop before applying sealant, you’ll need:
- A sponge or cloth
- Rubbing alcohol or a mild detergent
- A clean towel to wipe down surfaces
Cleaning ensures that dirt, grease, and old caulk do not interfere with the new sealant adhering to the surface.
Painter’s Tape (Optional)
Painter’s tape is an optional, but useful, tool for achieving clean lines when applying sealant. By applying painter’s tape along the edges of the sink, you can create neat, even lines without worrying about silicone spilling onto the countertop. It helps give you that professional-looking finish.
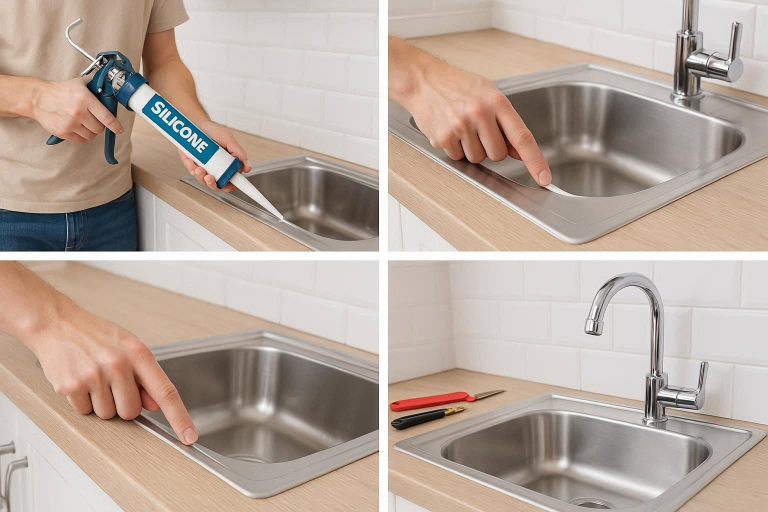
Step-by-Step Guide: Quick & Easy Ways to Seal Kitchen Sink to Countertop
Now that you’ve gathered all the necessary tools, it’s time to get started! Here’s a simple guide to sealing your kitchen sink.
Step 1: Clean the Sink and Countertop
Before applying the sealant, it’s important to clean both the sink and the countertop thoroughly. This step ensures that the silicone adheres properly and forms a tight bond.
- Remove dirt and grease: Use a mild detergent and warm water to clean the sink and the countertop. If you have stubborn grime, consider using a gentle abrasive cleaner.
- Use rubbing alcohol: After cleaning, wipe down the surfaces with rubbing alcohol to remove any remaining oils or residues. This ensures a residue-free surface for the silicone to bond to.
Step 2: Prepare the Caulk Gun and Sealant
Once the surfaces are clean and dry, you’re ready to prepare the caulk gun.
- Insert the silicone tube: Load the silicone sealant into the caulk gun. Cut the nozzle at a 45-degree angle to ensure smooth, even application.
- Test the flow: Before applying the sealant, squeeze a small amount onto a scrap piece of cardboard to check that it flows smoothly and consistently.
Step 3: Apply the Silicone Sealant
- Apply a steady bead: Starting from the back of the sink, apply a steady bead of silicone along the edge of the sink, where it meets the countertop. Hold the caulk gun at a 45-degree angle and apply pressure evenly for consistent coverage.
- Work in sections: Apply sealant around the sink in manageable sections, making sure to cover the entire perimeter.
Step 4: Smooth the Sealant
- Smooth with a finger or tool: Once the silicone is applied, use your finger or a smoothing tool to smooth the sealant along the edges. This ensures an even and neat finish.
- Remove excess: Wipe away any excess sealant with a clean cloth or paper towel.
- Use painter’s tape: For perfectly straight lines, apply painter’s tape along the edge of the sink before applying the sealant. After smoothing, remove the tape carefully to reveal clean, sharp lines.
Step 5: Let the Sealant Cure
After applying the sealant, it’s important to allow it to cure properly. This process can take anywhere from 24 to 48 hours, depending on the brand and type of silicone sealant used.
Important tip: Avoid using the sink during the curing process. Letting the sealant fully cure ensures that it forms a strong, waterproof bond.
Alternative Methods for Sealing Kitchen Sink to Countertop
If silicone sealant isn’t the right choice for your kitchen, or if you want a more permanent solution, here are some alternative methods.
Using Butyl Tape
Butyl tape is a type of adhesive sealant that provides a waterproof barrier similar to silicone. It’s ideal for areas that require a more temporary seal or for situations where silicone might not adhere well.
Pros and Cons:
- Pros: Quick application, clean removal, and easy to apply.
- Cons: May not be as durable as silicone, especially in high-moisture areas.
Epoxy Resin for Stone Countertops
For stone countertops like granite or marble, epoxy resin may be the best choice. Epoxy provides a permanent bond and can handle the weight and pressure of a heavy sink. It also provides a seamless finish for stone surfaces.
Why use epoxy: Epoxy resin is durable, heat-resistant, and bonds well to stone, making it a perfect solution for high-end kitchen countertops.
Using Commercial Sink Sealing Kits
If you want a professional-grade solution, you can use commercial sink sealing kits. These kits usually contain everything you need, including specialized sealant, applicators, and instructions.
When to use a kit: If you’re unsure about choosing the right materials or want a hassle-free solution, a sealing kit can be an excellent choice.
Common Mistakes to Avoid When Sealing Your Kitchen Sink
Even with the best intentions, there are a few common mistakes people make when sealing kitchen sinks. Avoid these pitfalls for a successful, long-lasting seal.
Applying Sealant to a Dirty Surface
Always clean the area thoroughly before applying silicone. Dirt, grease, or old caulk can prevent the sealant from adhering properly.
Overapplying or Underapplying Sealant
Apply an even bead of silicone around the sink. Too much sealant can create a messy finish, while too little won’t provide adequate protection.
Not Allowing Enough Curing Time
Be patient! Rushing the curing time can result in a weak seal that doesn’t last. Always wait at least 24 hours for the sealant to cure completely.
Using the Wrong Type of Sealant for Your Countertop
Some countertops, like granite and marble, require specialized sealants. Always ensure that the silicone or epoxy you use is compatible with your countertop material.
Maintaining the Seal Around Your Kitchen Sink
Once your sink is sealed, maintenance is key to keeping everything in good condition.
Regular Cleaning to Prevent Mold and Mildew
Regular cleaning is essential to prevent buildup of dirt or mold around the sink. Use mild cleaning agents and avoid harsh chemicals that could damage the seal.
Inspecting the Seal Annually
Check the seal periodically for wear and tear. If you notice any cracks or gaps, reapply sealant to ensure the sink remains watertight.
Dealing with Failed Seals
If your seal starts peeling or cracking, remove the old sealant and reapply a fresh layer. Over time, even the best seals will need attention.
FAQ
How long should I wait for the silicone sealant to cure?
Typically, silicone sealant takes 24-48 hours to fully cure. Avoid using the sink during this time.
Can I use kitchen sink sealant on a granite countertop?
Yes, but make sure to use a silicone sealant that’s safe for stone surfaces. Some sealants may stain or damage granite.
Can I seal my sink to the countertop without using a caulk gun?
Yes! If you don’t have a caulk gun, you can use pre-applied sealant tubes or squeeze tubes for a simpler application.
How do I clean the area before applying sealant?
Clean the sink and countertop with mild detergent, followed by rubbing alcohol, to remove any oils or residues.
What should I do if I get silicone sealant on my countertop?
If silicone spills on the countertop, remove it immediately with a damp cloth before it dries. Once dry, you can use a silicone remover to clean up any excess.
Conclusion
Sealing your kitchen sink to the countertop is a crucial step in preventing water damage, maintaining your kitchen’s stability, and keeping your countertop looking its best. By following the steps outlined in this guide, you can easily and efficiently seal your sink and ensure a long-lasting, waterproof barrier. Whether you’re using silicone, epoxy, or an alternative method, proper sealing will keep your kitchen functioning and looking great.
So, take your time, gather your tools, and get sealing—your kitchen will thank you!