A kitchen backsplash is more than just a decorative feature; it’s an essential part of your kitchen’s design that can protect the walls from grease, water, and food splatters. It’s also a great way to showcase your style, whether you prefer a classic look or something more modern. The best part? Installing a kitchen backsplash can be a fun and rewarding DIY project.
Tiling your backsplash offers many benefits: it’s easy to maintain, durable, and comes in countless styles, colors, and materials. Whether you’re looking to transform your kitchen or simply add a splash of color, tiling your backsplash can be an affordable way to elevate your space. In this guide, we’ll walk you through everything you need to know about tiling a kitchen backsplash, from preparation to installation.
Preparing for Your Kitchen Backsplash Project
Before you dive into the actual tiling process, preparation is key. The more organized and prepared you are, the smoother the installation will go. Here’s how to get started.
Choosing the Right Tile for Your Backsplash
The first step is selecting the tile that fits both your style and your kitchen’s needs. Here are some popular types:
- Subway Tiles: These timeless, rectangular tiles are a classic choice for any kitchen. They’re simple to install and come in a variety of materials, including ceramic, glass, and porcelain.
- Mosaic Tiles: For a more artistic or intricate design, mosaic tiles are perfect. They can add a pop of color or a modern touch to your backsplash.
- Glass Tiles: If you’re going for a sleek, contemporary look, glass tiles are a great option. They’re easy to clean and reflect light beautifully, making them ideal for smaller kitchens.
- Ceramic Tiles: Durable, affordable, and versatile, ceramic tiles come in endless colors and styles, making them an excellent choice for all types of kitchen designs.
Consider your kitchen’s overall style. Do you want a bold look with colorful tiles or something subtle with neutral tones? Choose a tile material and color that will blend with your cabinets, countertops, and other elements in the room.
Tools and Materials You’ll Need
To get started, you’ll need a few essential tools and materials:
- Tile Adhesive: Thin-set mortar or tile mastic (depending on tile type) is typically used for backsplash installations.
- Tile Cutter or Wet Saw: If your backsplash tiles need to be cut to fit edges and corners, a tile cutter or wet saw is essential.
- Trowel: A notched trowel helps you spread adhesive evenly on the wall.
- Tile Spacers: These ensure your tiles have consistent grout lines.
- Grout: Used to fill the gaps between tiles once they’re set.
- Sealant: Protects grout from stains and moisture after installation.
- Level: To ensure tiles are straight and level.
Other optional materials include a backer board (for added stability) and grout sealer to protect against moisture.
Preparing the Surface
Whether you’re installing your backsplash on drywall, existing tiles, or another material, the surface must be clean, smooth, and dry for the adhesive to bond properly. Here’s how to prepare the surface:
- Clean the Wall: Remove dust, grease, or oils that may interfere with adhesive bonding.
- Smooth the Surface: If you’re working with drywall, sand down any bumps. Ensure the surface is level and free from imperfections.
- Remove Any Existing Backsplash (if applicable): If you’re replacing an old backsplash, remove the old tiles and clean the wall thoroughly before starting.
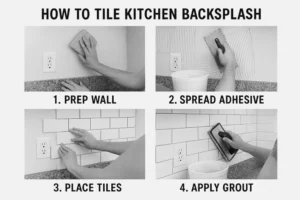
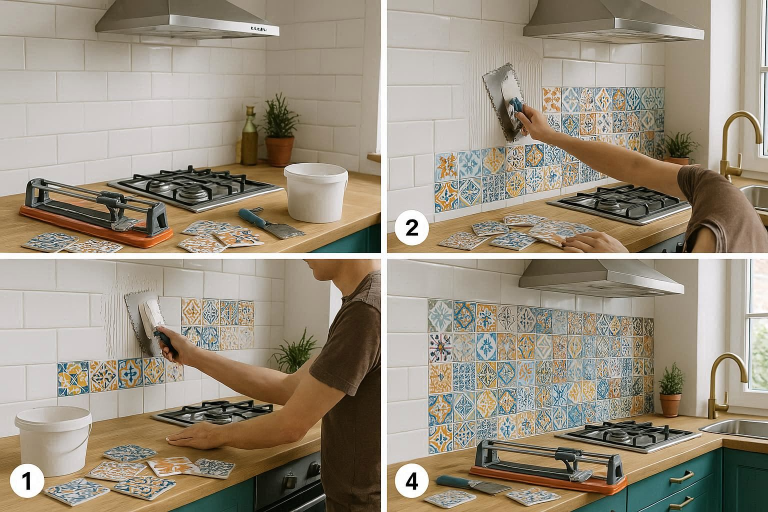
Step-by-Step Guide on How to Tile Kitchen Backsplash
Once you’ve prepared the wall and gathered your materials, you’re ready to begin the installation process. Here’s a detailed breakdown of each step:
Step 1: Measure and Plan Your Layout
Planning your layout is essential for a neat and professional-looking backsplash. Start by measuring the area you want to cover, ensuring you account for any cabinets, electrical outlets, or switches. Use a pencil to lightly mark reference lines on the wall, ensuring your tiles will be level and straight.
Consider starting your tiling from the center of the wall or from one edge, depending on your layout. This will help ensure symmetry and avoid small, awkward tile pieces at the edges.
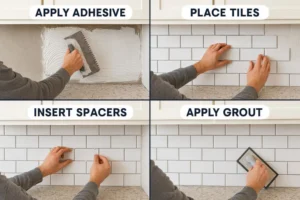
Step 2: Apply Adhesive to the Wall
Using a notched trowel, apply a thin, even layer of tile adhesive to a small section of the wall. It’s best to work in small areas to prevent the adhesive from drying out before you place your tiles. Spread the adhesive in a straight, even pattern, following the direction you plan to lay your tiles.
Make sure you apply only enough adhesive to cover a manageable area – about 2-3 square feet – so the adhesive doesn’t dry before you can place the tiles.
Step 3: Installing the Tiles
Start placing your tiles onto the adhesive, pressing them firmly to ensure good contact. Be sure to leave a small gap between each tile for the grout. Use tile spacers to maintain even spacing between tiles.
If you’re using different shapes or sizes, it’s crucial to work slowly and ensure the tiles are aligned correctly. Make sure you check for level regularly using a spirit level.
Step 4: Cutting Tiles for Edges and Corners
Once you reach the edges or corners, you’ll likely need to cut some tiles to fit. A tile cutter or wet saw is essential for making precise cuts. Measure and mark your tiles carefully before cutting to ensure they fit snugly.
When using a wet saw, always follow safety precautions, such as wearing goggles and gloves to protect yourself from tile shards and water.
Step 5: Grouting the Tiles
After your tiles are set and the adhesive has dried (typically 24 hours), it’s time to grout. Use a rubber float to apply grout between the tiles, pressing it into the gaps. Work the grout into all the spaces, then remove excess grout using the float at a 45-degree angle.
Once you’ve applied grout, use a damp sponge to clean off any remaining grout haze from the tile surfaces. Be gentle to avoid pulling grout from the lines.
Step 6: Sealing and Finishing Touches
After the grout has dried completely, apply a grout sealer to protect it from moisture and stains. This is particularly important in the kitchen, where spills are common. Finally, inspect your work, making sure all tiles are level, all grout lines are filled, and everything is clean and dry.
Specific Kitchen Backsplash Installation Techniques
Depending on your kitchen setup, there may be some special techniques you’ll need to follow when installing your backsplash.
How to Install Tile Backsplash Without Mortar
If you prefer a quicker installation process, you Healthy Cooking Gadgets Every Home Should Have can opt for peel-and-stick tiles or adhesive-backed tiles. These tiles don’t require mortar, making installation simpler. However, they may not be as durable as traditional mortar-based installation. Simply peel off the backing, stick the tiles to the wall, and press them firmly into place.
How to Install Tile Backsplash Behind Stove
When tiling behind your stove, special attention must be given to heat resistance. Use heat-resistant tiles, like ceramic or porcelain, and ensure the area is properly cleaned. Tiling behind a stove is not only practical but also stylish, giving your kitchen a professional look while protecting the wall from cooking splatters.
How to Install Tile Backsplash on Drywall
Tiling directly onto drywall is a common method for installing a backsplash. First, make sure the drywall is smooth and clean. For better adhesion, you can use a bonding primer or apply thin-set mortar directly to the drywall. Be sure to apply adhesive evenly and allow the grout to dry properly.
How to Install Tile Backsplash with Adhesive
If you’re using tile adhesive like thin-set or tile mastic, apply it in small sections, just enough for a few tiles. Work carefully to ensure even coverage and ensure that the adhesive is spread smoothly across the wall. Adhesive is perfect for lightweight tiles and can help prevent the mess and hassle of mortar.
How to Install Tile Backsplash in Bathroom
Bathroom backsplash installations are similar to kitchen backsplash installations but require extra attention to moisture. Use waterproof adhesive and grout to ensure your backsplash stands up to humidity and steam. Apply grout sealer to protect the tiles from mold and mildew growth.
Tiling a Kitchen Wall for Beginners
If you’re a beginner, tiling can seem intimidating. But with the right approach, anyone can do it!
Basic Tiling Tips for Beginners
- Avoid Common Mistakes: Avoid using too much adhesive or not spreading it evenly. Make sure to check the alignment of tiles regularly.
- Leveling Tiles: Ensure your tiles are level with a spirit level, and double-check as you go.
- Take Your Time: Tiling can take time, especially for beginners. Don’t rush through the process; take your time and double-check each step.
Understanding Grout Lines and Spacers
Use tile spacers for even grout lines. The size of the spacers will depend on the width of your grout lines. Properly fill the grout lines for a uniform finish.
Handling Difficult Areas (Corners, Edges, and Fixtures)
When tiling around corners, electrical outlets, or fixtures, take extra care. Measure your tiles carefully, and use a tile cutter to trim them to fit perfectly. Be patient and precise when cutting to ensure a clean look.
Additional Tips and Ideas for Kitchen Backsplash Design
Creative Tile Layout Ideas
Mixing different tile patterns can bring unique style to your kitchen. Experiment with herringbone, diagonal, or staggered patterns to create visual interest. Mixing tiles with different materials, like glass and stone, can also add texture and dimension.
Using Different Materials for a Custom Backsplash
Consider using materials like glass, metal, or stone for a more custom backsplash. Glass tiles are sleek and modern, while stone tiles add a natural, rustic feel. Mixing and matching materials can also make your backsplash truly one-of-a-kind.
FAQ
Can I tile a kitchen backsplash as a beginner?
Yes! With patience and careful planning, beginners can successfully tile a kitchen backsplash.
How do I install a tile backsplash without mortar?
Peel-and-stick tiles or adhesive-backed tiles are the easiest option for installation without mortar.
How do I install tile backsplash behind a stove?
Use heat-resistant tiles and ensure the area is clean and properly prepared before installation.
Can I install tile backsplash on drywall?
Yes, you can tile directly onto drywall with the right adhesive. Just make sure the surface is clean and smooth.
What’s the best adhesive for installing tile backsplash?
Thin-set mortar or tile mastic are commonly used for tiling backsplashes.
How do I install a tile backsplash in a bathroom?
Use waterproof adhesives and seal grout lines to prevent moisture damage.
How long does it take to tile a kitchen backsplash?
A backsplash project typically takes 1-2 days, including drying time for adhesive and grout.
Conclusion
Tiling a kitchen backsplash can be a fun and satisfying DIY project. Whether you’re a beginner or experienced, the key is to take your time, plan carefully, and enjoy the process. With the right materials, tools, and patience, you can transform your kitchen into a stylish, functional space that you’ll love for years to come. Ready to get started? Gather your supplies and make your kitchen backsplash the perfect focal point of your home!