Crown molding can transform the look of your kitchen cabinets, adding a touch of elegance and sophistication that makes your space feel custom and polished. Not only does it enhance the aesthetic appeal of your cabinets, but crown molding also serves a functional purpose—helping to conceal gaps between your cabinets and the ceiling while improving the overall structure. Whether you’re a seasoned DIY enthusiast or a first-time home improver, this guide will provide you with all the tips and techniques you need to install crown molding on kitchen cabinets successfully.
Why Install Crown Molding on Kitchen Cabinets?
Aesthetic Benefits
Crown molding is one of the simplest ways to elevate the look of your kitchen. It adds a professional, high-end finish that gives your cabinets a custom look. It can make your kitchen feel more polished, luxurious, and complete. Whether you Healthy Cooking Gadgets choose a simple or more intricate design, crown molding can suit a variety of kitchen styles, from traditional to modern.
Concealing Imperfections
Over time, the space between your cabinets and the ceiling may become uneven or filled with gaps. Crown molding not only hides these imperfections but also adds a seamless, finished look to the top of your cabinetry. It helps to frame the space and can even make the room feel taller by drawing the eye upward.
Increased Home Value
Installing crown molding in the kitchen can have a significant impact on the overall perceived value of your home. Buyers tend to appreciate the attention to detail and the added touch of sophistication. By enhancing the look of your kitchen cabinets, crown molding can make your kitchen feel more upscale and appealing.
What You’ll Need to Install Crown Molding
Before starting the installation process, it’s important to gather the right tools and materials.
Tools Required
- Saw (preferably a miter saw for precise cuts)
- Measuring Tape and Pencil (to mark cuts accurately)
- Hammer or Nail Gun (to attach the molding to the cabinets)
- Wood Glue (for added stability)
- Level (to ensure your molding is straight)
- Caulk and Caulking Gun (for filling gaps and creating a smooth finish)
- Stud Finder (optional, for locating studs if necessary)
Materials
- Crown Molding (choose from wood, MDF, or polyurethane based on preference and budget)
- Nails (finishing nails or brad nails)
- Paint or Stain (to match the cabinetry if needed)
Safety Equipment
- Protective Eyewear (to shield your eyes from flying debris)
- Hearing Protection (if you’re using loud power tools like a saw or nail gun)
- Dust Mask (especially if sanding or cutting wood)
How to Measure and Cut Crown Molding for Kitchen Cabinets
Accurate measurement and cutting are crucial to a flawless crown molding installation. Here’s how you can ensure precision.
Measuring the Cabinets
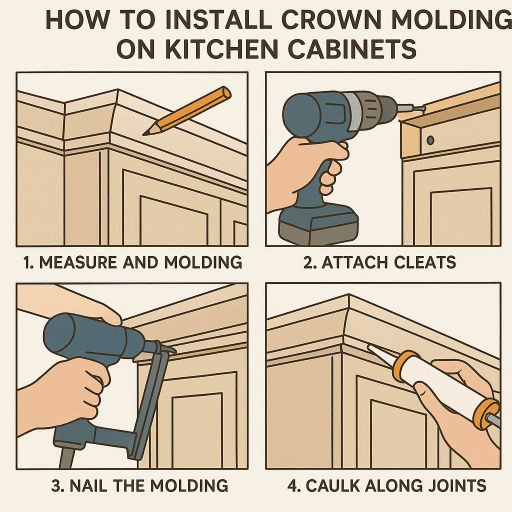
Start by measuring the top edge of your cabinets. This is where the crown molding will be installed, so you need to know the exact length of each piece. Take measurements of all the cabinet sections, including corners and edges, ensuring that you account for inside and outside angles.
Cutting the Molding to Size
Crown molding typically requires angled cuts, especially at the corners. This is where a miter saw becomes your best friend. Set the saw to the proper angle, typically 38 degrees for kitchen cabinets, to make accurate miter cuts. If your cabinets have inside corners, you’ll also need to use a coping saw to create a tight, clean edge that fits seamlessly.
Fitting the Molding to Your Cabinets
Before attaching the molding permanently, dry fit each piece. Place the cut molding along the cabinet top and check the alignment. If necessary, make adjustments to the cuts for a perfect fit.
How to Install Crown Molding on Kitchen Cabinets
Once you’ve measured, cut, and fit your crown molding, it’s time to install it. Follow these steps for a smooth installation.
Preparing the Cabinets
Before attaching the crown molding, make sure the cabinet tops are clean. Remove any dust, dirt, or debris that may have accumulated. Also, check for any gaps between the cabinets and the ceiling. If you notice any gaps, use wood filler or caulk to fill them before proceeding with the installation.
Attaching the Molding to the Cabinets
Begin with the longest piece of molding and attach it to the top of the cabinet. If you’re using a nail gun, place finishing nails every few inches along the molding to secure it. You can also use wood glue for additional strength. Be sure to use a level to ensure that the molding is straight and flush with the ceiling. Work your way around the cabinets, cutting and fitting the molding as you go.
Corner Installation (Inside and Outside)
- Inside Corners: For inside corners, you’ll need to either miter cut the molding or use the coping method. The coping method is ideal for creating a seamless fit at inside corners. Trace the profile of the molding with a coping saw to fit it against the adjoining piece.
- Outside Corners: For outside corners, measure and cut the pieces to fit perfectly. Be sure to check for alignment and adjust if necessary.
Using Corner Blocks: If you’re looking for an easier installation method, use corner blocks. These pre-made pieces eliminate the need for miter cuts and make corner installations simpler.
Finishing Touches and Touch-Ups
After attaching the crown molding, it’s time for the finishing touches to make it look flawless.
Filling Gaps and Nail Holes
Use wood filler to fill any visible nail holes or gaps in the molding. After applying the filler, allow it to dry and then sand it smooth. This ensures that there are no visible imperfections in your molding.
Caulking and Sealing
Apply caulk along the top edge of the molding where it meets the ceiling to fill in any remaining gaps. Smooth the caulk with your finger or a caulking tool for a clean finish. Caulking helps to create a polished look and provides a seamless transition from the molding to the ceiling.
Painting or Staining the Molding
If you’ve used raw wood or MDF molding, painting or staining it to match your cabinets will complete the look. Apply a smooth, even coat of paint or stain, and let it dry completely. For added durability, consider applying a protective finish to the molding.
Tips for a Successful Crown Molding Installation
Work Slowly and Carefully
Take your time with measurements and cuts. Double-check all your angles and ensure each piece of molding fits perfectly before making it permanent.
Keep the Molding Level
Use a laser level or manual level to ensure that the molding stays straight and aligned. A small mistake can cause the entire installation to look uneven.
Safety Precautions
Always wear protective eyewear and hearing protection when using power tools. Keep your work area clean, and make sure to ventilate properly if you’re using adhesives or paints that release fumes.
Troubleshooting Common Crown Molding Installation Problems
Miter Cuts Not Matching
Sometimes miter cuts don’t align properly, which can create gaps at the corners. This can happen due to incorrect angles or saw setup. If you encounter this issue, check the saw angle and make sure the molding is positioned correctly on the saw.
Gaps Between Molding and Ceiling
Gaps can occur if the molding isn’t sitting flush with the ceiling. To fix this, use caulk or wood filler to fill in the gaps, or adjust the angle of your cuts to improve the fit.
Uneven Molding
If the molding doesn’t sit flush with the cabinets or ceiling, check the alignment with a level. Sometimes, the molding may need to be trimmed slightly for a smoother fit.
FAQs
Can I install crown molding on cabinets without removing the doors?
Yes, you can install crown molding without removing cabinet doors. However, be mindful of the space above the doors, especially if they open upward.
What type of crown molding is best for kitchen cabinets?
Wood and MDF are the most popular choices. MDF is often more affordable and easier to paint, while wood offers a more natural finish.
How do I make miter cuts on crown molding?
Use a miter saw to make precise angled cuts. Set the saw at the correct angle (usually 38 degrees for kitchen cabinets) to ensure a clean fit.
Do I need a coping saw for corner cuts?
A coping saw is ideal for cutting the profile of the molding for inside corners. It helps create a tight, seamless fit without gaps.
How can I make crown molding installation easier?
Using corner blocks or pre-made corner pieces can make corner installation easier, especially for beginners.
Conclusion
Crown molding is an easy and affordable way to add sophistication and polish to your kitchen cabinets. With the right tools, measurements, and techniques, you can install crown molding yourself, transforming the look of your kitchen and adding value to your home. By following this step-by-step guide, you can achieve a professional-quality installation and enjoy the benefits of beautifully enhanced kitchen cabinets.
Ready to try your hand at crown molding? Share your experiences, ask questions, or subscribe for more DIY tips in the comments below!