Replacing a kitchen faucet with two handles may seem like a daunting task, but with a little know-how, it’s a completely manageable DIY project. Not only can replacing your faucet save you money on plumber fees, but it also gives you the opportunity to upgrade your kitchen with a more modern or functional faucet. In this guide, we’ll walk you through the steps involved in replacing a kitchen faucet with two handles, along with addressing common questions such as how to replace a double handle kitchen faucet with a single handle or how to install a faucet with a sprayer.
By the end of this post, you’ll feel confident about tackling this project, and with the right tools and materials, you’ll have your new faucet installed and working in no time!
Tools and Materials You Will Need
Before you begin, gathering the proper tools and materials will make the process a lot smoother. Here’s what you’ll need:
Tools:
- Adjustable Wrench: For loosening and tightening the nuts that hold the faucet in place.
- Basin Wrench: Especially useful when working in tight spaces under the sink.
- Screwdriver: Typically, you’ll need a flathead or Phillips screwdriver for some faucet components.
- Plumber’s Tape: This helps seal the water connections and prevent leaks.
- Pipe Wrench (optional): For particularly stubborn connections that don’t budge easily.
Materials:
- New Faucet: Make sure your new faucet fits the existing setup, whether it’s a two-handle, single-handle, or sprayer-compatible model.
- Gasket or Silicone Sealant: To ensure a watertight seal between the faucet and sink.
- Supply Lines: If your current ones are old or damaged, you may want to replace them with new ones.
- Rubber Washers: These help prevent leaks where connections meet.
Optional Tools:
- Drill (if you’re adding holes for a new faucet type, like a 3-hole faucet setup).
- Sealant for extra waterproofing around the faucet base (if recommended by the manufacturer).
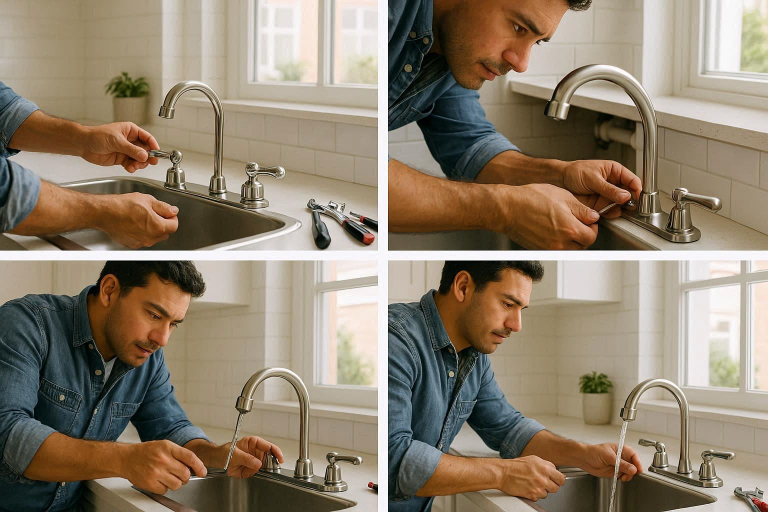
Step-by-Step Guide on How to Replace a Kitchen Faucet with Two Handles
Now that you have all the tools and materials, let’s walk Kitchen Appliances for Small Kitchens through the steps of replacing a kitchen faucet with two handles.
Step 1: Turn Off the Water Supply
The very first thing you’ll need to do is turn off the water supply to your faucet. This is crucial to avoid flooding your kitchen.
- Locate the Shut-off Valves: You’ll find the water shut-off valves under your sink. Usually, there are two – one for the hot water line and one for the cold. Turn both valves clockwise to shut them off.
- Double-Check: Turn on the faucet to make sure no water is coming out. This ensures the water supply is completely cut off before you proceed.
Step 2: Disconnect the Old Faucet
Next, it’s time to remove the old faucet.
- Detach the Supply Lines: Use an adjustable wrench to loosen and disconnect the hot and cold water supply lines. Have a bucket or towel ready to catch any residual water that might spill out.
- Remove the Nuts: Under the sink, locate the nuts that hold the faucet in place. You may need a basin wrench to get into the tight spaces. Loosen and remove these nuts.
Step 3: Remove the Old Faucet
Now that the faucet is disconnected, it’s time to remove it from the sink.
- Lift Off the Faucet: With the nuts removed, gently pull the faucet from the sink. Be careful not to damage the sink’s surface.
- Clean the Area: Use a cloth to clean the sink area where the old faucet was installed. Any leftover debris or old sealing material should be removed to ensure a clean surface for the new faucet.
Step 4: Install the New Faucet
Now comes the fun part — installing your new faucet!
- Position the Faucet: Place the new faucet into the holes on the sink. If you’re installing a faucet with two handles, make sure each handle is in the correct position (typically, the hot and cold handles are aligned in a specific way).
- Secure the Faucet: From under the sink, tighten the mounting nuts that hold the faucet in place. Make sure the faucet is aligned and secure. You don’t want it moving around once it’s connected.
Step 5: Connect the Supply Lines
Next, reconnect the water supply lines to the faucet.
- Attach the Supply Lines: Screw the supply lines into the faucet’s inlet valves (for hot and cold). Use plumber’s tape on the threads to ensure a secure, leak-free connection.
- Tighten Connections: Tighten the connections with your wrench, but be careful not to overtighten as this could damage the fittings.
Step 6: Test the Faucet
Before you call it a day, it’s essential to test the faucet to make sure everything works.
- Turn On the Water: Slowly open the shut-off valves and turn on the faucet. Check for any leaks around the connections.
- Test Both Handles: Turn both the hot and cold handles to ensure water flows properly from both sides. If you’ve installed a sprayer, test it as well.
How to Replace a Double Handle Kitchen Faucet with a Single Handle
If you’re thinking of swapping out your double handle faucet for a more modern, space-saving single handle faucet, here’s how to do it.
Step 1: Assess the Size and Configuration of the Hole
A single handle faucet typically requires a different hole configuration than a double handle faucet. If you’re replacing a double handle faucet with a single handle, make sure your sink can accommodate it.
- Check the Holes: If your sink has three holes (two for the handles and one for the faucet), you might need to either cover up the extra holes with a deck plate or add a soap dispenser or sprayer.
- Measure the Space: Ensure the hole diameter fits the new faucet. Some single-handle faucets are designed to fit existing holes, but others might require new holes to be drilled.
Step 2: Remove the Old Faucet and Clean the Area
The process for removing the old faucet remains the same as when replacing a double-handle faucet.
- Remove the Old Faucet: Follow the same steps to disconnect the supply lines and remove the nuts holding the faucet in place.
- Clean the Sink: Clean the sink area to ensure a smooth surface for the new faucet.
Step 3: Install the Single Handle Faucet
- Install the New Faucet: Place the single handle faucet into the sink. If there are any extra holes, cover them with a deck plate or a soap dispenser. Secure the faucet by tightening the nuts underneath.
- Seal the Faucet: Apply a thin layer of silicone sealant around the base of the faucet to ensure a watertight seal.
How to Replace a Kitchen Faucet with Sprayer
If you’re upgrading your faucet to include a sprayer, here’s how to install both the faucet and the sprayer nozzle.
Step 1: Ensure You Have a Sprayer-Compatible Faucet
Make sure your new faucet has a built-in sprayer attachment or is designed to accommodate a sprayer.
- Check for a Sprayer Hole: You’ll need an extra hole in your sink to attach the sprayer nozzle. If your sink doesn’t have one, you may need to drill a new hole.
Step 2: Install the Faucet and Sprayer Nozzle
- Install the Faucet: Follow the same installation steps as before, securing the faucet in place.
- Install the Sprayer Nozzle: Attach the sprayer hose to the faucet and secure it underneath the sink.
Step 3: Connect the Water Supply Lines
- Connect the Sprayer Line: Ensure the sprayer is connected to the water supply line, usually the same as the faucet. Use plumber’s tape to ensure there are no leaks.
How to Replace a Kitchen Faucet for a 3-Hole Sink
If your sink has three holes, you’ll need to make sure you choose a faucet that fits the configuration.
Step 1: Choose the Right Faucet
Select a faucet that fits the three-hole setup. Some faucets come with a deck plate to cover any unused holes, while others are designed to work with soap dispensers or sprayers.
Step 2: Install the Faucet
Follow the same steps for installing a two-handle or single-handle faucet, ensuring everything is secured and sealed properly.
Common Challenges When Replacing a Kitchen Faucet with Two Handles
Replacing a kitchen faucet is usually straightforward, but there are a few challenges you might face:
- Rust and Stubborn Fittings: Some fittings can be difficult to remove, especially if they’ve been in place for years. Use penetrating oil to loosen rusted nuts.
- Limited Space: Working in cramped spaces can make it hard to reach the connections. A basin wrench can help in these situations.
FAQ:
How Do I Know If My Faucet Is Compatible with a Sprayer?
Ensure the faucet has a dedicated sprayer hole or is sprayer-compatible. Some faucets come with a sprayer included, while others require you to buy one separately.
Can I Replace a Double Handle Faucet with a Single Handle?
Yes, it’s possible. However, you may need to adjust the sink’s hole configuration or use a deck plate to cover extra holes.
How Do I Replace a Delta Kitchen Faucet with Two Handles?
Follow the same steps as replacing any faucet, but ensure you’re using the correct parts for Delta faucets. Some models may require specific tools for removal and installation.
Conclusion
Replacing a kitchen faucet with two handles can be a rewarding DIY project that saves money and enhances your kitchen’s functionality. By following the steps above, you can confidently install a new faucet, whether it’s a two-handle, single-handle, or sprayer-compatible faucet. Just remember to take your time, use the right tools, and double-check your connections to ensure a job well done.