If your KitchenAid is clanking, leaving a flour halo at the bottom of the bowl, or forcing you to scrape down every minute, the fix is usually simple: adjust the beater-to-bowl clearance. You don’t need a repair shop, special tools, or a free afternoon. In most cases, you’ll be done in a few minutes with one screw turn and a quick test.
In this guide, you’ll learn the exact steps for both mixer styles—tilt-head and bowl-lift (including the Professional 600). We’ll keep it clear, conversational, and practical, so you can get back to baking Healthy Cooking Gadgets without the guesswork.
Why the beater-to-bowl clearance matters
Getting this tiny gap right makes a big difference:
- Faster, more even mixing. Ingredients incorporate on the first pass. You’ll see fewer dry pockets and less overmixing.
- No clanking or scraping. Metal-on-metal contact is hard on your bowl, beater, and motor. Proper clearance stops that harsh sound.
- Better texture. Cookie doughs cream properly. Whipped cream aerates quickly. Bread dough kneads without riding up the hook.
Real-world example: If your sugar and butter aren’t creaming well and you’re seeing streaks of butter on the sides, your beater is probably too high. If your flat beater leaves scratches or you hear a tick-tick at low speeds, it’s probably too low.
What you’ll fix in minutes (and which style you own)
KitchenAid stand mixers come in two broad styles, and the location/direction of the height screw is different for each:
- Tilt-Head models (Classic, many Artisan models): The head tips back on a hinge. You’ll adjust a screw near the hinge/neck to change the beater height.
- Bowl-Lift models (Professional/Pro 500/600/620, 5–7 qt): The bowl rides on two arms and moves up/down with a lever. You’ll adjust a screw on the column to change the bowl height.
If you’re not sure which you have:
Does the head tip backward with a lever? Tilt-Head.
Does the head stay fixed while a lever raises the bowl on arms? Bowl-Lift.
Tools & quick safety
You’ll need
- A flathead screwdriver (medium size works great)
- A dime (or similar small coin)
- A soft cloth or paper towel for wipe-downs
Safety first
- Unplug the mixer before making adjustments.
- Lock the head or bowl before testing at low speed.
- Keep fingers, jewelry, and tools clear of moving parts during the coin test.

The 60-second “Dime Test” (your calibration shortcut)
The coin test is the easiest way to gauge the gap—no feeler gauge required.
- Attach the flat beater and lock it in.
- Place a dime in the bottom of the clean bowl.
- Lock the head or raise and lock the bowl.
- Run on Speed 1 for a few seconds and watch the dime.
Goal: The dime should move slowly in small circles. That means the beater is “kissing” the surface—close enough to move the coin, but not grinding into the bowl.
What the dime is telling you
- Dime doesn’t move: The beater is too high (too much clearance). You need to lower the beater (tilt-head) or raise the bowl (bowl-lift) a little.
- Dime skates wildly or you hear scraping: The beater is too low (too little clearance). You need to raise the beater (tilt-head) or lower the bowl (bowl-lift) a touch.
Make changes in tiny increments, then re-test. You’re aiming for “moves gently,” not “rattles around.”
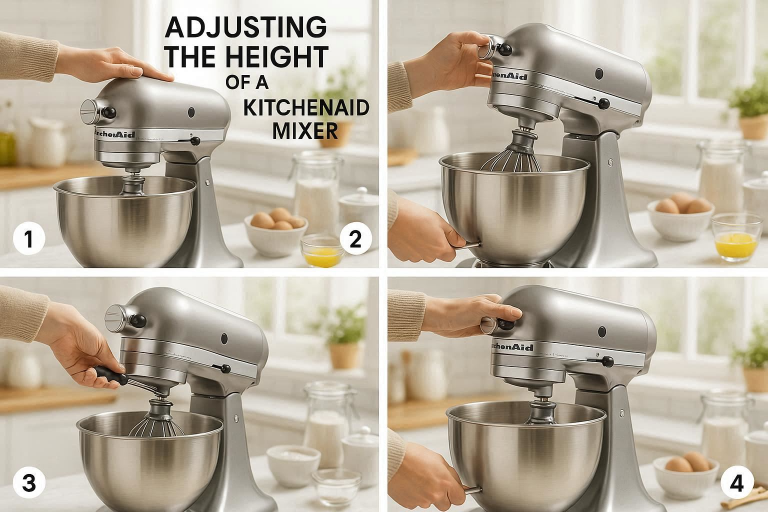
Adjusting a Tilt-Head KitchenAid (2–3 minutes)
This covers popular Classic and Artisan tilt-head models.
- Unplug the mixer.
- Tilt the head back and look near the hinge/neck.
- Find the height adjustment screw (a single slotted screw you can reach with a flathead).
- Turn the screw in tiny steps—⅛ to ¼ turn at a time:
- Clockwise: raises the beater (creates more clearance).
- Counterclockwise: lowers the beater (creates less clearance).
- Tilt the head down, lock it, and run the dime test on Speed 1.
- Repeat micro-adjustments until the dime moves slowly in small circles.
Example: Your cookie dough keeps leaving dry flour at the bottom. Do the dime test. If the dime doesn’t budge, turn the screw counterclockwise a hair to lower the beater. Test again. Two tiny turns often do the trick.
Adjusting a Bowl-Lift KitchenAid (incl. Professional 600) (2–3 minutes)
This covers Professional and Pro series like Pro 500/600/620 and many 5–7 qt models.
- Unplug the mixer.
- Lower the bowl using the lever.
- Look on the column just below the head (front or slightly under the tilt point).
- Find the height adjustment screw (slotted).
- Turn the screw in tiny steps—⅛ to ¼ turn at a time:
- Clockwise: raises the bowl (creates less clearance).
- Counterclockwise: lowers the bowl (creates more clearance).
- Raise the bowl and lock it, then run the dime test on Speed 1.
- Repeat micro-adjustments until the dime moves slowly with no scraping.
Example: Your Pro 600 clanks at low speed with the flat beater. That’s usually too little clearance. Turn the column screw counterclockwise slightly to lower the bowl, lock it, and retest until the clank disappears.
Fine-tuning for each attachment
The dime test uses the flat beater, but you should sanity-check all your go-to tools:
- Flat Beater: Aim for the dime motion described above. This is your baseline.
- Dough Hook: It should knead without banging the bowl or riding up and spinning the dough like a carousel. If it climbs the hook, a tiny lowering (tilt-head) or raising (bowl-lift) can help it grab.
- Wire Whip: It should whisk cream or egg whites without scraping. If you hear ticking, increase the clearance slightly.
- Flex-Edge Beater: Designed to wipe the sides. It should “squeegee” the bowl without stalling or making contact noises. If it drags hard, increase clearance slightly.
Tip: After you set the height with the flat beater, most other tools fall into place. Tweak only if you hear contact or see poor mixing patterns.

Troubleshooting: common symptoms and quick fixes
Symptom: Clanking or ticking, especially at low speeds
Likely cause: Beater/bowl contact (too little clearance)
Fix:
- Tilt-Head: Turn the hinge screw clockwise slightly (raises beater).
- Bowl-Lift: Turn the column screw counterclockwise slightly (lowers bowl).
- Re-test with the dime.
Symptom: Dry ingredients collecting on the bottom
Likely cause: Beater too high (too much clearance)
Fix:
- Tilt-Head: Turn the hinge screw counterclockwise a hair (lowers beater).
- Bowl-Lift: Turn the column screw clockwise a touch (raises bowl).
- Re-test.
Symptom: Uneven mixing at the sides; “streaky” batters
Likely cause: Normal beater geometry; clearance close but not perfect
Fix:
- Scrape the bowl once mid-mix, or try a flex-edge beater for better side coverage.
- Also check that the bowl is fully seated and locked.
Symptom: Wobble, rattling, or poor alignment after transport
Likely cause: Bowl not latched, head not locked, or feet out of level
Fix:
- Reseat and lock the bowl or head.
- Check that the mixer sits flat on the counter.
- If wobble persists, stop adjusting and contact service.
Symptom: Still can’t hit the sweet spot after several tries
Fix:
- Don’t force it. Back off to the last “safe” setting (no contact).
- Inspect the beater shaft: fully inserted and tightened?
- Try a different bowl or attachment to rule out a bent tool.
- If problems remain, consult a service technician.
When to stop adjusting
The beater should never scrape metal on metal. If you can’t get rid of scraping with 1–3 tiny adjustments, stop and reassess. Over-adjusting can stress the hinge or column and may void warranties. It’s better to be a hair high (and scrape once mid-mix) than too low with constant contact.
Quick reference (cheat sheet)
- Tilt-Head: Use the hinge/height screw.
- CW = raises beater (more clearance)
- CCW = lowers beater (less clearance)
- Bowl-Lift / Pro 600: Use the column screw.
- CW = raises bowl (less clearance)
- CCW = lowers bowl (more clearance)
- Adjust in ⅛–¼ turns.
- Re-test with the dime test after each change.
Practical examples for confidence
1) The “sugar snow” test—tilt-head Artisan
You add sugar to butter, set Speed 2, and sugar dust flies while a fine layer of sugar sticks to the bowl bottom. After the dime test shows no movement, you turn the hinge screw CCW ⅛ turn (lowering the beater). The dime now moves slowly, sugar incorporates cleanly, and your creamed mixture gets light and fluffy in half the time.
2) The “tick-tick” fix—Pro 600
At Speed 1 with the flat beater, you hear a faint tick. That’s contact. You turn the column screw CCW ⅛ turn (lowering the bowl), lock the bowl, and re-test. The tick is gone, the dime still moves, and your mixer sounds smooth and healthy.
3) Dough that climbs—both styles
Pizza dough starts riding up the hook. That often means the hook is scraping a touch or the dough isn’t getting enough friction at the bottom. Back off the clearance slightly (raise the beater on tilt-head CW, or lower the bowl on bowl-lift CCW) so the hook can stretch and fold the dough instead of spinning it.
Pro tips to keep your setting “set”
- Mark your factory setting. Before your first turn, put a tiny dot of painter’s tape near the screw as a visual reference.
- Recheck after big temperature swings or moves. If you store your mixer in a garage or move house, do a quick dime test the next time you bake.
- Use the right tool for the job. Thick cookie dough belongs on the dough hook once it gets heavy. Don’t force the flat beater through stiff doughs.
- Clean attachment hubs. Flour dust can pack around the shaft and collar. Wipe down after heavy use to keep fit and height consistent.
FAQs
Can you adjust the height of a KitchenAid mixer?
Yes—every KitchenAid stand mixer has a user-adjustable clearance between beater and bowl using the model’s height screw; takes only a few minutes.
How to raise arm on KitchenAid mixer?
Tilt-Head models: Use the head release/lock lever to tilt the head; use the height screw to change beater clearance.
Bowl-Lift models: Use the bowl-lift lever to raise the bowl (the “arms” that hold the bowl); fine-tune clearance with the column screw.
How to adjust bowl height on KitchenAid Professional 600?
Locate the height screw on the column; turn clockwise to raise the bowl, counterclockwise to lower. Test with the dime and make micro-adjustments.
How to tilt a KitchenAid mixer?
Lock to “unlocked,” hold the head, press/slide the release lever, tilt the head back until it clicks; re-lock before operating.