A kitchen backsplash is more than just a decorative element — it serves both functional and aesthetic purposes. Whether you’re aiming to protect your walls from splashes or add a stylish design feature, installing a backsplash can be a game-changer for your kitchen. This post will guide you through everything you need to know about installing a kitchen backsplash, from understanding its importance to the tools and materials required, and how to apply it like a pro. Let’s get started!
Why Install a Backsplash in Your Kitchen?
Functional Benefits
A kitchen backsplash is essential for protecting your walls from food splashes, grease, and moisture, all of which are common in cooking environments. Without a backsplash, these elements can seep into your walls, causing stains, mold, or even structural damage over time. A backsplash creates a durable barrier, making it easier to wipe down any messes and keep your kitchen looking clean.
Additionally, installing a backsplash can significantly reduce the Healthy Cooking Gadgets amount of time spent cleaning your kitchen. Whether it’s water from washing dishes or grease from cooking, a backsplash keeps your walls protected and simplifies maintenance.
Aesthetic Appeal
Beyond functionality, backsplashes are a focal point in kitchen design. They come in a variety of materials, colors, and patterns, offering endless opportunities for customization. A well-chosen backsplash can bring your kitchen’s aesthetic together, from rustic charm to sleek modern vibes. Whether you’re using tiles to create a timeless look or incorporating bold patterns to make a statement, a backsplash can help elevate the overall design of your kitchen.
Types of Backsplash Materials
The material you choose for your backsplash plays a key role in the look, durability, and maintenance of the space. Let’s explore some of the most popular options:
Ceramic and Porcelain Tiles
Ceramic and porcelain tiles are the most common choices for kitchen backsplashes. They are affordable, easy to install, and come in a wide variety of colors, shapes, and patterns. Ceramic tiles are ideal for those on a budget, while porcelain tiles tend to be slightly more durable.
- Benefits: Affordable, versatile, easy to clean, and long-lasting.
- Drawbacks: Can crack or chip if not installed properly.
Subway Tiles
Subway tiles are a classic choice for kitchen backsplashes. They offer a timeless appeal, with clean lines and a simple design. Subway tiles can be installed in a horizontal or vertical layout and are available in various materials, including ceramic, glass, and stone.
- Benefits: Timeless, easy to install, and a versatile design choice.
- Drawbacks: May seem too basic for those looking for something more unique.
Natural Stone (Marble, Granite)
Natural stone backsplashes, such as marble and granite, offer a high-end, luxurious look. These materials are durable and provide a unique, one-of-a-kind design due to their natural patterns and colors. However, they can be more expensive and require regular maintenance to keep them looking their best.
- Benefits: Luxurious, durable, and unique.
- Drawbacks: Expensive and high-maintenance.
Glass and Mirror Tiles
Glass and mirror tiles offer a sleek, modern aesthetic that can brighten up smaller kitchens or create a reflective effect. These tiles are perfect for those looking to add a touch of sophistication and elegance to their space. However, they can be harder to clean, as smudges and fingerprints are more noticeable.
- Benefits: Modern, sleek, and reflective, brightens small spaces.
- Drawbacks: Requires frequent cleaning, prone to smudges.
Peel-and-Stick Backsplashes
Peel-and-stick backsplash tiles are an easy, budget-friendly option for DIY enthusiasts. These tiles come with adhesive backing, making them simple to install without the need for grout or mortar. While they’re not as durable as traditional tiles, they are a quick fix for renters or those on a budget.
- Benefits: Easy to install, cost-effective, and temporary.
- Drawbacks: Less durable, limited design options.
Tools and Materials Needed for Installing a Kitchen Backsplash
Before you start, make sure you have all the necessary tools and materials on hand. Here’s what you’ll need for a successful backsplash installation:
Essential Tools
- Notched trowel: To apply adhesive evenly.
- Tile cutter: For cutting tiles to fit edges and corners.
- Rubber float: To spread grout between tiles.
- Level: To ensure tiles are installed straight.
- Tape measure: To measure the wall and ensure accurate tile placement.
- Sponges: For cleaning excess grout.
Backsplash Materials
- Tiles: Choose your desired material (ceramic, glass, natural stone, etc.).
- Adhesive: Thin-set mortar or pre-mixed adhesive.
- Grout: Used to fill the spaces between tiles.
- Caulk: For sealing edges around the backsplash.
- Tile spacers: To maintain even gaps between tiles.
- Primer and sealant (for certain materials like stone).
Safety Equipment
- Protective gloves: To protect your hands from sharp edges.
- Goggles: To prevent debris from getting in your eyes.
- Dust mask: To avoid inhaling tile dust during cutting.
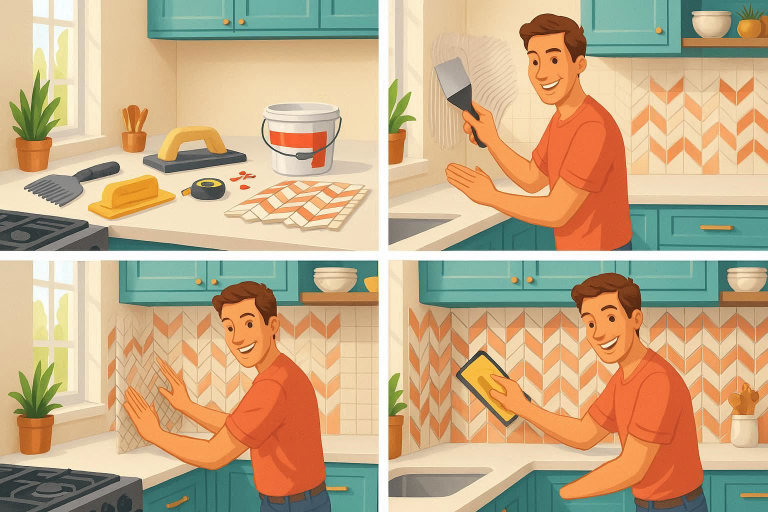
Step-by-Step Guide to Applying a Kitchen Backsplash
Now that you have your tools and materials ready, let’s go through the installation process step by step.
Step 1: Preparing the Wall
Before applying your backsplash, ensure the wall is clean and smooth. Use a mild cleaner to remove any grease or dirt, and let the wall dry completely. If you have an old backsplash, remove it carefully using a putty knife or utility knife. You may also need to remove any existing paint, especially if it’s peeling.
Step 2: Measuring and Planning
Measure the area where you want to install your backsplash. Mark the dimensions of the backsplash area with a pencil, and then use a level to draw straight lines. Planning your tile layout is essential to ensure symmetry and even alignment. Popular tile layouts include brick, herringbone, and stacked patterns.
Step 3: Applying the Adhesive
Once your measurements are marked, use a notched trowel to apply the adhesive to the wall in small sections. Spread the adhesive evenly, working in small areas to prevent it from drying before the tiles are installed. Be sure to apply a uniform layer to ensure the tiles adhere securely.
Step 4: Installing the Tiles
Start placing your tiles along the bottom of the wall or at a corner. Press each tile firmly into the adhesive, using tile spacers between them to maintain even gaps. As you work your way up the wall, use a level to make sure the tiles are aligned correctly. Continue until the entire backsplash area is covered.
Step 5: Cutting Tiles
When you reach the edges or corners, you may need to cut tiles to fit. Use a tile cutter or wet saw to make precise cuts. Measure the space where the tile needs to go, mark it with a pencil, and then cut carefully. Be sure to wear safety goggles when cutting tiles to protect your eyes from flying debris.
Step 6: Grouting the Tiles
Once the tiles are set and the adhesive has dried (usually 24 hours), it’s time to grout. Use a rubber float to spread the grout evenly over the tiles, pressing it into the gaps between them. Work in small sections and remove excess grout as you go. After all the grout has been applied, use a damp sponge to clean the tiles and smooth out the grout lines.
Step 7: Sealing the Backsplash
For natural stone tiles, it’s important to apply a sealant to protect them from moisture and stains. Apply the sealant according to the manufacturer’s instructions, and allow it to cure before using the backsplash.
Common Mistakes to Avoid When Installing a Kitchen Backsplash
Incorrect Tile Layout
One of the most common mistakes is misaligning the tiles. Make sure you measure carefully and check your layout before sticking tiles onto the wall. Avoid uneven spacing or crooked lines by using tile spacers and a level.
Overlooking Adhesive Drying Time
Don’t rush the process. Allow the adhesive to fully set before applying grout. This typically takes 24 hours, but be sure to follow the manufacturer’s recommendations.
Using the Wrong Grout
Choosing the wrong type of grout can affect the durability of your backsplash. Use sanded grout for wider tile joints (1/8 inch or more) and unsanded grout for smaller joints. Match the grout to the tile type for the best result.
Skipping the Sealing Step
Sealing grout is essential for preventing stains and mildew growth. Don’t skip this step, especially with porous materials like natural stone.
How to Maintain Your Kitchen Backsplash
Cleaning and Care
Keep your backsplash looking new by cleaning it regularly. Use mild dish soap and water for ceramic and glass tiles. For stone tiles, use a pH-balanced cleaner to avoid damaging the surface. Avoid harsh chemicals, which can cause discoloration.
Repairing Damaged Tiles
If you have a broken tile, replacing it is fairly simple. Carefully remove the grout around the damaged tile, pop the tile out, and replace it with a new one. Re-grout the joints to match the rest of the backsplash.
Kitchen Backsplash Design Ideas
Classic and Traditional Styles
For a timeless look, use classic subway tiles in neutral colors like white or gray. Combine them with a simple brick or herringbone pattern for added texture.
Modern and Trendy Designs
Opt for bold colors or geometric patterns for a modern look. Metallic tiles or mirrored finishes can give your kitchen a sleek, contemporary feel.
Farmhouse-Inspired Backsplashes
Rustic elements like shiplap or wood tiles create a cozy, farmhouse-inspired kitchen. Combine with vintage-style fixtures for a charming look.
Creative and DIY Ideas
Peel-and-stick tiles are perfect for DIY projects. Experiment with color combinations or mix materials like glass and ceramic to create a custom design.
Frequently Asked Questions (FAQ)
- What is the best material for a kitchen backsplash?
- Ceramic and porcelain tiles are affordable, easy to install, and highly durable. Stone and glass offer a luxurious look, while peel-and-stick options are best for quick DIY projects.
- How do I prepare the wall for a backsplash?
- Clean the surface thoroughly, remove old backsplash or paint, and ensure the wall is smooth, dry, and free from grease or dirt.
- Can I install a backsplash myself?
- Yes! With the right tools, materials, and a little patience, applying a backsplash is a manageable DIY project.
- How long does it take to install a kitchen backsplash?
- Installation usually takes a full day for a small kitchen, but drying times (for adhesive and grout) can extend the process to several days.
- What’s the ideal height for a kitchen backsplash?
- Typically, kitchen backsplashes cover the area from the countertop to the bottom of the upper cabinets, or 4 to 6 inches above the countertop.
- How do I remove old backsplash?
- Use a utility knife to cut the grout, then carefully pull off tiles using a putty knife. A scraper or heat gun may be necessary for stubborn adhesives.
- Can I mix and match different backsplash materials?
- Yes, mixing materials like glass tiles with stone or ceramic can create a unique and stylish backsplash that fits your kitchen’s design.
Conclusion
Installing a kitchen backsplash is a simple and effective way to protect your walls and enhance the overall design of your kitchen. Whether you’re using classic subway tiles, sleek glass, or luxurious marble, the right backsplash can tie your kitchen’s look together. With a little planning and the right tools, you can achieve a professional-looking result in no time. So, go ahead and give your kitchen a makeover – one tile at a time!